WATERCRAFT
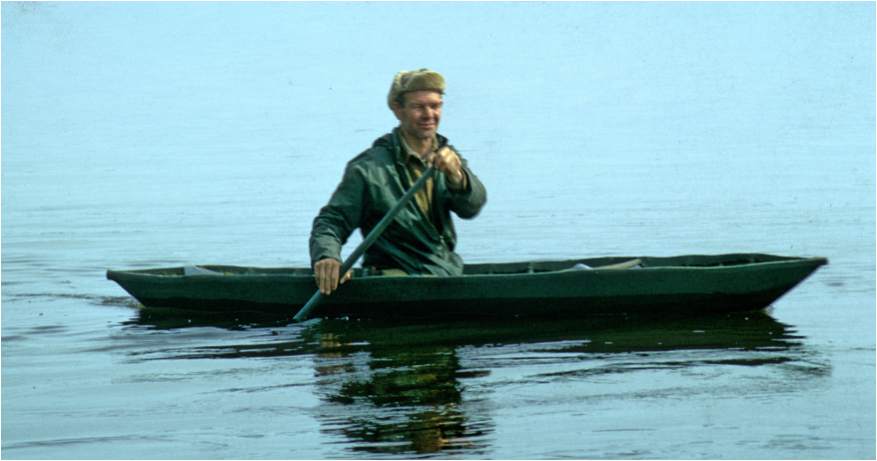
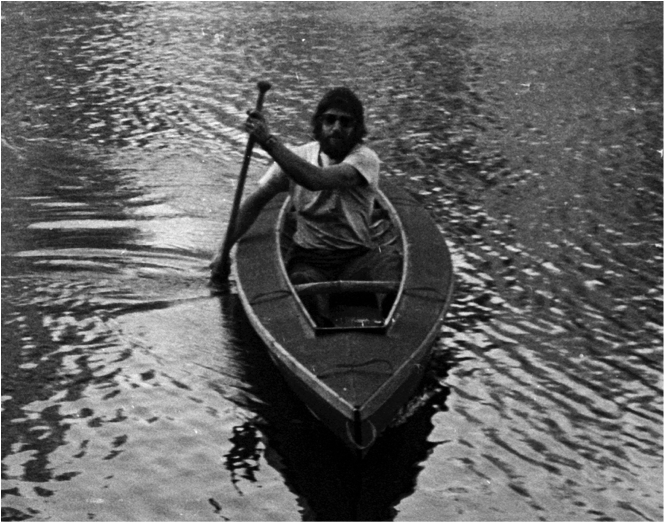
Oliver in his spring camp kayak, 1975.
Image by Sasha Wik
Watercraft often represented the fastest and easiest way to travel when living on a river.
Canoes
Canoes are quite important in the bush in the summertime.
I have a used 16-foot aluminum canoe. My friend, George Hobson, a pilot based in Fairbanks, Alaska, bought it at a reasonable price from some people who had a tourist lodge on a lake. He tied it onto the floats of his airplane and brought it to my lake homesite. I’ve had it at the landing ever since.
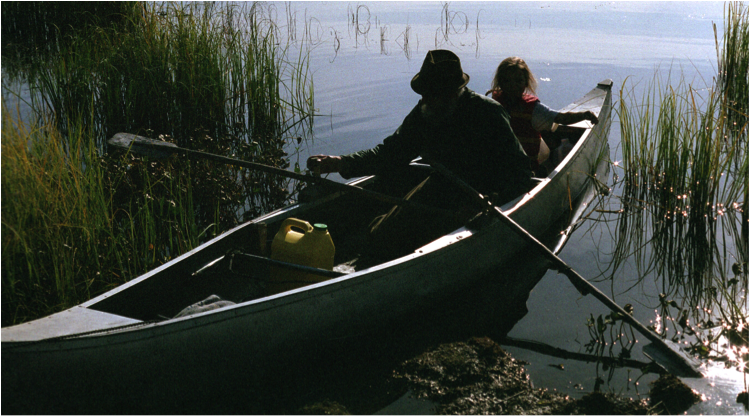
Oliver and Sat Sarbat Khalsa in his aluminum canoe.
Image by Devta Khalsa.
That canoe was old and weathered. I straightened it up a bit. Some of the rivets were loose and leaking, so I put an anvil on one side and peened the other, and that took care of the matter.
You can find lightweight canoes that are designed for portaging, but the aluminum is quite thin and is easily torn if you run onto a rock or something. For all-around use, get one with thicker material in the hull. You can check that by the gross weight of the boat. For a given length and width, the heavier one is the one you want. Mine weighs 65 pounds or so. It can be dragged a long way.
Aluminum canoes are better than plastic in many ways, especially since bears and others are not so apt to bother them—they delight in beating plastic boats. Also, you don’t have to worry if an aluminum canoe cracks, gets punctured, or fills with rainwater. They’re relatively easy to repair.
My canoe is a double-ender, which I prefer. Some canoes have a square stern for a small motor, but in a double-ender, it’s possible to make a bracket to fasten to the gunwales ahead of the stern and clamp a tiny motor on that. It won’t be quite as efficient as it would be if it were on the stern. However, a motor will depress the stern, so you must have buckets of water or some other counterweight up front to hold the bow down.
There was originally one seat in the front of my canoe and another in the back, a little lower than the gunwale. But they were too high for me, so I removed both of them.
I found that the center thwart was a nuisance in many situations, so I removed it, too. [Athwart is a transverse member spreading the gunwales of a canoe.] In order to stabilize the place where the thwart had been, I reinforced both sides with two pieces of 3 inches aluminum angle from the sides of a solar panel that a bear had torn. I riveted them to the gunwales where the thwart had been.
Removing the thwart put me in a better position for rowing. If I’m by myself, out in the clear, I’d rather row [using two oars, one on each side] than paddle [using one paddle, bringing it from one side of the canoe to the other, alternating]. Rowing is a lot more efficient. When you’re paddling, you’re working against yourself. One of your hands is a fulcrum against which the other hand pushes. Rowing with oars, you’re putting twice as much energy into moving the boat as you would with a paddle.
My canoe didn’t have any oarlocks when I got it, so I mounted a couple of blocks on the gunwales with holes for thole pins.
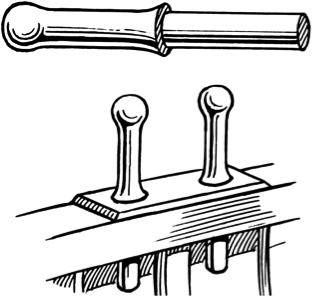
Thole pins are fitted to the gunwale to act as a fulcrum for an oar. The oar goes between them. (Image credit 39)
The pins were about 3/4 inch in diameter, hewn out of a stick. I whittled the bottoms of the pins down to 3/8 inch and drilled crossway holes through them to attach strings. I fastened the strings to the blocks in such a way that they’d be tethered and wouldn’t get lost when I wanted to prop the boat alongside a tree or work with a net.
I drilled the holes in the mounting block at an angle, so that the two pins leaned in toward each other. Otherwise my oars would have tended to ride up against the pins when I was rowing.

Example of thole pins in use. (Image credit 40)
When I’m leaning over the side of the canoe to check a fishing net, I use a stabilizer, kind of like an outrigger. It’s on the same side of the boat as the net, about a quarter of the way from the bow. It consists of a board fastened across the boat where the front thwart is. The thwart keeps the board from twisting. The board extends out 2-1/2 feet or so beyond the side of the boat, like a pontoon. There’s an empty, sealed five-gallon container at the end, on the bottom side. It would take quite a bit to sink the container.
I only use this outrigger when I’m working on a net or needing to guard against flipping over. For shorter trips, it’s easy to shift weight and trim the canoe to raise the can out of the water. I can also untie the board on the side where the float is in order to lift it out of the water. If I’m going some distance between nets, I take the outrigger off and put it in the boat to travel. It’s a nuisance if the wind is blowing.
I sit ahead of the rear thwart. That gives me some maneuverability when I’m checking the net. The dog is usually with me. I teach it to stay ahead of the forward thwart when it’s in the canoe.
I have a life vest, but quite often I don’t use it. Instead, I use solid foam that doesn’t absorb water, 1/2 inch thick. I cut a couple of mats of such a length that they make a roll about 8 inches in diameter and tie that to my belt as a flotation device.
When I was younger I used to be able to kneel in a boat, sitting on my heels. Paddling and flexing were enough to keep the circulation going. But now my feet tend to go numb in that situation, so I sit straddling the foam.
Dugout Canoes
When I was a youngster, I went fishing on a lake in a logged-off area quite a distance from home. A couple of loggers had hewed a canoe out of a cedar log.
It was a versatile, useful vessel for fishing in that particular lake. There were lots of dead snags sticking out of the water, so in most places it was difficult to fish from the shore. The preferred method of fishing in this area was trolling [a method where one or more fishing lines, baited with lures or bait fish, are drawn through the water. Trolling can be done from a moving boat, or by slowly winding the line in when fishing from a static position, or by sweeping the line from side-to-side.] Trolling is a lot more interesting to me than using a bobber and sinkers. I have fond memories of the times that I spent with that canoe.
When I was visiting in Norway, Heidi and Rein Dammann wanted to build a dugout canoe for their wilderness camp. The oldest extant boat in Norway is a dugout. Some scientists excavated it in the lower part of the Glomma River in 1997, and it was dated to 200 years BC. It was very well preserved, owing to the fact that it was buried in mud all that time. That’s the way they preserved their dugouts—they filled them full of rocks and sank them under the water. Otherwise they would have dried out and cracked.
In the marine literature, writers stress that dugout canoes are very tippy, and that unless you’re an expert and can swim like a frog, you’d better stay out of them. That’s not strictly true, since their design, using cottonwood, incluces a ballast-like feature.
The outside of a dugout canoe was left round. On the inside, the log was hewn down to a flat floor 5-6 inches thick. The cottonwood soon saturated with water, so it took some force to tip the thing over, though of course it could be done.
The Norwegian canoes were designed as float boats. They were made at the head of the river by people who wanted to bring their produce down to the lowlands for sale, along with pine tar, wool products, cheeses, and other things that were available to them in the timbered country.
It would have been a major project to carry a lot of produce upstream in a boat, but a pocket full of money didn’t weigh much. So, rather than trying to paddle the dugouts back upstream, they would just abandon them and walk home. [Rein and Heidi Dammann offered additional information that extends Oliver’s recollections in some details and in a few instances disagrees with them. Please see their comments at the end of this essay.]
The big dugout we made was 32 feet long and about 20 inches wide. Since I was not working on a float boat, my design was slightly different at the ends.
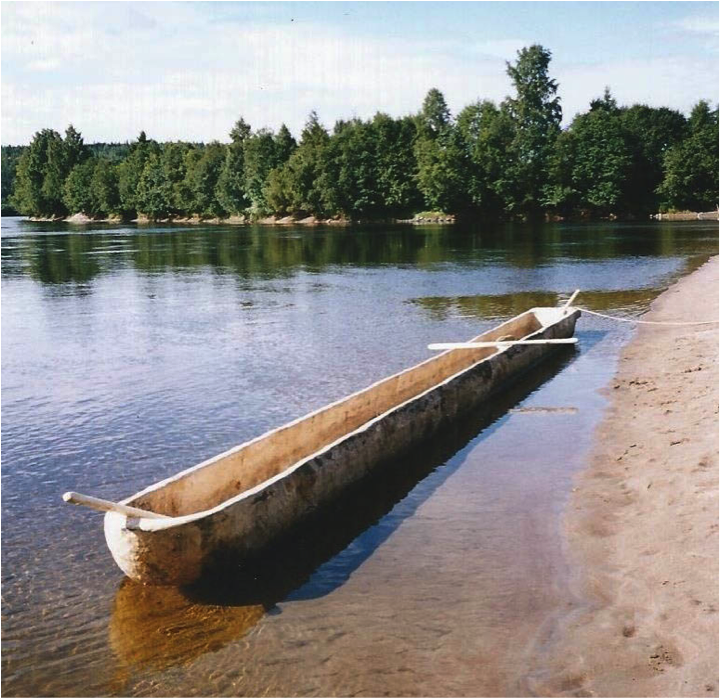
The finished dugout. Image from the Dammann Collection
The original Norwegian canoes were made out of cottonwood trees, and that’s what we used. There was a lot of interest in our project. The state forester found a tree for Rein and Heidi, and we had it trucked out to their camp where we could work on it.
Rein hadn’t done this kind of project in his growing up or in his working life—he was more used to building houses with dimension lumber—but he got a lot better at it. One of my main contributions was that I had a lot of experience in visualizing what I could get out of a stick of wood.
Tools
You would think that it wouldn’t be a problem to get almost any kind of woodworking tools in a timbered country like Norway, but that didn’t turn out to be the case. They’re much more oriented toward safety and control. For example, it’s illegal to own a double-bit axe other than a specialized kind that they use for throwing contests.
It turned out that in the part of Norway I visited, there hadn’t been much handworking of lumber for quite a few years.
Nonetheless, I wanted a double-bit axe for the project, along with a good adze, a splitting maul or a hammer, some fairly thick wedges with wooden handles on them, a curved blade slick, and some measuring tools. I had to make all of those. There was a fellow who had a machine and welding shop right at the highway where the road came out of the forest from the wilderness camp. I made good use of him. [For more information on adzes, see Oliver’s essay, “Making an Adze.” A slick is a large chisel with a heavy blade and a long, socketed handle.]
Making an axe
I wanted a double-bit axe for the project, but couldn’t buy one.
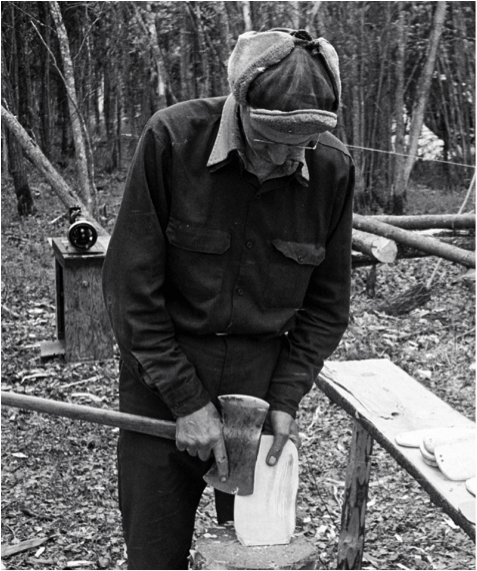
Oliver works with a double bit axe. Note that there are blades on both ends, and a bulge in the middle. Image by Curt Madison
I took two single-bit axes and cut them in two right through the eyes [the holes where the handles go through], in such a way that they could be welded together to make a double bit [a double-bit axe has two sharp blades, one on either side of the axe head]. I wanted this axe for hewing and for cutting out areas in the canoe where I wanted a curve, so I accentuated the shaping of the axe to facilitate that.
Instead of cutting the eyes square off the single bit axes, I cut them each at a slight bevel. That way, when they were put together, one side of the axe was straighter than the other. If I’d cut them off straight, the tool would have been the same shape as any double-bit axe, which would not have facilitated cutting curves as well.
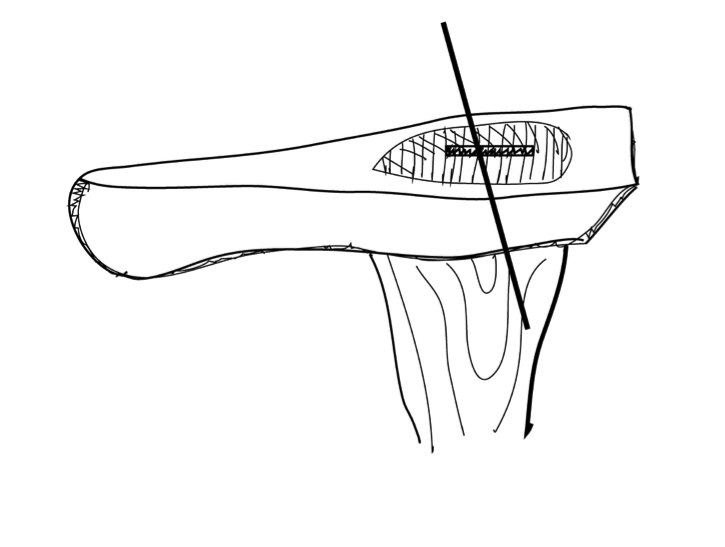
This drawing suggests how Oliver cut off the blade parts of two single bit axes at an angle, as the dark line shows. Drawing by Brady Wedman
I took the two halved axe heads to a machinist, and had him weld the short sides of each axe head together so they laid more or less flat. Then I took the new axe head and filed the eye out, so that the eye tapered from both the upper and the lower side. This would hold a handle very securely when I drove it into the eye of the head. I also filed off some of the bulge that naturally arose on the outside of the axe head, in the middle around both sides of the eye. I flattened one side of the head and tapered it down to the cutting edge so that the axe had almost no bevel on that shorter side. Having a straight side like this made the tool similar to a hewing axe, a double-bitted hewing axe.
When you’re using a commercially-made axe with quite a bit of bevel on it, the eye of the axe has to be up quite a bit above the line of your cut in order to get the bit of the axe to bite. Since the weight is off center from the direction of your stroke, it wants to tip up when it bites. I wanted the weight of my axe to stay behind the cutting edge when I was using it.
I sharpened the axe to make a very slight bevel right at the blade edge, so that when I was getting a chip, the bit didn’t want to bite in too much or tip up the way an ordinary axe would.
The axe was not as heavy as I would have liked, but when I wanted to true up a section of wood, I often used it like a huge chisel with a long handle, sliding the axe along on the surface rather than striking with it.
Since they didn’t have double-bit axes in Norway, and even the single-bit axes were comparatively short-handled, I had to manufacture my own handle. They did have hickory handles, perhaps imported. I sorted through a bunch and found one with the right grain, and then whittled it down to fit my axe head.
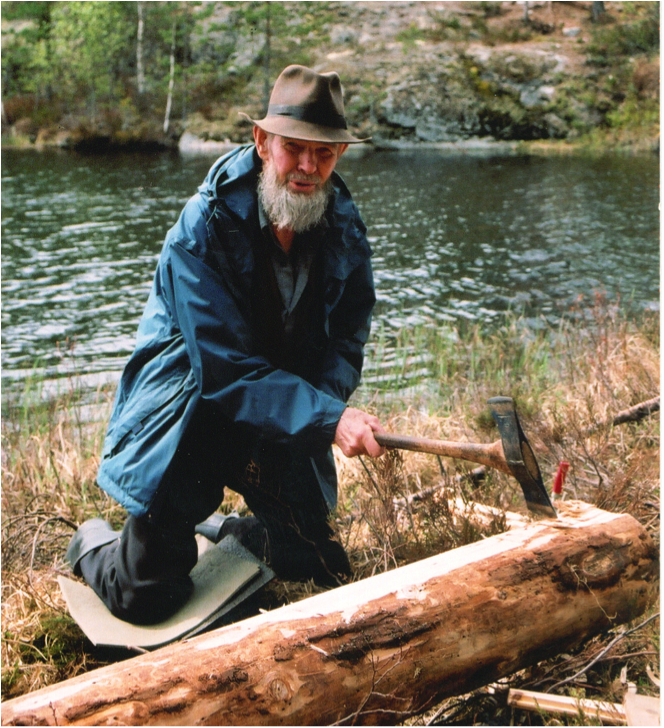
Oliver using his custom-made double-bit axe in Norway.
Image by Heidi Dammann
Making an adze
I also wanted an adze for the dugout canoe project. I assumed that some Norwegian woodworkers had some old adzes, but we couldn’t find one for sale anywhere.
I could have made an adze similar to those the original ancient canoe makers or boat builders used. I would have flattened out part of a spring leaf [a metal piece of a car’s suspension], rolled the edges up, and made a slot on one side to take a handle. But I wanted something rather heavy that wouldn’t take too much time to make, and I didn’t have all of the blacksmithing tools I would have needed.
This example of an adze resembles the tool that Oliver made. (Image credit 41)
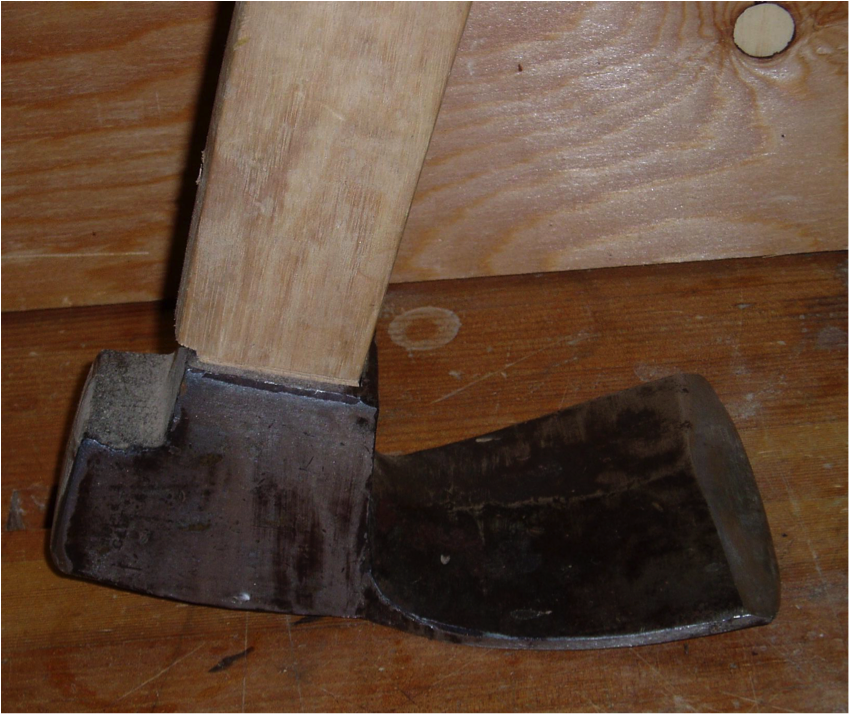
So, I took another single-bit axe and cut it across the eye. Here again I cut at a slight angle, not straight across.
I had it welded at right angles onto the poll of a splitting maul head, so that the blade tipped downward. [The poll is the side of the maul’s head away from the cutting edge.]
I did a lot of the shaping with that tool. I used it a lot.
Making a slick
I also made a curved-blade slick by cutting a piece from a fairly heavy spring leaf that Rein had found.

A selection of chisels and slicks from the collection of Jim Bucknell. The four on the left have curved blades. Image by Anore Jones
I didn’t have access to a blacksmith forge, so with my help, Rein made a stove—just a sheet iron box with a pipe coming up out of one corner—to use as my forge.
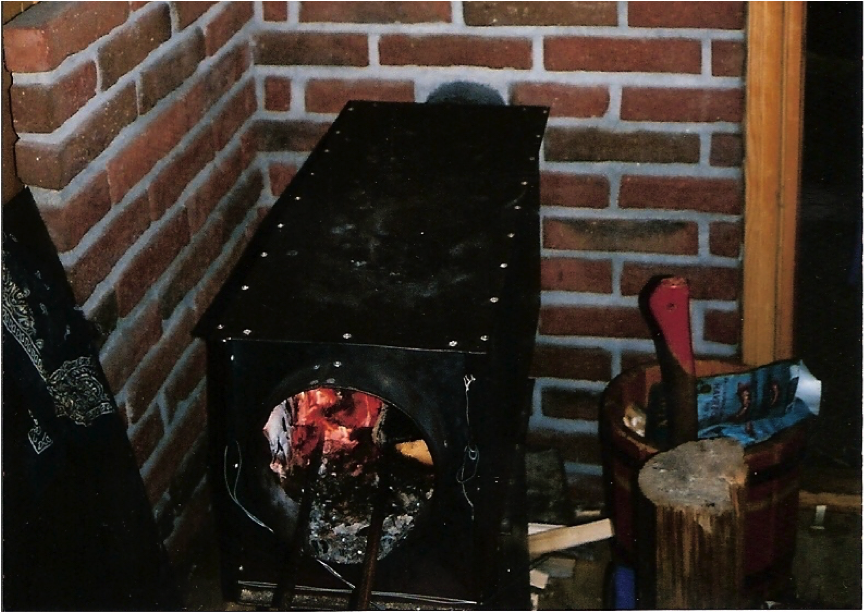
Wood stove at Rein and Heidi Dammann’s home, similar to the one Oliver describes. This one shows metal heating through the open door. The drawing below shows more specifically the draft opening in the door that can be controlled with a milk can or tomato can cover. The can covering the draft has with vent holes cut in it to control the amount of air allowed on your fire at any specific time. Image from the Dammann collection
There was an opening in the end of the stove for a milk can-type door like I usually make (see next drawing). When the draft of a stove like that is coming in through the front, the hottest coals are just inside the door, and that’s where we would heat the metal.

With the type of door Oliver is describing, a suitable tin can may be inserted into the draft hole to regulate the amount of air that reaches the fire. With no can in place, a concentrated jet of air blows directly on the fuel nearest the opening. Illustration by Jon Hersh. [Wik, Ole. Wood Stoves: How to Make and Use Them (Anchorage: Alaska Northwest Publishing Company, 1977), 101.]
We got a good charcoal fire going. I heated Rein’s spring leaf to red-hot, took it out, and hammered the curve out of it. Then I stuck it in a little farther, got it red hot again, and hammered out another section,repeating until I ended up with a flat piece of steel that was 2-1/4 inches wide, and maybe 5/16 inch thick and 16 inches long.
Next, I heated the very edge of one side and hammered it out thin to make a blade for the cutting edge. Here again it was shaped to act like a chisel—flat on one side, with all of the bevel on the other side.
For the handle end of the slick blade, I’d make a sort of tang-tab on the same side of the blade as the bevel. I heated the steel very hot and bent 3/8 inch at the end into a right angle.
In the wooden handle, I cut a crossways groove, back 7 inches from the end. That groove would take the tab when I mounted the blade. I also cut out a channel in the wood of the handle to make a pocket for the blade to fit into. The pocket was about 7 inches long and 1/2 inch wide. That bent-over tab extended deeper into the handle in the crossways groove at the head of the pocket.
I put two flat head 1/4-inch bolts through the steel and the handle, flush-mounted. The handle was right in line with the blade.
I put a lip on the unbeveled side of the blade, to press against with my fingers. I wanted my fingers a little above the surface I was working on. That positioning gave me maneuvering power so that I could guide the blade out of the cut. If I couldn’t have pried the cutting edge up a little bit, the blade would have just kept going, and I wouldn’t have been able to maneuver the thickness of the chip I was removing.
When it was complete, that slick was heavy enough that I could slide it along and just take off a little wood. Or I could use it at a steeper angle and cut out a little more, for smoothing and truing up surfaces, especially on the inside of the canoe. If I was chiseling down a bulge at the side of the canoe’s inside, I’d use the bevel side of the blade against the work so that I could gouge out a fair amount there to smooth it up.
Making splitting wedges
We did find some commercial splitting wedges in Norway, but they were not suitable for what I wanted.
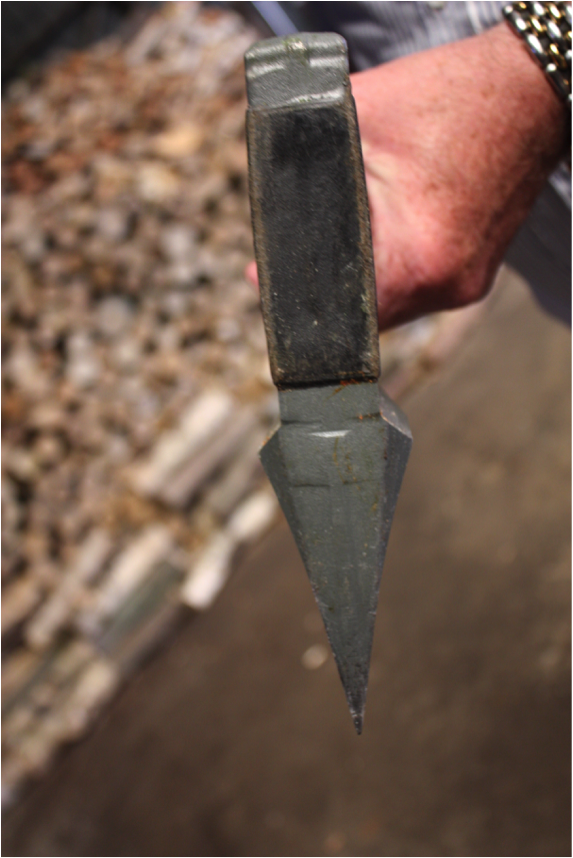
Typical commercial splitting wedge in use. (Image credit 42)
I had the machine shop operator who welded the axe blade cut me two wedges out of very heavy steel. They were 10 inches long and the heads were square, probably 2-1/2 inches wide at the very end. The taper ran all the way from the head to the cutting edge.
Of course, if you’re beating on a wedge with a sledge hammer, you don’t want steel that’s too hard, because there’s a danger of a piece of metal breaking off and flying into you. So the heads were annealed to make them softer.
However, the softer heads tended to spread out on the edges after use. To prevent the edges from spreading, the machinist welded a piece of pipe about 3 inches long onto the end of the wedge. This made an eye for a handle. I fit a piece of seasoned birch into this eye right in line with the wedge, and left it sticking out 8 inches or so.
Then I had a ring made out of the same pipe, same diameter, about 5/8 inch long. I whittled the top end of the seasoned birch down to the appropriate size to slip that ring snugly over it. That end of the birch was the striking end with the little ring holding the wood together so that it wouldn’t split when struck.
With my modifications to the splitting wedge, I was striking a piece of supported wood instead of bare metal. When removing a small piece of wood, I used the birch handle as a lever to lift the piece off.
That wedge was quite handy. I remembered seeing a tool like this once when I was a kid.
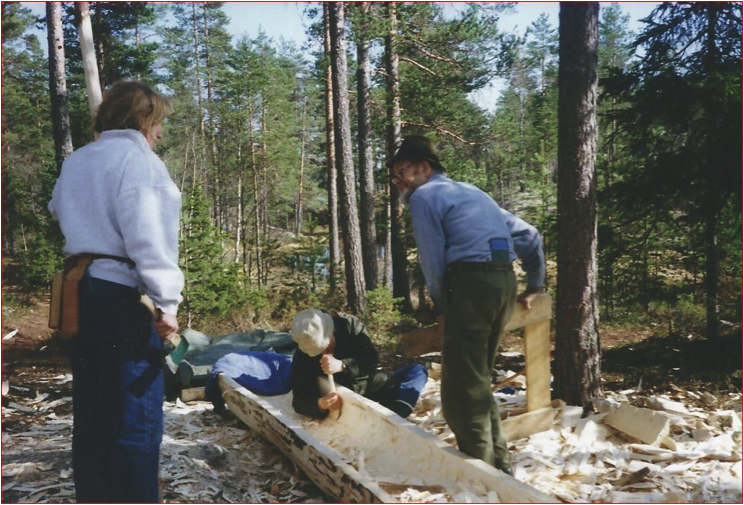
Hewing the hull
Here’s how we made the dugout canoe using my improvised tools.
The first step was to cut ta flat side off of the log to get the basic shape of the canoe. To do this we used the tip of a chain saw to cut a channel along each side of the log, from forward to aft of the canoe as we envisioned it. Next we cut across the log on the side we intended to remove, every 8 inches to make a crosshatch with the two long channel cuts. That left square chunks of wood sticking up between the cuts made by the chainsaw.
At each end of the dugout, we cut these chunks out with the head of the adze. With these removed we now had room to start working with wedges. From there on we split the chunks off with the wedges and a regular eight-pound maul.
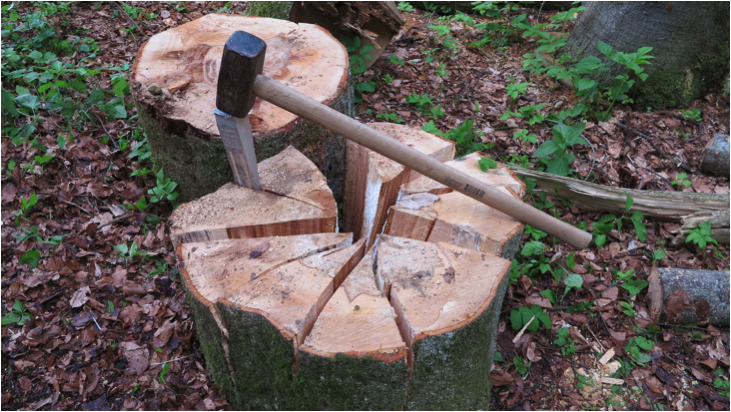
A maul is used to split firewood. If the wood only cracks, the blunt end is used to drive a wedge into the crack and complete the split. (Image credit 43)
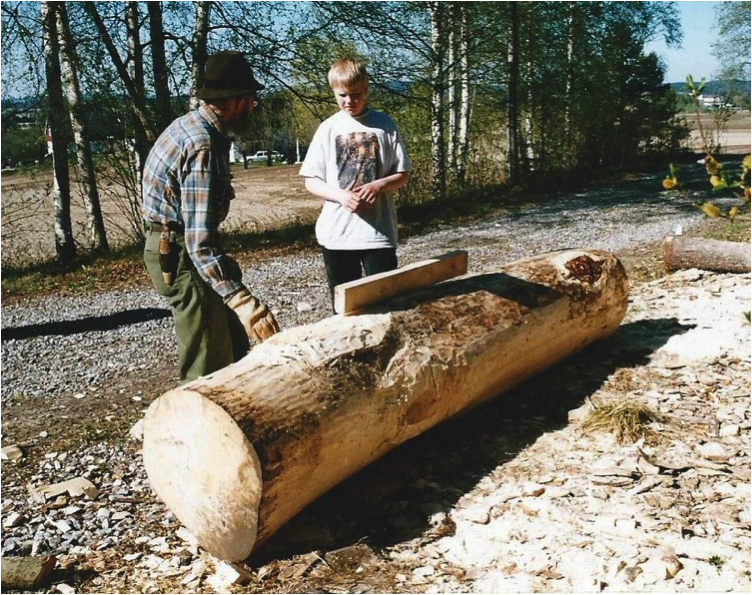
In other words, we used the wedges like huge chisels, cutting parallel the length of the boat, with the grain. Wedging out the chunks saved us a whole lot of hewing.
Now we needed a pair of calipers so that we could gauge the thickness of the walls of the dugout. We didn’t have calipers so I made a pair out of two small birch trees, each about 1-1/2 inches in diameter. I chose trees with pretty skookum branches sticking out on the side. I fastened these two small birch trees together near one end, with the branches sticking in towards each other. These were the two legs of the calipers. It was 18 inches long, and the side branches stuck out maybe 3 inches.
I needed to be able to set the calipers to the thickness I wanted, so I trued off the joining sides of the two legs with an axe, and then fastened them together with a small wing nut. When the two halves of the caliper were set for the thickness I wanted, I’d tighten the wing nut to keep them in that position. I could then slide the caliper down the side of the canoe. Where the canoe wall was too thick, I would trim the wood away until the caliper fit was snug. The branch parts of the calipers were long enough that I could measure down around the curving sides of the boat all the way to the bottom.
The bottom of the canoe was flat and we gauged it’s thickness, not by using the calipers, but by laying a string across the gunwales and measure down from there. The bottom was to be about 6 inches thick.
There are two other tools that I used a great deal on this project. One was a store-bought short-handled hatchet. It was shaped like the hewing axe, nearly flat on one side, and had quite a bit of bevel on the other side. The other tool was a wooden club that I used to drive the hatchet. By striking the hatchet with the club I could be much more accurate than when trying to strike directly with the hatchet. I used these tools mostly for trimming out the inside of the canoe.
The ends of the old-time Norwegian canoes were pretty blunt and thick, with maybe 12 inches of solid wood in the end. We left ours the same way, but when we rolled it over, I fudged just a little bit, tapering it to make a less blunt entry; easier for paddling in a lake. When you had it sitting in the water, it still looked very much like the original ancient ones.
The side walls of the canoe were about 1-1/2 inch thick. We wanted to make the cockpit as wide as we could. The camp was for all sorts of people, and there would be some pretty broad individuals wanting to sit in it from time to time. We didn’t put in any thwarts. That was not necessary.
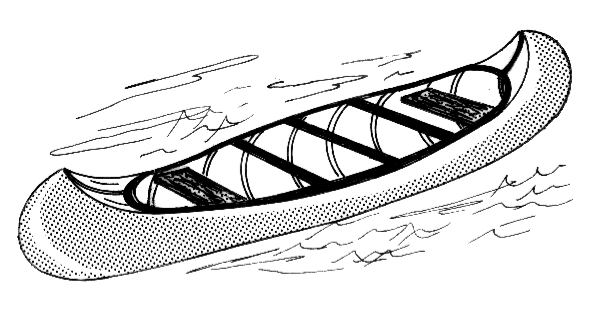
The black crosspieces in this image are thwarts. (Image credit 44)
Since there were other duties to tend to, we didn’t work on the canoe eight hours a day. We kept it covered with wet sacks most of the time, especially the ends, in order to keep the wood from drying and cracking. Even so, there were some small cracks in the end of the canoe which Rein needed to caulk.
We didn’t put anything on the wood to protect it. Ordinarily I would have used pine tar which I use in Alaska for treating many of my wooden products. Samson’s Hardware sells it in gallon cans. [Samson’s Hardware is a store located in Fairbanks, Alaska. The people living around Ambler and Kotzebue relied on Samson’s for mail order supplies.]
I had to leave for home before the canoe was finished. Together, Rein, Heidi, and I got the hull partly cut out, and they finished it after I left.
Paddles
Rein and Heidi had bought commercially-made paddles that had very broad, thin blades. I made another one out of a single piece of spruce.
Mine was from a tree that had been cut at one of the sites where they had set up their camp. I shaped it mainly with the double-bit axe, one of my favorite tools. Once I got it roughly to shape with the axe, I used my knife for finer work.
As I recall, the entire paddle, including shaft and blade, was about 5 feet long. The single blade was quite thin on the edges, and was a little longer than those on the commercial ones—probably 2 feet. The shaft was also narrower, maybe 5 inches.
I left a spine down the middle of the blade on both sides and let it go to the edge. The blade was tapered, but at the end it didn’t come to a fine edge. That way you could use it like a pole, pushing against rocks or the bottom or a dock, without damaging the blade.
The shaft wasn’t uniform. It wasn’t quite round, and it had a knob at the top. It was small below the knob so that you could wrap your fingers around it. From there it swelled out a bit, to maybe 1 inch. Then, as it got down toward the blade, I let it get slender again, so it would have a little springiness.
When you’re pushing something or prying something with a stiff paddle, you’re liable to be bearing weight on it, and it is liable to break. But when your paddle has a little spring to it, you have a sense of whether you are going too far.
Launching the dugout
It had been quite a big event when they’d found the ancient dugout in the Glomma River, so after we made our replica, there was quite a bit of publicity in Norway. To give it a test run, Rein and Heidi had it trucked to the head of the river, launched it, and drifted down with it, pretty much in the way that the people who originally used the boats did.
There were places in the river where it was not obvious which way to go. In one place they took the wrong channel, got caught in the rocks, and dumped everybody into the water. Fortunately the canoe lodged in such a way that it didn’t get away from them.
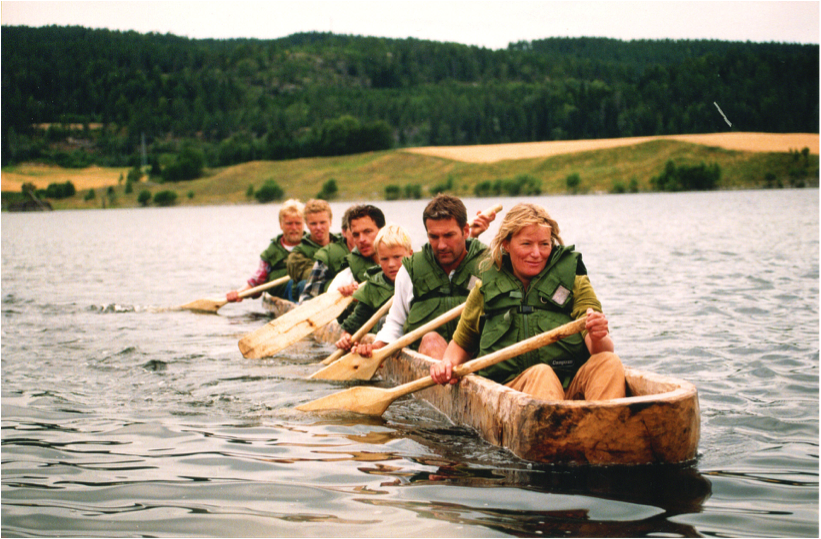
Heidi Dammann sits in the front of the dugout, with son Dyre in third place. Rein Dammann sits in the stern, just behind son Narvaq. Image from the Dammann collection
Other Dugouts
While in Norway, I also helped a Norwegian friend make another canoe in exchange for his help with some translation. His name was Per. He was a civil engineer who spoke English well.
Heidi Dammann looks on as Oliver and Per Øyvind Sørebø work on a dugout. Image by Rein Dammann
He had a friend who had a piece of land that had been more or less clear-cut and replanted with white fir less than seventy years earlier. White fir grows quite rapidly. It was amazing how far apart the winter grain was.
White fir is a softwood, and it was hard to sell. Sawmills didn’t want it—the only market for it was as firewood.
We found one of these firs growing right between two rocks. It wasn’t an ideal tree, but it was the only one on the property that was big enough for a canoe. Even though it was a fourth bigger in diameter than the others, it was a little smaller than the logs that we’d used for the large canoe for the Dammann’s camp.
The diameter of our tree tapered fairly rapidly. It had a swelled butt at the base. In order to get the maximum length, we cut it at the ground. It was perhaps 18 inches in diameter halfway up trunk—wide enough that we could make a canoe that people with narrow hips, like Per, could sit in.
Of course Per and I didn’t have the connections that Rein had to help us move the log, so we made our dugout right where the tree fell. We trimmed the outside where it was swollen at the butt. That swelling wasn’t uniform, so we had to clean it up.
We laid the trimmed log on a couple of small logs so that we could roll it over and decide what was the best way to work with it. From there on, the process was just about the same as the other canoe.
Oliver and Dyre Dammann begin the process of building another short dugout canoe. Image from the Dammann collection
I should also mention that there were actually two big dugouts being made while I was in Norway—the one that we made, and another that a commercial shop made. Once they were completed, the Dammanns would often arrange races between the two boats, and ours was quite a bit faster.
The Dammanns used those long dugout canoes at times to transport the parties that came to their wilderness camp across the lake. That was a real wilderness experience for some of those clients.
* * *
Notes:
Rein Dammann wrote extensively on “How Oliver Changed Norwegian Maritime History.” [See his tribute on www.olivercameron.org]
Heidi Dammann offered these comments on Oliver’s narrative:
• The oak tree that the Glomma dugout was made of was 2,200 years old, so the boat would be around 2,000 years old. The fact that it was so well preserved is likely due to the restricted access to oxygen under the mud. That dugout was also made of oak, which is known to preserve much better than other woods.
• We tried the dugout upstream on Glomma and found that it worked well. We had to slow down the speed because we almost took in water in the front. That shows that people in ancient times were able to paddle upstream.
• Good metal tools where hard to get two thousand years ago, so I don’t believe that they just would make one trip downstream, leave the dugout behind, go home, and make a new one.
• We also tried the dugout in a rapid. There were four of us. We had not checked the depth of the water in the rapid at that time of the year and we got stuck in some places, but we made it through.
• The commercial dugout that Oliver mentioned was made by Knut Thorsen’s company. Ours was a little wider at the rear for larger people. Knut’s dugout lay a little deeper in the water, but the difference was slight.
Rein Dammann offered these comments on Oliver’s narrative:
• Unfortunately, Oliver wasn’t there when we launched the dugout in the Glomma River, and did not see how easily it moved upstream.
• Oliver wrote that the original dugouts in Norway were made of cottonwood. We don’t know that. I recently heard of a few that were made of cottonwood, but almost all of the ones that have been found were made of pine. The old one from the Glomma River was made out of oak. The reason we made our boat out of cottonwood was that we couldn’t find one single oak tree that was big enough.
• We were extremely tense as the dugout was being lowered to the water for the very first time. The scientists were claiming that no one could paddle a canoe like this without a lot of training, and that it would tip over right away. There was a lot at stake for us because we had pretty loudly claimed the opposite, and had invited the press to the event. The scientists wanted us to fail, and were very negative about the project. Luckily, the boat floated like a swan!
• Oliver made one paddle, and we made seven more after he left. We took them on the expedition, but lost some when the boat tipped over in the rapids. We had to use some commercial ones for the rest of the trip.
• The caliper tool was made of birch branches, as Oliver said. It didn’t have a wing nut, so it wasn’t possible to change angles. We had no reason to adjust it, because all the walls in the dugout were supposed to have the same thickness. But still, it was very efficient. It reached all the way down to where the bottom started for ease of measuring.
• Oliver wrote that the trunk was brought to the camp, and that we worked on it there. Actually, it was brought to our house in a small place called Sørumsand, and that’s where we made the boat. The house was just a few miles upstream from where the old boat was found. We didn’t bring it to the camp until after our expedition on the Glomma River. We got a horse to pull the dugout from the truck down to the lake by the camp. They made a documentary film of the camp that time. That film was shown on Norwegian national television.
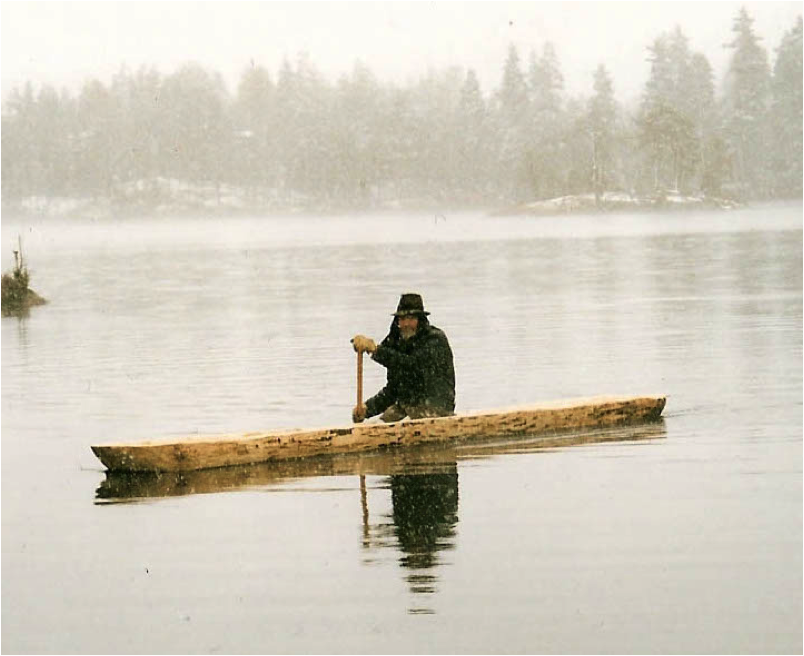
Oliver in one of the dugouts on the lake at the camp in Norway. Image by Heidi Dammann
Making a Kayak
I’ve made quite a few kayaks. The one I’ll describe here is an open and full kayak, which is like a cross between a kayak and a canoe.
My kayaks have wide bottoms for more stability than many kayaks. My hull sides are flared, not straight up like some canoes, nor do they have tumblehome like other canoes. [Tumblehome is the narrowing of the hull as it rises above the waterline]. Tumblehome or straight sides makes for easier paddling, but they also make it easier for the canoe to flip over if you rock it too far.
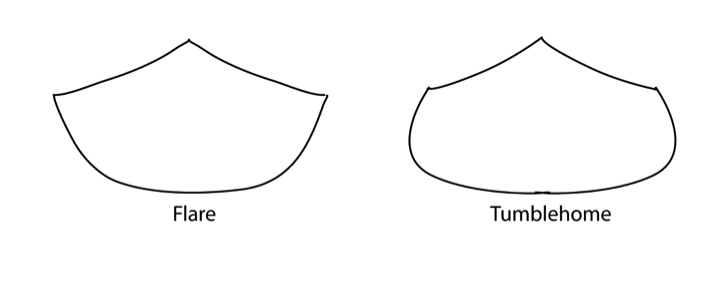
Flared sides versus tumblehome. Drawing by Brady Wedman
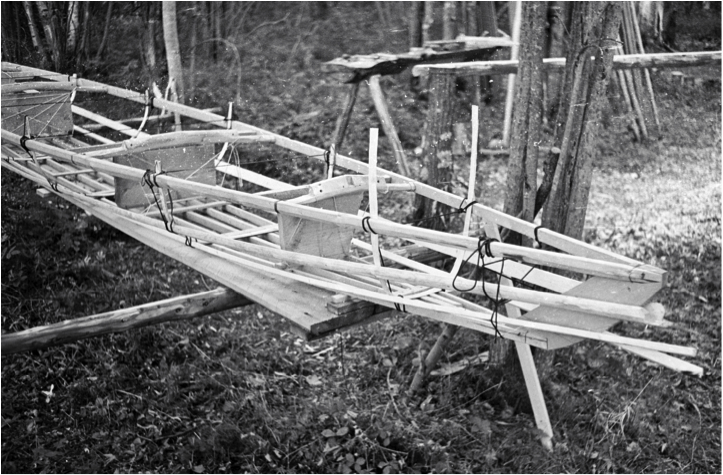
Making a kayak is a big and somewhat complicated subject, but the pictures should help give an idea of the process.
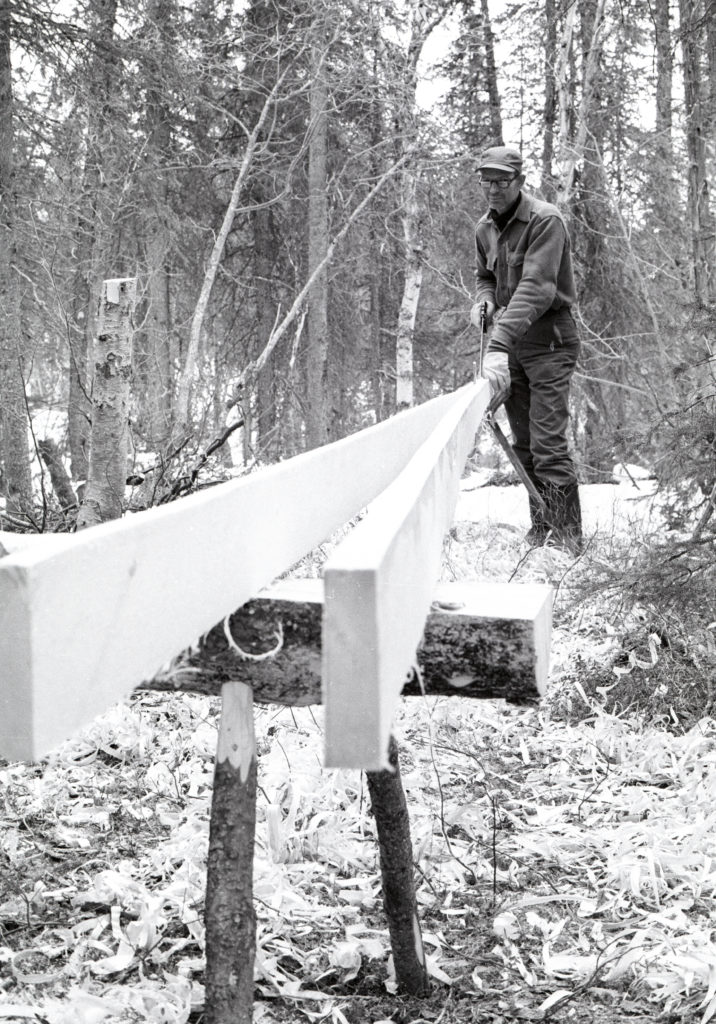
Oliver started with a spruce tree, cut out these planks with a special rip saw of his own design, and sawed them into long strips for building a kayak at spring camp. Kobuk River, 1975. Image by Sasha Wik
Preparing to build
The first thing to do is to gather the materials and prepare the wood for the boat. The materials I’ll need are the wood for the frame, the canvas for the shell, and the lap cement for sealing the vessel and making it watertight.
To prepare the wood for the boat, I find tall, straight spruce trees for the longitudinal pieces of the frame. Spruce is preferred to birch for this purpose because spruce is lighter in weight. From those trees, I rip the various boards and strips needed for the frame, the dimensions of which are discussed in each section where I use them below.
Bottom
I make a latticework for the bottom of the kayak that takes the place of a keel. I use relatively small strips of wood, approximately 1/2 inch wide and about 1-1/4 inches thick from top to bottom. I place them side-by-side and spread them apart a bit, so that the bottom framework is about 12-14 inches wide, depending on the width of the boat.
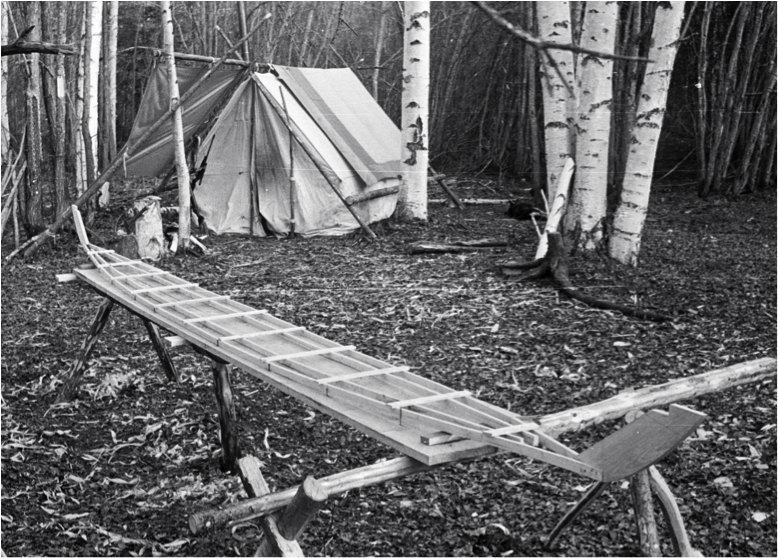
Bottom latticework frame and end pieces.
Image by Curt Madison
End Pieces
Then I set stem and stern pieces into both ends of the bottom latticework frame. [The stem is the vertical forward extension of the keel, to which the forward ends of the planks are attached. The stern is the rear part of the vessel.] These pieces are flat, and about 1 inch thick. These stem and stern pieces have edges that are slightly curved where they slice through the water. They rise at about a 60-degree angle from the bottom framework, sloping forward and aft.
Gunwales
The gunwale is the top edge of the side of the boat. [“Gunwale” rhymes with tunnel.] The gunwales come together on those stem and stern end pieces. Gunwales are 2-3 inches wide. Their length determines how much wider the boat is at the top than the bottom.
I like to tilt the gunwales a bit toward the outside, so that in the process of bending them to meet at the ends, the gunwales flare out along the center of the boat, but rise up a bit at each end.
Where the gunwales land on the end pieces I taper them slightly so that the joint is smooth for the canvas covering.
Thwarts
I cut 3 to 5 thwarts from small poles. These act as spreaders for the gunwales and provide stability to the kayak frame. The number of thwarts needed depends on the length of the boat. There are four in the kayak shown in the photo.
I smooth these round and then drill holes in each end for tying them to the gunwales. Each thwart is cut to the exact length of the desired width of the kayak at the position where it will be fastened. I use several wraps of nylon twine to secure each thwart to the gunwales. Spacing between the thwarts must allow for the paddler to get into the kayak.
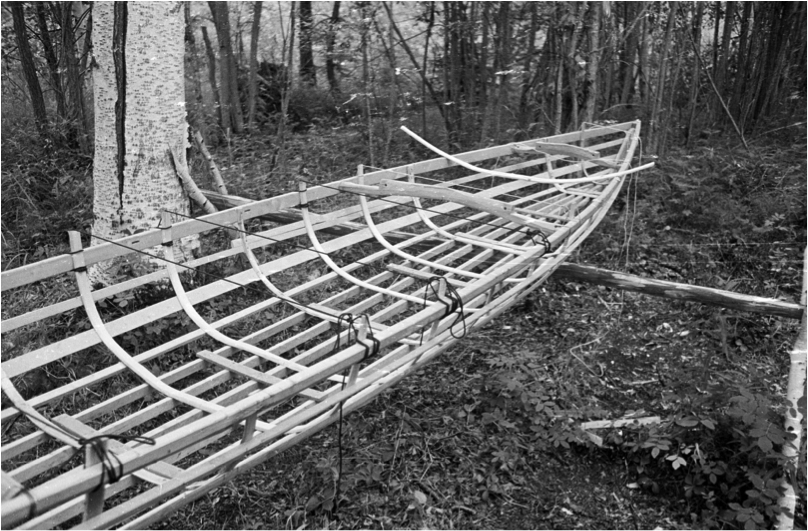
When placing the gunwales I stabilize them temporarily by fastening scrap wood to the thwarts. That gives me the cross-sectional shape of the boat, and gives me something to fasten the ribs into.
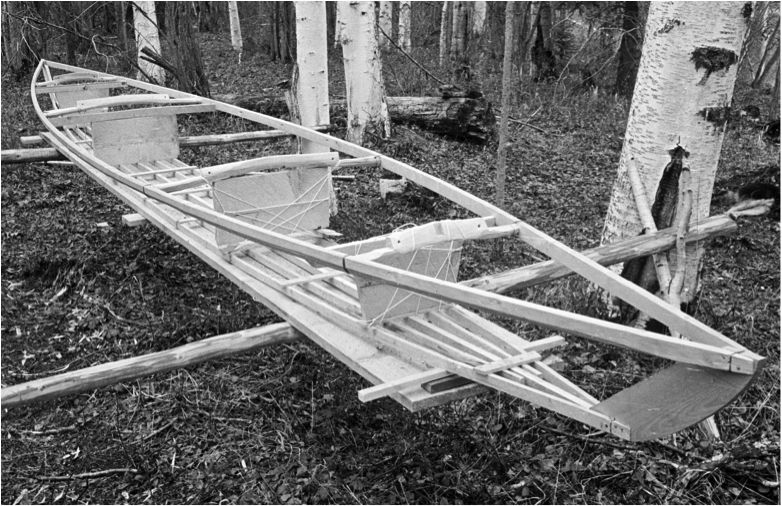
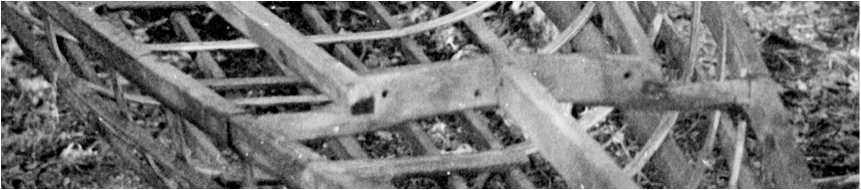
The basic shape of the kayak is now set. Here you can see the gunwales in place as well as the thwarts. The gunwales taper and attach to the top of the end piece. The bottom framework tapers and attaches to the bottom of the end piece.
Image by Curt Madison
Ribs
The ribs are thinly cut strips of wood, flexible enough to make the extreme bend for the bottom shape of the kayak. They extend down from one gunwale, across the bottom and back up the other side to the other gunwale.
Birch bends more easily than spruce. I find straight birch trees to saw the ribs from Split willow is another wood that can be used especially for smaller kayaks.
The grain must run true the length of the rib, so that the grain doesn’t run out to one side or the other causing the rib to break as it is being bent into place. Moistening the wood with a warm rag helps it to bend without breaking as you press it into the hull shape between the two gunwales.
A little trial and error will improve one’s skill at making kayak ribs that will bend without breaking.
I tie a few of the ribs to the bottom lattice framework and bend them in a gradual curve up to the gunwales. They angle matches the tilt of the gunwales. Each rib is securely tied to the gunwales.
After a few of the ribs are in place they help to provide the shape needed to place the first strakes. The strakes in turn will guide the exact shapes for the remaining ribs.
Here Oliver has tied the first few ribs in place in order to guide him in positioning the first two strakes. The strakes, in turn, will determine the exact shapes of the remaining ribs. Image by Curt Madison
Strakes
The strakes will run the full length of the kayak along each side. They are cut thin to be light in weight while still providing strength and shape for the boat.
Each strake will be a little longer than the one below to match the sloping stem and stern pieces. The strakes taper at each end to land on the stem and stern pieces.
The positioning of the strakes and the ribs will define the shape of the boat. You want a graceful flare without gaps or protrusions. I may use temporary pieces of wood for bracing, a baton to determine a smoothly curved line, and a lot of nylon twine for holding pieces in place as I adjust the strakes and ribs to get a smoothly contoured shape.
Strakes and ribs. Image by Curt Madison
This final shape is very important for the canvas covering to fit snugly against the frame, as well as for the boat to glide smoothly through the water.
Inwales, cockpit, and deck
A few inches inside of the main gunwales, I add sturdy inwales parallel to the gunwales. These give rigidity and strength to the hull. The forward and aft thwarts are notched with a landing for the ends of the inwales. I usually put blocks between the gunwales and the inwales to stabilize them.
Thwart with inwales attached.
Image by Curt Madison
The cockpit is outlined by the inwales and the endmost thwarts These sturdy pieces provide a strong structure that is handy for loading and unloading. There is no coaming around the cockpit—but there is a 3/4 inch strip that covers the area where the canvas will be tacked down to the top. [Coaming is a raised border or vertical surface designed to prevent entry of water. It usually refers to raised section of deck plating around a cockpit.]
I run a support member from the endmost thwarts to the stem andstern. This provides strength and creates a deck that gives me covered storage space at both ends of the kayak. Sometimes I put Styrofoam in that space to assist with flotation in case of capsizing.
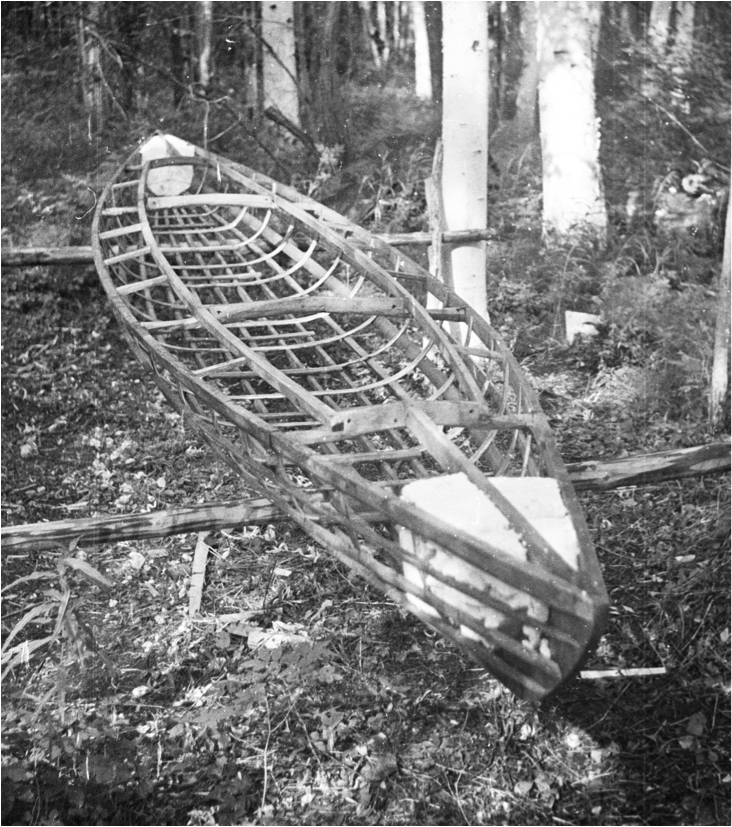
Complete hull showing inwales and stabilizing blocks. Note also the support member that runs from the thwart to the prow to support the deck canvas. The white objects at either end of the kaynoe are blocks of Styrofoam, added for flotation in case of a capsize.
Image by Curt Madison
There is no coaming around the cockpit—just a 3/4-inch strip that covers the area where the canvas will be tacked down to the top. [Coaming is a raised border or vertical surface designed to prevent entry of water. It usually refers to raised section of deck plating around a cockpit.]
Canvas
When I put on the canvas, I first cover bottom and sides of the frame. I then draw the canvas up over the top of the gunwales all the way to the inwales.
I tack it to the inside edge of inwales all the way along. I also tack the deck canvas to the top of the wooden supports that run from the endmost thwarts to the stem and stern. This covered area now slopes from the cockpit to the gunwales and allows water to run off. Sometimes I put a little covering strip over each seam in the canvas which helps to secure it in place and also helps to keep water from dripping through.
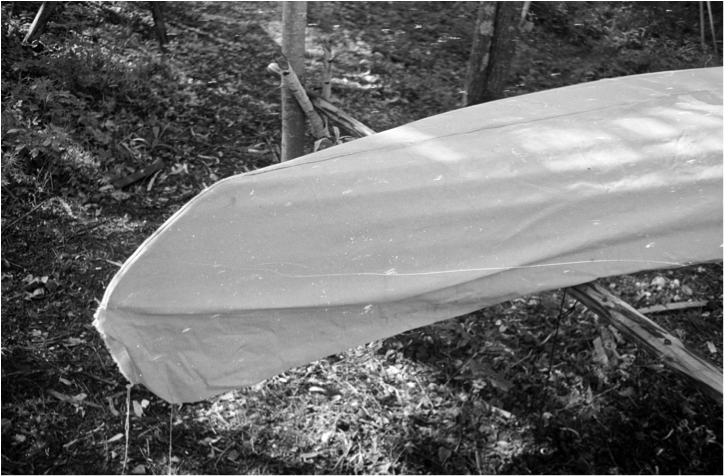
Putting on the canvas. Image by Curt Madison
At the ends of the kayak I cut out a wedge from the canvas where the bottom joins the end pieces. I sew up the seam with a whip stitch. I cover the seams on the end pieces with an extra strip of wood to protect them from wear.
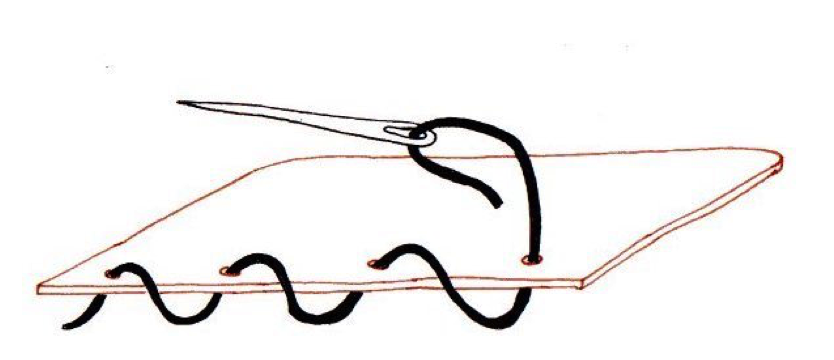
Whip stitch (Image credit 45)
Straps
I fasten straps of webbing across the top of the deck at the bow and the stern. The straps are a bit loose so I can get hold of them to drag the vessel around or I can tie something to it.
I add more webbing straps just ahead of and just behind the cockpit to slip my paddle under when it’s not in use.
Sealant
Once the canvas is on and all parts are sewn, I cover the entire hull with lap cement—the kind that’s used on roofs where tarpaper overlaps. If need be, I thin the cement a little with gasoline or kerosene so that it will penetrate the fabric. It takes several days to dry. The lap cement stays flexible even after it’s dry, whereas paint would get brittle and crack.
Paddle
You can get by with a single-bladed paddle, but I prefer a double-bladed one. A single bladed paddle only has the paddle blade at one end, whereas a double-blade paddle has blades on both ends, and makes paddling easier. I make my own paddle from a spruce tree. Some trees will split fairly straight, but most won’t. Then I have to hew the wood to the shape I want after splitting it.
The paddle should be long enough that your stroke into the water is at a comfortable angle. The shorter it is, the more often you have to make a stroke. With a longer paddle, you can reach farther ahead to get more pull and each stroke carries your further through the water.
The diameter of the handle should be whatever is comfortable for you to hold, maybe 1-1/2 inches.
To make the blades, measure by placing your paddle across the center of the kayak. The blade on each end of the paddle should start two feet out from the edge of the kayak. Each blade should be at least 4 inches wide and about 30 inches long.
The edge of the blades should be fairly thin, but right at the tip I leave them blunter and somewhat thicker. That way I can poke things and push away from the shore, and in shallow water I can use the paddle like a pole.
Occasionally I just nail boards on each end of a pole instead of hewing a single piece of wood down to make a paddle. Then I use a fairly wide board and let it stick out quite a ways. It’s not nearly as graceful or as nice to use. Also, being wider and longer it catches more wind when it’s up out of the water.
If you have the patience as you are hewing your paddle, you can leave a ring of wood on the handle, a little ways toward you from the paddle blade. That will shed water that runs down the pole to your hands. Otherwise you can wrap a fairly good-sized rope around the pole, or several layers of tape. No matter what you do, you’ll still get a little water coming down to your hands.
I always carry an extra paddle, not necessarily double-bladed. I keep it fastened inside the boat for emergency use. It’s a good idea to tie your paddle to the boat or to yourself. Then if you go over, you won’t lose your paddle.
Seating
When I’m in the boat, I sit on a roll of foam with my knees bent back, in an almost kneeling position. I don’t sit on my bottom with my feet stretched out. Have your dog sit behind you. Or, if you have an extra-long cockpit, he can sit ahead of you. Just be careful that there’s nothing sharp, like a can, that he can step on or lie on so that it pokes through the canvas!
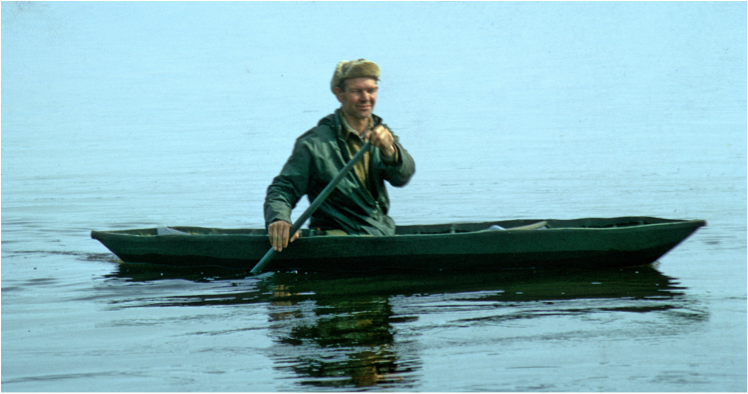
Photographer Curt Madison takes a spin in Oliver’s new kayak. The straps on top can be used to drag the kayak or to hold a spare paddle or a fishing pole.
Image by Oliver Cameron
Storing the boat
For storage, I usually I just pull the kaynoe out of the water and turn it upside down out of the wind. I may have a couple of poles that I can set it on to get it off the ground.
Bears like to play with kayaks. If I’m going to be away for any length of time, I don’t leave mine on the beach. I carry it up to my camp and store it more securely.
A few notes on building a small kayak
If you’re going out to spring camp with dogs and a sled, and you plan to return from camp by water after break-up, you’re going to build some kind of a boat at spring camp.
If going home is floating downstream, you can do most anything. Make a raft. But if you want something that you can paddle upstream you need a kayak. Also if you want to portage from one lake or watershed to another, for hunting muskrats or exploring, you’ll want a craft that’s light enough to carry.
Oliver in his spring camp kayak.
Image by Sasha Wik
Make the wooden boat frame out of material you cut at camp. For the covering, you’ll need some #10 duck that is long enough to make a small boat. It’s not the same as 10-ounce canvas—it’s heavier and more tightly woven.
I make my spring camp kayaks about 10 inches deep; more or less depending on how I’m going to be using them, and about 3 feet wide.
As to length, a 10-foot boat that is reasonably wide and fairly deep will hold you, and quite a bit of stuff besides. But, I prefer the boat to be at least 12 feet long. While its heavier to carry, and it is blown around more by the wind, it moves more efficiently through the water.
I build out of whatever material I can find. I usually use split willow. Some spruce will split nicely, but it can be hard to find. Birch doesn’t last as long as willow.
Building the kayak on a on a couple of fairly tall sawhorses is ideal. These can be made while there at spring camp. They are not something you need to bring with you. The frame can be built either upright or upside down on the sawhorses.
For a fast spring camp kayak, I mostly tie the frame together—you don’t have to have nails. From there, the basic process more or less follows that of building the larger kayak.
Rafts
Lumber Raft
Over the years I made many rafts of dead poles that I had gathered for firewood. They were long and narrow, and I just tied them together, without any crosspieces. This was on the Ambler River.
On one trip, I had quite a bit of wood, so I laid sticks across the first layer of logs and then put another layer of logs on top of the sticks. The lower logs, which were larger, were completely covered by water.
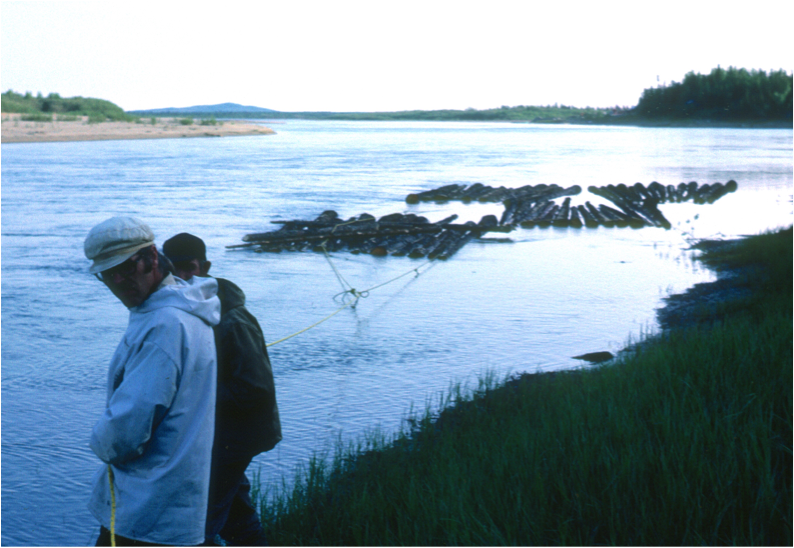
Keith Jones, Oliver’s good friend (foreground), and Oliver securing wood rafts on the Ambler River. Image by Dorene Cameron Schiro
Those rafts were mostly for firewood, but I ended up cutting a few of the logs into lumber. I made a homemade chainsaw mill to cut them. It was hard on the bar and chain because I didn’t get the grit cleaned off the logs as well as I should have—but that cleaning was very difficult to do. It would have been easier with a pump with a hose and a nozzle attached so that I could wash the logs with a strong stream of water.
There was often quite an ado when the BLM [Bureau of Land Management, U.S. Department of the Interior] came around for inspections or work. People complained about other people cutting wood near their spot, or taking wood they had already cut. That sort of thing did happen, so the BLM set up a system so people could apply for cutting permits on certain areas. [In the days before snow machines crowded out dog teams, a person might put in a lot of effort snowshoeing a trail to a spot with good firewood, only to have other villagers use that trail to cut the firewood for themselves.]
There was one area up above the Redstone River that was open to anybody. I made one of my rafts up there. I made another along a creek below that, which was quite a bit closer to my homesite than going all the way to the open-use area. I went to that nearby site fairly often to fish for grayling [Thymallus thymallus, a species of freshwater fish in the salmon family]. There was quite a stand of dead trees there, probably killed by bugs, so I made a raft of them.
To make a lumber raft, I started by tying the end of a rope to the first log. Each time I added another log, I made a clove hitch or a couple of half hitches around it. [See Oliver’s essay, “Tying Knots.”] If I hadn’t done that, the logs would have been free to move around, and the middle ones would have slipped out and gotten away from me as I towed them home.
At the back of the raft, I didn’t bother to hitch all of the logs together. I just tied a second rope to the two outside ones, to keep them from fanning out.
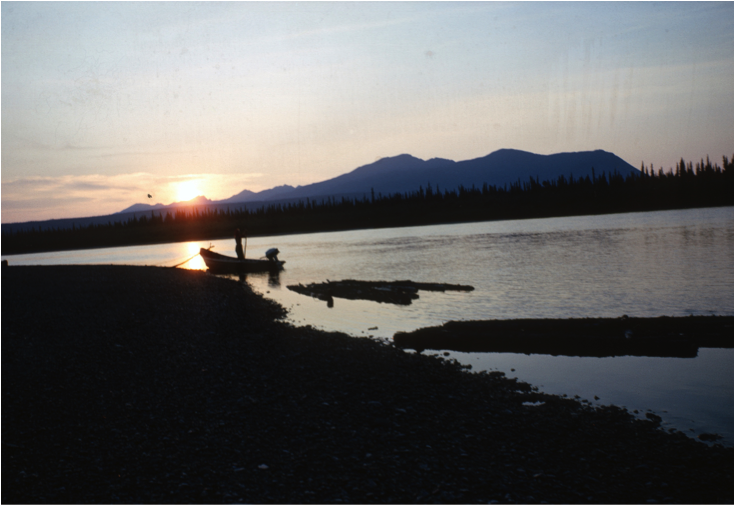
Ken Ross preparing to bring rafts of firewood logs down the Ambler River, August 1966. Image by Pam Ross
The raft had a yoke on it, and I towed it with a boat. I let the current do most of the work, but towed it just enough to keep it out in the current where it wouldn’t hang up.
When I got close to home, I’d let out the tow rope so I could get my boat way ahead of the raft. The rope was quite long. There was a tree close to the shore just a little bit up the river from my place. I’d unfasten the tow line from the boat, jump ashore, run up to the tree, and wrap the tow line around the tree a time or two. I’d have one of my kids running the boat motor. That was in the days when my children were still at home.
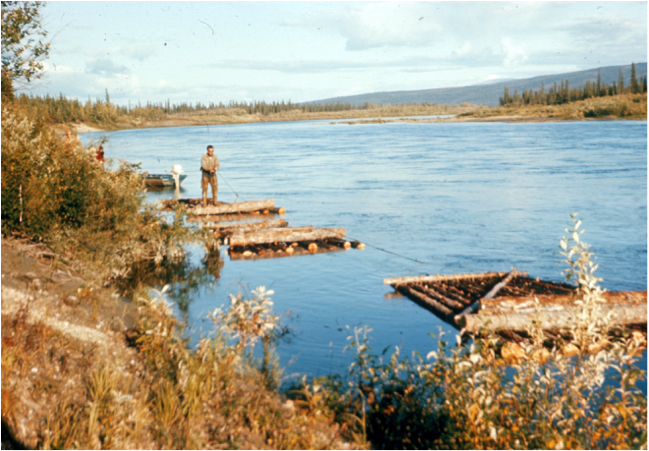
Dan Denslow in hip waders tying up rafts of firewood.
Image by Joyce Denslow
To tie the raft to the tree, I made a hitch that’s meant for tying up dogs or horses, called a hitching tie. You go around the tree and you have the standing line in your left hand if you’re right-handed.
When you wrap it around the tree, you put the end in that same hand, hold it together, drop a loop down below that, throw the free end across, reach through the loop and under the standing line, and grab a loop of that and pull it through. You then have a kind of slip knot.
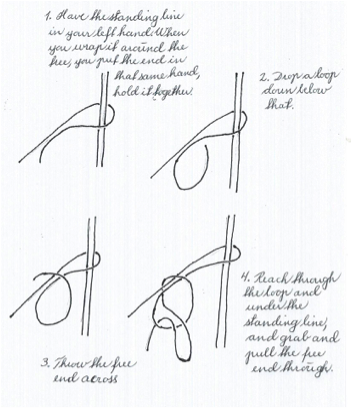
Oliver’s hitching tie.
Drawing by Heidi Dammann
The hitching tie is quick to make and easy to undo. It lets you hold the standing line so that it isn’t pulling strongly against your hand while you’re tying the knot.
When the raft drifted down far enough to tighten up the rope, it would swing close to the shore. I would have set up some sizable logs on the beach. I’d drag the small ends of a couple of them down to the river, and slide them out into the water a little ways under the raft to serve as skid poles. If I needed to, I could tie them to stakes so that they wouldn’t move around too much.
Next, I’d tie the end of a rope either to a stake or to the end of one of the skids, basically making a barrel roll rope setup.
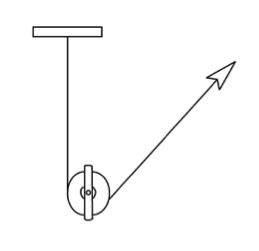
A “barrel roll setup” describes a system based on the principle shown in this diagram. Drawing by Brady Wedman
[In Oliver’s example, the log was the load. The fixed end of the rope was attached to a stake on the beach, or to the end of one of the skid poles. By pulling on the free end of the rope, Oliver only had to exert half of the force that would have been required if he had pulled the log directly up the ramp.]
The skid poles were long enough that I could roll all of the logs of the raft onto them. I’d pull three or four of the logs up the beach and block them so they wouldn’t move. Then I’d stack the next logs by shifting them on top of the others. I’d pull up one end, twist and lever the other end, and roll it a bit so that it would fall behind the others.
This brought the firewood log rafts neatly up onto the shore.
Human Transport Raft
When I was living at Rein and Heidi’s wilderness camp outside Oslo, I made a small raft out of spruce logs and then took it apart. As part of the camp activities, Rein and Heidi hosted dinners on a small island in the lake, and the challenge to the guests was to assemble the raft and relay their whole party to the island on the raft in order to get their meal.
It was such a popular project that Rein wanted a larger raft, so the next year I made another one, roughly the same way.
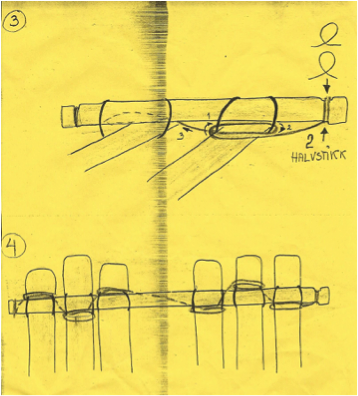
To make the raft, one of the challenges was to stabilize the logs. I made some log dogs out of lightweight rebar. They were like big staples that you could stick into the tops of two logs lying side by side or stacked crosswise to keep them from rolling. The dogs were about 3/8 inch diameter. I put the ends in the fire and drew them out to points, and then bent about 1-1/4 inches of each end in a right angle, with both points pointing in the same direction.
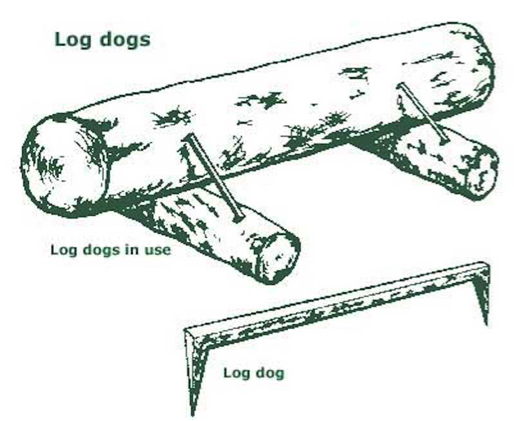
Log dogs are used to hold timber in place. (Image credit 15)
Then I made a couple more the same way, except that the points went in opposite directions, one pointed up and the other down. You could have a log on the ground, with the log you were working on top of it. You could stick one of those log dogs into the side of the log on the ground, and another one on the other side. Then you would put one of the first kind into the end to help stabilize it.
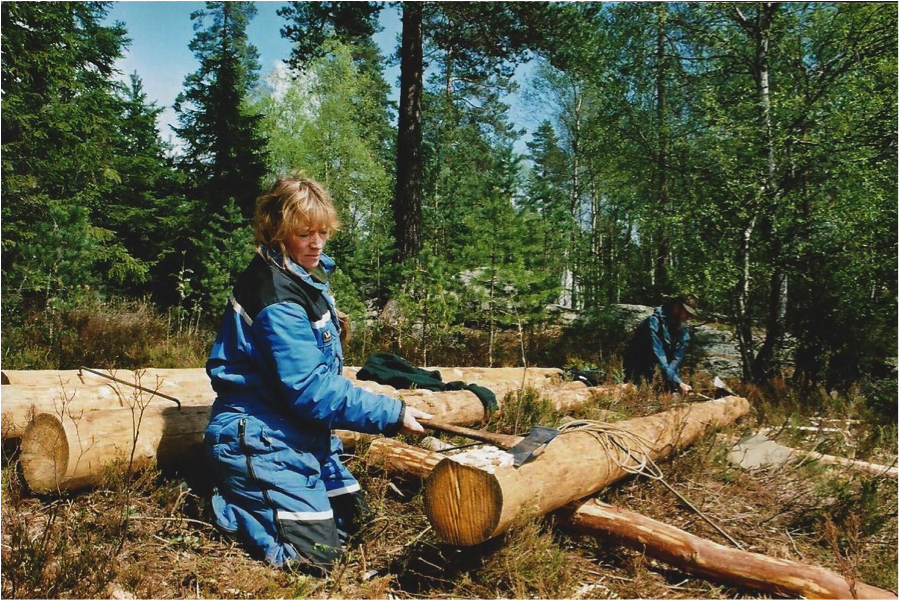
Heidi Dammann and Oliver working on the raft. Note the steel dog holding the logs behind Heidi. When complete, the raft will be pushed down the skids into the water. Photo by Anne Kirsti Augestad
I shaped the bottoms of each log so they would move through the water fairly easily. I smoothed the bottoms off and hewed the fronts, so that they were like small boats. The front ends weren’t blunt like those of the big dugouts—they tapered quite a bit, so that it was easier to push the water aside. I tapered the backs of the logs a little too, starting maybe 16 inches from the end, so that there would be something for the water to push ahead once the raft got moving.
Assembling the raft
I used six logs to form the main body of the raft, laid out in groups of three. Once I had all of the logs shaped, I laid them on the ground in the positions that they would have in the water. To make the raft more stable, I left a 2-foot gap in the middle. The three logs on each side took up about 3 feet, so the whole thing was about 8 feet wide.
Next I needed to lash the six logs to crosspieces at each end. I marked and hewed out a channel about 5 inches wide near both ends of the logs. Then I cut a crosspiece that fit in that channel like a key. I made the crosspieces slightly longer than the width of the raft.
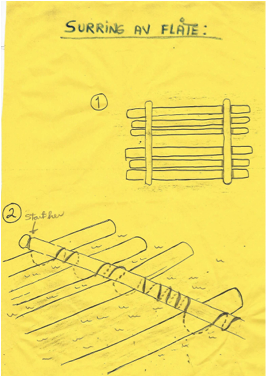
Sketch of the raft, showing the groupings of three and the lashing of one of the crosspieces. Drawings by Heidi Dammann and Anne Kirsti Augestad
I tied a rope to one end of the crosspiece, ran it under the outermost log, up and over the crosspiece, down and under the next log, up and back across the crosspiece, and down under the third log. I wrapped it around the crosspiece a few times to reach the next grouping of three logs, and lashed the them the same way.
Then I took the end of the rope that was left over and went back to tighten up the lashing. There was quite a gap between the strands where the rope came up one side of the crosspiece, over the top, and down the other side. I took a half hitch around those two legs, drew them up tight, and then moved on to the next pair. By the time I got all the way across the raft, everything was really snug. And then of course I tied the rope off at the other end.
Tightening loops
When I was designing that tightening system, I had to keep in mind that it was very likely that the people who would be assembling the raft would have had very little experience with lashing. I tried to make it as simple as I could and yet make it tidy, so that Rein or Heidi could demonstrate what it was like and have them finish it well. Heidi commented that she was amazed that things could be tied up that simply and made so tight and snug.
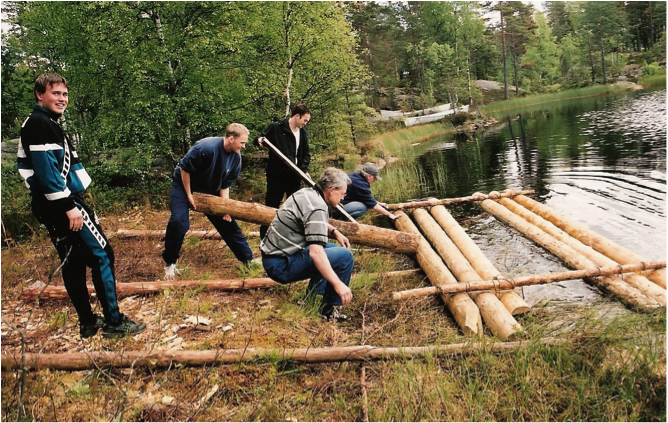
Launching the raft.
Photo by Heidi Dammann
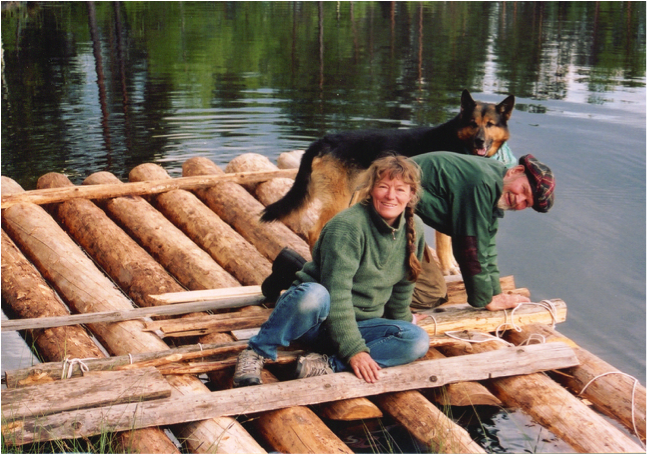
Rein and Heidi put down short boards atop the raft, maybe 8 inches wide, so people wouldn’t put their feet down between the logs. I think the lake was shallow enough that they could pole the raft most of the way out to the island, but I also made paddles that they could use.
I was never there when they used the raft, but I heard it was a very popular project. They’d have a different group at the camp about every week or so, and I guess all of the groups used it, unless the weather was too cold.
While I was in Norway visiting Rein and Heidi, I saw the Kon Tiki raft in the folk museum or boat museum in Oslo. [Kon Tiki was the name of a balsa wood raft that Thor Heyerdahl and his crew built and used to sail across the Pacific in 1947.] Rein’s father started a grassroots movement called “The Future in Our Hands”. [Erik Dammann (born 9 May, 1931, in Oslo) is a Norwegian author, environmentalist and government scholar.] Thor Heyerdahl was a member of that group. When Thor was living on an island in the Pacific, Rein’s father took his family and visited him there. [Heyerdahl was living in Western Samoa.]
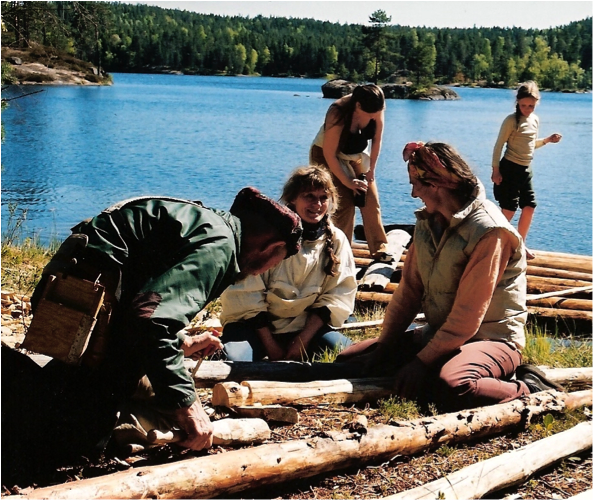
Oliver works with a chisel and a homemade club on a raft crosspiece as Heidi Dammann chats with a visitor. Image by Anne Kirsti Augestad
Oliver and Heidi Dammann work on a raft as Tonto the dog looks on.
Image by Anne Kirsti Augestad