WORKING WITH SKINS
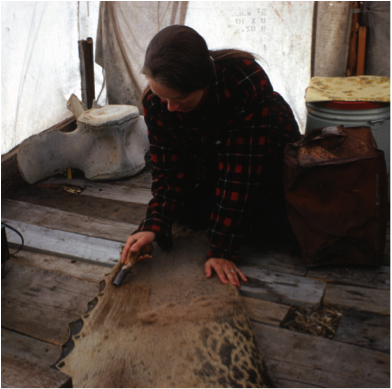
Dorene Cameron Schiro removes flesh from a moose hide. All fat and meat must be removed to prevent spoilage. Image by Bob Schiro
MAKING A RABBIT SKIN BLANKET
When I set out to make a rabbit skin blanket, first I needed a way to keep a raw, cased hide steady as I cut it into a long strip.
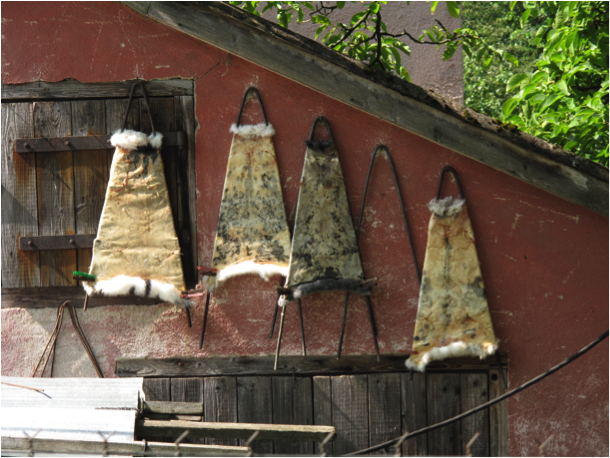
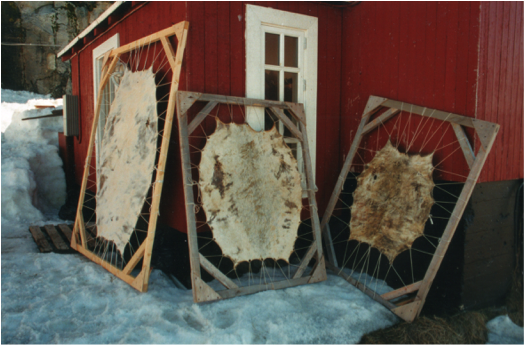
A cased hide is one that has been opened only at the rear end and pulled off the animal in one piece, the way you’d pull a sock off of your foot from the top. The inside-out hide is usually stretched and dried on a special frame, as shown in this image of four cased rabbit hides. (Image credit 106)
The strips would be used to “weave” the blanket. I carved a wooden spindle, which I stood upright in a hole drilled into my workbench. It was about 1 ¼” in diameter and fit loosely enough into the hole so it could rotate as I worked.
I cut each rabbit hide when it was freshly cased. I pulled the green skin over the spindle with the neck part up, trimmed the open end at the hide’s bottom with a sharp knife, and then cut the hide into a connected strip about an inch wide, going round and round the cased hide until I ran out of skin. The edges of the strip rolled together and looked like a rope with fur on all sides. Each hide made a strip about 6 feet long.
I rolled the strip into a ball and put it outside to freeze it. I’d add more rolled balls whenever I got another rabbit. When I had about sixty wrapped skins, I decided to create a rabbit skin blanket, making it as large as the skins I had would allow.
I started by making a wooden frame, suspending a string around the inside of it the way woodsman and author Elmer Kreps showed in his book, Woodcraft.
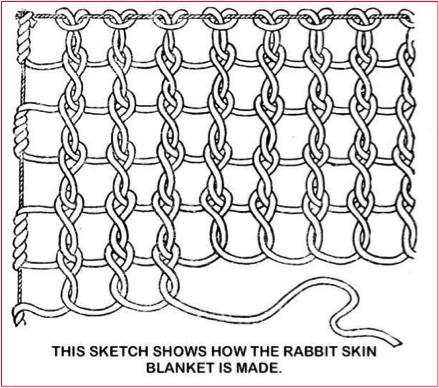
Image from Elmer Kreps’s book Woodcraft. The string is suspended just inside the wooden blanket frame and serves as the selvage of the blanket. (Image credit 107)
The frame was about 4 feet wide by 7 feet long. I sewed the end of my first strip to the string in one corner and started weaving as in the image below, using my fingers as a guide for the spacing. I didn’t need to stretch the strips; they’d been somewhat stretched as they dried in their balled shape. When I reached the other side of the frame, I wound the rabbit hide two or three times around the selvage string before starting across again, weaving into the last set of holes above. When I ran out of skin, I’d sew on the next strip of hide with a small needle and dental floss.
The finished blanket was about the size of my frame, 4 feet wide and 7 feet long. I let it dry for a while before I removed it from the frame. Even though I could poke my finger through the weave, it was snug and warm. I used it to cover me whenever I’d lie down.
After it had dried, the blanket didn’t give off any smell.I had intended to open up some burlap bags and make a cover for it, but I never did. As a result, the hairs stuck to my clothes, and I looked like a rabbit!
MAKING AN AXE HOLSTER
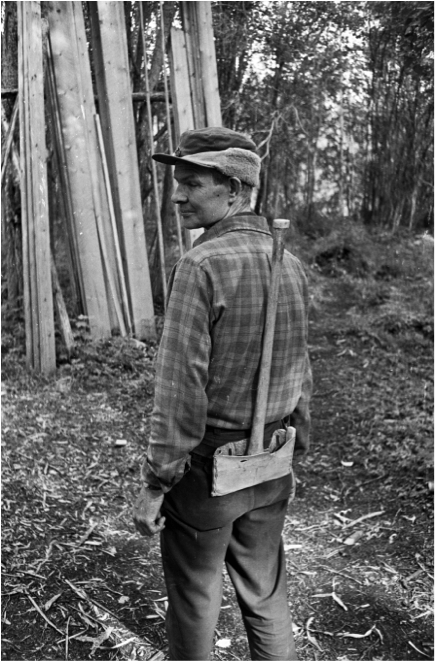
For small axes I use a drop-in holster that I wear on my pants belt rather than a conventional holster. The axe slides into the holster with the blade end down, with the handle up and easy to grasp.
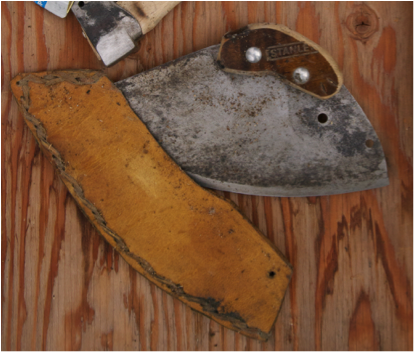
Oliver made this single-bit holster later in his life, in Norway.
Image by Heidi Dammann
Basic design
I make my holsters out of stiff leather like moose rawhide or ugruk skin. The leather doesn’t wrap too tightly around the blade; the holster is wide enough for the blade to easily drop in, and deep enough to keep the handle upright without it catching on anything. The top of the holster extends 6 inches or more above the axe’s head, but if the leather is too short, it’s hard to drop the axe in or get it out. Normally I wear the holster on the side of my hip, in the rear.
The piece of leather where my belt feeds through the upper part of the holster is the full width of the holster. There are two slots for the belt near each edge. The belt goes through one slot, underneath, and then back up and through the other slot, shaping the holster to my body. I wear fitted clothing when carrying the axe; baggy clothing around the edges of the holster can tangle with the axe and keep it from sliding in or out freely.
I always carry my axe with the sharp edge forward. I also want the handle to angle a little behind me. The holster should align with my leg when I’m kneeling, and I form the holster so that the axe fits into it at a slight angle, which sends the handle slightly toward the back and keeps it out of the way of my arm.
The holster’s pocket collects natural debris like leaves or twigs as I move through the bush. I tip the holster upside down and dump some of it out, but I like to leave a small opening along the bottom so debris can drop out on its own, too.
Design details
I want the pocket of the holster to stay open so I can slid my axe in and out of it smoothly. I sew two wooden spreader sticks into the sides to keep the pouch open. The sticks protrude above the main part of the leather. On the side of the pocket worn near my arm, the spreader stick is deeper and higher than the side worn closer to my back, providing me with a guide when reinserting the axe. I deliberately bump the axe head against the sticks when putting it away, which allows me to return the axe to the holster by touch alone. I don’t have to watch what I’m doing or fumble to find the sides of the holster.
Rear view of a hatchet holster from Oliver’s homesite on the lake. The blade edge goes against the shorter wooden stick; note the small piece of leather scabbed onto the leather and the stick.
Image from the Dammann collection
The axe’s cutting edge butts up against the shorter stick in the side of the holster. That edge will take some special features to prevent the sharp axe from cutting it. To fasten the shorter stick securely to the leather of the holster, I first scab a strip of leather onto the stick. [A scab is a material used to bind two things together. In this case a leather scab binds the holster to the short wooden spreader stick that it abuts.] Then I run my leather lacing through the scab, through holes drilled in the spreader stick, and finally through the holster’s leather. This arrangement prevents the axe edge from cutting into the stitching.
For a double-bit axe with two cutting edges, you need do this on both sides. For a single-bit, as pictured, you don’t need a scab on the poll end. [The poll is the blunt or broad end of a tool such as a hammer or ax.] On the poll side of the holster, just sew through the stick and the leather. You will need a much thicker spreader stick on the poll side than the blade side, however.
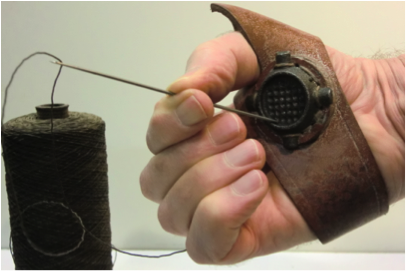
With any bladed tool in a holster, you don’t want the sharp edge to come in contact with the stitches holding the edges together, as that will tend to cut the stitches and cause the holster to fall apart. Though using wire for the “sticthes” could prevent breakage, it would also dull the blade. Instead, I use a damp piece of leather cut into a thin lace. I lace and tighten the stitches a great deal, until a bit of a wave appears in the leather edging.
Wavy stitching on an ulu holster.
Image from the Dammann collection
The lacing is not like stitches from a sewing machine—the lace goes in one hole and out the next, so gaps separate each stitch. When the lacing is complete, tuck the free end under the stitches on one side, all the way down, which helps to create the wave. Do the same on the opposite side—push the extra material under each stitch before tucking it under itself and cutting it off at the top.
If you wet your leather lacing to soften and stretch it, the wave in the leather becomes more pronounced. This wavy shape prevents the tool’s edge from coming into contact with the stitches. I often used this method on ulu holsters.
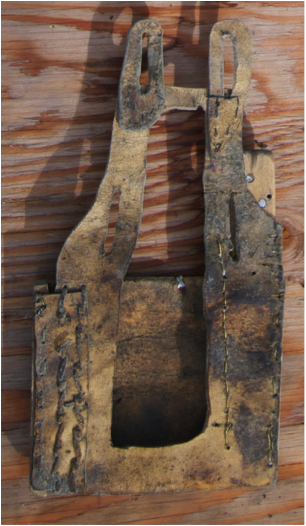
One of Oliver’s axe holster designs for a double-bit axe. Some details differ from those he described during the interviews.
Image by Curt Madison
When I make a holster for axes, I use fairly heavy, stiff leather. This stiffness has advantages. Stiff leather won’t bend easily when it’s folded to make the holster pocket, so it gaps where the end of the spreader sticks meets leather. The leather in that area of the holster only touches the sides of the sticks, which helps to prevent the axe blade from cutting anything.
If I’m in a hurry, I’ll leave fur on the outside of the holster, but ordinarily the hair is scraped off the leather I use. I use a sewing palm [a device that protects the handle during sewing] for pushing a big needle through that tough, thick leather.
Traditional sewing palm for making sails.
Rifle Holster
When traveling by dogsled, I also valued a rifle holster made from stiff leather. It encased the rifle, but with one end open allowing me to slide the rifle in and out. I sewed a flap of lighter skin over the opening for the rifle, so there was no danger of getting snow inside it if I tipped the sled over.
The holster was tied to the side of the sled so that it usually rode on the outside of the sled for easy access. I normally tied it to the top railing of the sled with leather string. That position allowed me to flip the holster up on top of my load when traveling through brush.
My axe and rifle holster designs were a matter of “needism,” which is the mother of invention and of problem solving.
MAKING AN ICHUUN
Ichuuns are skin-scraping tools, made from small-diameter pieces of steel tubing the size of your thumb or a little bigger, with sturdy wooden handles. They are used for two purposes: to scrape flesh, hair, and other matter from skins, and to soften and stretch those skins.
One end of the tube is filed to a sharp edge on the inside. The other end of the tube is filed square across. I taper the wooden handle to fit inside the steel tube. It fits just snugly enough that I can pull the tube off and reverse it, depending on which end of the tube I want to use for any particular project.
The sharp end of the ichuun scrapes the flesh, fat, and fascia from the skin. A lot of that material tends to quickly harden again, so you need remove it from the skin.
That squared across end is used to soften and stretch skins. Softening skins is sometimes done better without a sharp edge.
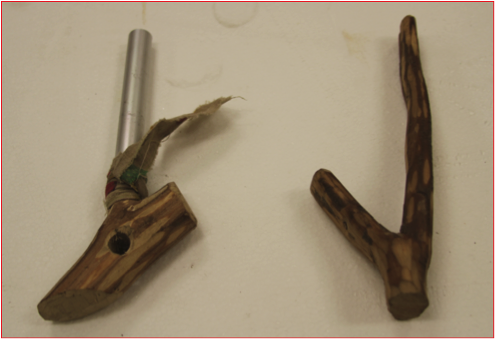
One of Oliver’s ichuuns. He carved homemade handles for various tools to fit his hand.
Image by Dorene Cameron Schiro
When preparing to use an ichuun, arrange two or three hides on the floor as a cushion before placing the unscraped hide that you will be working with on top of them, skin side up.
I often carve the handle of an ichuun out of a piece of driftwood from the beach. If I want a particular shape or crotch for an ichuun handle or other tool handle, I’ll go search for an alder bush, where I can usually find what I want. Alder is quite a hard wood with many crotches and connections.
Oliver used to set aside promising branches for later use as handles on a variety of tools. Image by Molly Rettig
In the winter and spring, if I was out walking where I might break through overflow [water lying on top of ice but concealed by a layer of thin ice or packed snow], I wore mukluks with ugruk soles and sealskin tops. They were waterproof and well-made, but the bottoms were slippery, so I would often make them with the inside of the skin turned out. That way I could scratch up the bottom with my ichuun to roughen it.
Pam Ross uses an ichuun to scrape the hair off a ringed seal skin. This was a traditional use of the ichuun by people living on the coast. Oliver was more likely to use ichuuns on caribou skins. Image by Ken Ross.
MAKING RAWHIDE & BABICHE
Making Rawhide
The first step in making rawhide is to get the hair off the skin. In the springtime there would be puddles around where the snow was melting and I’d soak caribou skins in that water when the sun was shining on it and warming it.
After a couple of days the hair would begin to slip, and most of it would come right off. [If you put a wet hide in a warm place for a couple of days, the hair will “slip”—that is, release easily from the skin.] To get the rest off, I’d put the skin over a beam and scrape it with the back of a butcher knife or a piece of sled-runner steel.
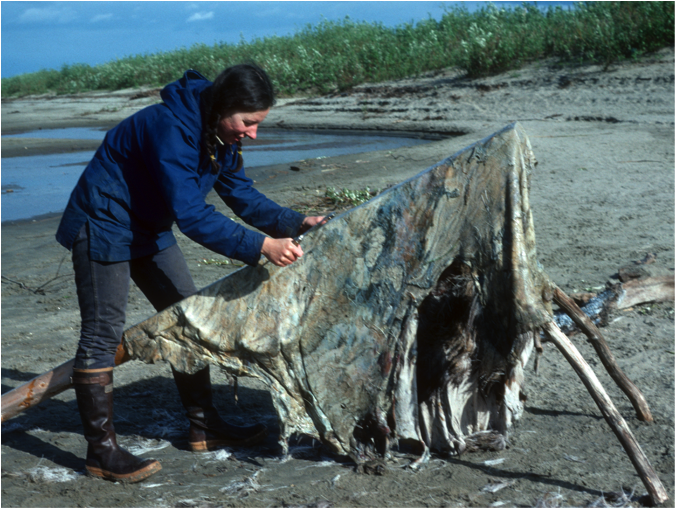
Skins stretching on a frame. The method shown here does not use hooks, as Oliver describes below. These are seal skins. In Alaska as of 2018, only Alaskan Natives living on the North Pacific Coast or on the Arctic Ocean may harvest marine mammals for subsistence. Oliver most often worked with caribou skins. (Image credit 108)
The next step was to stretch the skin. I’d poke holes a couple of inches apart around the edges and then hang the skin in a frame. I found that the easiest way to hang and stretch the skin was to make a bunch of small S-hooks out of heavy wire and insert those hooks into the holes in the skin. It’s a whole lot easier to run lashing line over a series of hooks than it is to thread the line through every hole, and it’s also much easier to take the hide down once it’s dry.
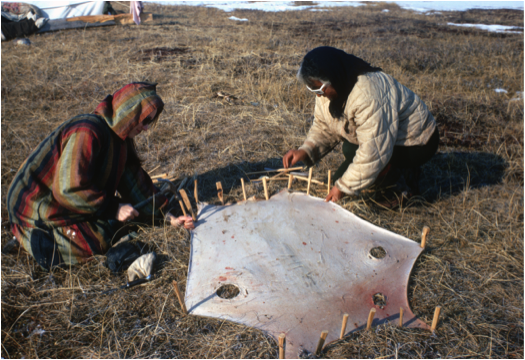
Another method for stretching and drying a skin is staking it into the ground. Shown here is a ringed seal skin (Pusa hispida), but this method could also be used for the animals Oliver hunted inland: caribou or moose. Image by Ken Ross
Making Babiche
Babiche is rawhide that’s been cut into thin strips. It’s useful in lacings, in some sewing projects, and in making the lanyard [web] in traditional snowshoes. I used moose hide babiche for snowshoes. [See Oliver’s essay“Making Snowshoes.”]
To make babiche, I’d take a sharp knife and cut the hair off of a “flint hide”—one that was dried up hard. It wouldn’t be necessary to shave it, but I did cut the hair fairly close. I made sure not to cut into the skin.
Then I’d soften and stretch the hide by beating it with a ball peen hammer as I moved it around over a 2-inch hole drilled with an augur into the end of a sizable block of birch wood. The beating softened the hide and also broke loose any tissue remaining around the hair stubble. Then it was relatively easy to scrape that remaining debris off with an ichuun.
I’d dampen the hide to make it flexible and easier to cut, and then I’d cut a hole in the middle with a good sharp knife. I’d start going around and around inside the hole, cutting a circular, spiraling strip maybe 3/16 inch wide. I’d have to sharpen my knife every once in a while because those hides invariably still have a little grit in them at the base of the hair.
I find the hide easier to handle when I start in the middle and work toward the outside, though it is often done the other way around, too, from outside to center. In the end it is probably a matter of preference.
To help keep your string a uniform width, you can make a gauge by cutting a slot in the end of a squared stick. I found that to be a nuisance, though, because usually I had to involve somebody else to hold the hide or the gauge while I did the cutting, so I got good at eyeballing it.
Conceptual drawing of Oliver’s homemade gauge. The knife sits upright in the slot, with the cutting edge toward the inside, and you pull the gauge toward you. The edge of the rawhide rides against the shoulder (shaded) as the strip of rawhide exits the gauge upward toward the right. The distance between the slot and the shoulder determines the width of the babiche strip. Drawing by Brady Wedman after Ole Wik
I mentioned elsewhere that often I’d open a carcass on the side rather than up the middle. [See Oliver’s essay “How to Butcher a Caribou.”] That was so I could take off the belly skin in one piece. It gave me a fairly large piece of skin that was thinner and more or less uniform in thickness. A thin piece of skin is handy for making things like mitten liners.
Usually I’d cut the neck skin of a caribou that same way, on the side rather than up the midline, and sometimes leg skin, too. That keeps you from cutting strips on the bias, which produces weaker babiche. If I wanted exceptionally strong babiche, I used a cased hide rather than a flat hide, and I’d just cut it around and around. [A cased hide is one that has been removed in one piece from an animal, then placed snugly on a specially-shaped board or wire frame for drying, fur side in. In this passage Oliver is talking about casing only the neck hide of a caribou.]
At other times I’d cut a whole hide down the middle and then cut strips along one side. That doesn’t give very long pieces though.
When you cut a piece of skin around and around in the circular fashion I mentioned above, the strips will have a curve to them, and when you straighten them out you’ll be pulling on one side of the strand more than the other. It seems reasonable that they wouldn’t be as strong as if they’d been cut the full length of the hide with equal tension, but they’re still plenty strong enough.
Once I peeled off the neck skin of a caribou in one piece and slipped the hair. Then I cut the skin going around and around, and while the strips were still damp I wrapped them around the legs of my cache to dry. I pulled them as I wrapped them to get out the stretch.
Once babiche dries, it’s stiff. To soften it again for use, you can stick your axe in a block of wood to hold it while you seesaw a strip back and forth over the edge of the axe head between the eye and the cutting edge. You could use some other edge for that. I used the metal upright stand of my treadle sewing machine, too.
You work about 2 feet of babiche at a time over the edge, seesawing, and then move it along and do another section. That breaks up the fascia [connective tissue beneath the skin] on the inside so that it often comes loose and just peels off. Then your babiche is soft and ready to use.
TANNING HIDES
There is a difference between tawing and tanning.
Tawing is just making the skin usable, preparing it and dressing it with beating and rubbing. It starts out somewhat like tanning, but instead of the glue in the hide being chemically changed, it’s only broken up by friction and beating. If a tawed hide gets wet, it will dry up stiff.
Tanning is putting the skin through a process in which the natural glue that stiffens it is chemically changed, leaving the skin permanently soft.
Tanning methods vary. Nowadays skins are often treated with either soap or flour. In the past people used oil from the water that fish had been cooked in or oil from mashed-up liver or brains. Smoking the hide also helps preserve it.
I’m not an expert at this sort of thing, but I will describe what I’ve done.
Hides do not need to be tanned immediately after they are dried, but can be stored for months or even years in a cache as long as they remain dry. Usually during the fall there’s not much time to spend on tanning. [Fall is a busy time when there’s always a lot going on to prepare for winter—hunting, freeze-up, fishing under the ice.]
Later, in the winter, when I get ready to tan a hide, I take two or three others from the cache and spread them on the floor as a cushion and put the hide I’m working on top with its skin side up. I take an ichuun [Inupiaq skin scraping tool] and start scraping to first get off all of the flesh, fat, and fascia that will break loose. That gets rid of a lot of the material that tends to harden the skin.
Next I get a basin of warm water, a bar of soap, and a bit of detergent. Fels Naptha soap works well, and that’s what I’ve generally used, but any kind will work. [Fels Naptha is an American brand of laundry soap.] I put a bit kind of powdered detergent on the hide, though I don’t like the smell. The detergent helps the hide absorb water.
I rub the hide with the bar of soap and some warm water, over and over, until I have worked up a sudsy lather. Then I fold the hide in half and stick it under the bed where it’s not too warm, leaving it overnight to give the soap a chance to soak in.
The next day, I take the hide out and use a table knife to scrape off the soap. Then I squeeze out as much water as I can and drape the hide over a chair. All this is done inside the house, since it’s always winter by the time I get around to doing it.
When the hide begins to dry, I start stretching it one way, then the other way and back again, pulling it out as hard as I can in each direction. I also scrunch the hide together, rubbing it firmly between my two hands to help it soften, and then stretch it out again. I let it dry for a few minutes, and then I begin this process again, continuing to stretch in all directions, until the hide is completely dry. As it dries it tends to harden, and each time I work it, I’m stretching and massaging that hardness into a softer finished product. I continue to work on it until the hide becomes very soft and flexible, ready to be made into clothing.
The end result is a hide that’s saturated with soap so that each particle of the skin has soap worked into it. The soap serves two purposes. One is that it interacts with the skin’s natural glue, changing it so that the glue no longer hardens the dried skin. The other is that the soap stabilizes the fat in the skin. The stable fat remaining in the skin keeps the hide soft enough to use. [Each soap molecule bonds with a molecule of fat. The resulting compound is soluble in water, and soaks into the skin. In that sense the fat remains in the hide.]
Some people tan skins using flour and water instead of soap suds. Some Inupiaq people use sourdough starter with a little soda added. They put a layer of that flour paste or sourdough paste on the hide, fold it over, and leave it a night or two to soak into the hide. You don’t want to leave it damp much longer than that or the hair will start to slip.
The advantage of using flour instead of soap is that this process draws the oils and fats out from the skin rather than stabilizing it into the skin. Skins tanned with flour remain more flexible in cold weather conditions. Fats harden when they become cold and are less flexible. This flour-tanned leather which remains flexible even when cold, is useful for making mittens and gloves.
The disadvantage of having the fats removed is that the skins will tend to harden if they get wet. However, they will not harden as much as a hide that has not been tanned at all, because the flour paste still has mixed with the glue and changed it as in the soap tanning process. Having leather that will remain flexible in the cold is a trade off for soap- tanned leather that is even softer as long as the temperatures are warm enough for the fats to remain flexible. It’s not too hard to soften leather that has been tanned with flour paste and so the tradeoff is worth it for certain uses.
I’ve used both the soap and the flour tanning methods. But after any method, the hide really does need to be smoked for proper preservation. Smoke acts as a preservative. If you don’t smoke it, and it gets wet, the soap will rinse out, and the hide will dry up and be hard again. Also if it’s been smoked, the fat sets in better.
To smoke the hide, you can build an open fire in a pan, but you’ll have to watch it closely. I use my smokehouse, which has a stove in it. If you have a stove with one length of stovepipe and a damper, you can control the smoke and the heat better. You don’t want too much heat.
I’ve also made various temporary setups for smoking hides. Some people just fasten the edges of the skin together to make a tube, and hang that over the fire so that the smoke goes up through it. Eventually they turn the other side out and smoke that side too. It doesn’t take very long to smoke it that way.
If you only taw a hide and it gets wet repeatedly—or if you keep it wet—it’s going to get harder. Not flint hard, but still stiff.
If that happens, you have to work it again. You can rub it between your hands, twist it back and forth, or lay it out and work it with a stake [pressing the hide against a stake to stretch it]. An ichuun is handy for this. It can be just a piece of pipe the size of your thumb, or a little more, with a bit of wood for a handle.
To make a quick ichuun, file the inside edge of one end of the pipe sharp and the edge at the other end flat. In use, you switch from one edge to the other by reversing the pipe on the handle. The sharpened edge can be used for the early process of scraping off the fascia and flesh. The dull edge is for working and softening the skin later.
Like almost every other skill I’ve described in these essays—there are lots of little details to learn as you go along, and there’s more than one way to get the job done.
Tanning a moose hide takes a lot of work. Moose skin is especially tough and thick. I’ve never tried to tan or taw a whole moose hide in one go. Usually I cut a piece off that is big enough for whatever I need to make—say, a holster for an axe or a knife.
First, while the piece of hide is still flexible, drape it over a tree or a pole. Fasten the hide down at one end, then pull the skin out with one hand and shave off the hair with a sharp knife. If you’re careful, you can shave it right down, like you shave your face, but’s it’s not really necessary to shave it that closely.
Roll the skin up and keep it damp, as with a caribou hide. As soon as it gets stinky, the stubble hair that’s on there will scrape off. Also scrape the flesh side. Then hang the hide up or spread it out and let it dry. If you let it freeze-dry outdoors, it won’t be as stiff as it will be if it dries in the house.
Drill a hole in the end of a block of birch wood, lay the hide over that, and taw it by beating the hide down into the hole with a heavy ball peen hammer. The peen itself is 1-1/4 inches in diameter, and the hole in the block of wood is 1-1/2 or 1-3/4 inches. Move the hide constantly to cover all areas. It takes a while, but this method does a good job of softening up the hide.
At this point I usually put some kind of oil on the hide, like neatsfoot oil. That keeps it flexible. [Neatsfoot oil is a yellow oil rendered and purified from the shin bones and feet of cattle. Among other things, neatsfoot oil is used as a conditioning, softening, and preservative agent for leather. See Oliver’s essay, “How to Butcher a Caribou” for how to make neatsfoot oil.] The moose hide is now ready for use.
If you’re going to use a piece of the moose hide for mukluk bottoms, you can make a form from wood shaped like your foot. Wet the skin, and pull it up onto the form so that it comes halfway up around the sides. It will pucker a little bit in various places, but tack it there and let it dry. When you remove the moose skin from the form, cut off the upper edges to create a straight edge and use the bottom part that is formed like your foot. It will be cupped up a bit around the sides, and more so at the toe.
To add tops to these mukluk bottoms, sew a piece of leather or tawed hide onto the shaped moose skin bottom. Tanned leg skin of a caribou is good for the mukluk upper. You can turn the fur side in if you want the smooth skin on the outside, or turn the fur side out if you want a warmer item.
You can make socks to wear inside those mukluks from some of the softer caribou hide that you’ve tanned, too. I also usually make an insole for the mukluks. This is made from the neck of a heavier hide, with the hair cut down to a length of about 3/4 inch. I use the insole with the hair side up towards my foot. Sometimes I tack it into my caribou skin sock with just a few stitches at the toe and heel so that it won’t shift around too much when I step down. If I want to wear ordinary wool socks, I often fasten another lighter-weight piece of hide over the toe of my insole to make a sort of hood that I can slip my foot into. It looks something like a slipper. A little extra insulation over your toes is nothing to be sneezed at, at least not with my cold toes.
Deer and caribou have hollow hairs that break off from haired skins, which is sometimes a nuisance. I don’t know any way of avoiding it. It’s worse if the skin is kept in a dry house. They don’t break off so quickly if you keep the skin outside in a cache. The natural moisture of the air keeps the hide a slight bit damp.
Skins with the hair on them are useful for making very warm mittens or socks for mukluks. You tan the skin the same way, just skip the step of scraping off the hair. Leg skins have shorter hair than what’s on the rest of the caribou body. This shorter hair and the natural shape of the leg skin is an advantage for making mukluks.
I use tanned hides mainly for mittens, mukluks, and caribou socks. Once I took all the hair off some home-tanned caribou skins and made a vest out of them that I loved and wore for many years. I put a number of pockets on it in handy places. I also had a whole suit of clothes with the hair on—a fairly long coat and a pair of pants, though I didn’t wear them all together very often.
For hides to be used as bedding, I usually just scraped the fat and fascia off. Big bull caribou hides were large enough that I could use a single hide as a bed mattress. More often I’d sew together two medium-sized hides to get the length I needed. I’d cut straight across on the tail end, using only the thicker parts farther up on the animal. I’d also trim off the sides so that the best part of two hides formed my mattress.
When you use a skin like that for a bed, with the hair side up, it’s always slipping around. Either you slide off of it, or it moves out from under you. When I sew the two skins together, I put the hair of one flowing in the opposite direction from the hair on the other. This helps minimize the slipping.
Of course those bed pads are always shedding hair. But, if you don’t have caribou hair floating around, it’s a cold and hungry camp!