Image by Sasha Wik
The following essays discuss ways people can get around in the North on their own two feet.
MAKING SKIS
One possibility for personal transportation around the North is skis.
I had a neighbor, an old man. When he was younger, he had worked in the mines in the mountains that had only a poor excuse for a road. One winter a big storm came through right after the first of the year and they couldn’t get supplies up to the mine. The mine operators weren’t sure that the State would open the road at all, so they shut the mine down until the spring.
This fellow didn’t want to spend all that time up at the mine—he wanted to get home to his family, but the road was closed. So, he took his axe and his hunting knife and made a pair of skis.
He had to ski up gradually to get over a pass, but from there it was downhill or on the level for about 20 miles to get back to a maintained road. He started out very early in the morning and made it out to that road in one day, just before dark. From there he was able to catch a ride into town.
The way I make skis is the way that some of the trappers in the deep snow country of Idaho used to make theirs. They used them for working a trapline or for moving from one cabin to another. For use in loose snow and timber, some of these skis were as long as 9 or 10 feet. They were also wider than lighter commercial skis.
Material
These trappers would look for a tree, usually a white fir in Idaho, and cut a board as long as they wanted, about 1-1/4 inches thick and 5 inches wide. My skis were usually only about 7 feet. That way they were more maneuverable.
Foot Pad
The footrest would be about halfway back on the ski board. Your heel would be a little behind the center. I’d cut the board down at the front of the footrest area so that there was a way for my toe to rock forward a bit when I made a step. The loop that held my foot was just behind that cut.
Front End
As I said, the board was 5 inches wide. Sometimes I left it wider at the front as I shaped it.
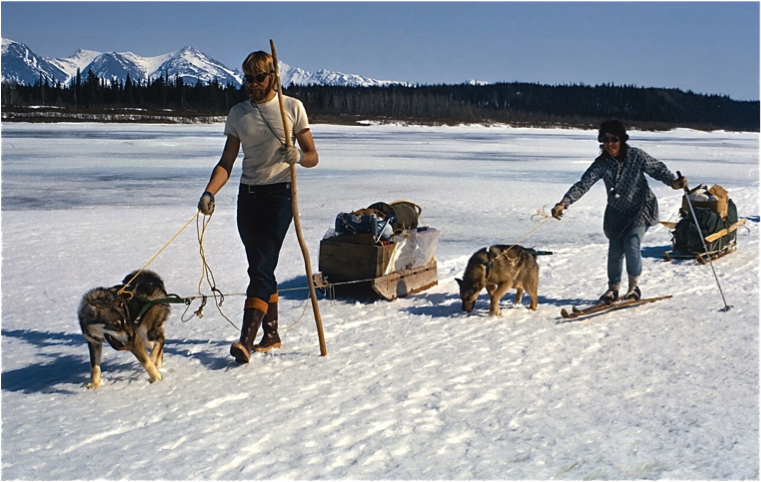
From the footpad forward, the thickness of the board would taper slightly until it was maybe 1/2 inch thick. From there to where it started to turn up, it would be increasingly thin. The front foot or so, through the turn-up, would be maybe 3/8 or 7/16 inch thick. The tip would be 4-5 inches off the snow, somewhat more than those on a typical ski. The turn-up at the front was less than vertical— only a little steeper than 45-degrees. If you took a rounded block of wood 1 foot in diameter, fastened a long stick on each side and let them stick ahead, and then put a crosspiece ahead of the block so you could stick the ski in there and bend it over the block, that would be an appropriate curve.
This setup shows the wood engaged against a crosspiece and then bent around the form. The long sticks that Oliver mentioned would be attached to the upper and lower surfaces and would extend to the right, to keep the ski in place while the wood dried. Drawing by Brady Wedman
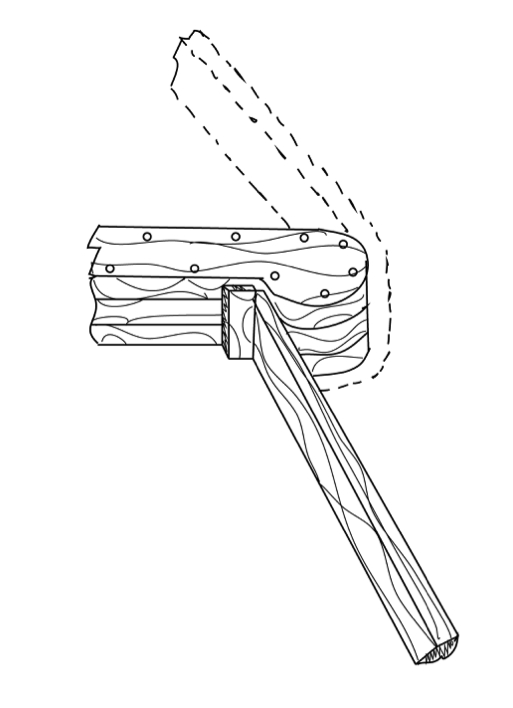
In those days most people had a wash boiler. They’d stick the ski into it and boil the wood to soften it before making the bend.
Typical wash boiler, used for heating laundry water. Drawing by Brady Wedman
Back End
The board would be left the full thickness to the tail end of the ski, but would be tapered to be maybe 1/2 an inch narrower than at the front. The skis were not turned up at the rear.
Groove
There would be a groove on the underside, in the center, starting just back of where the board was thinned. It was hollowed out at a 1/2 inch, but it wasn’t the same width all the way along. It would start out narrow and then get wider and wider, until at the back end it would take up most of the ski. The purpose for that groove on the trappers’ skis was to fill it with a fairly soft wax.
First, they’d coat the skis with pine tar, top and bottom, cook it in, and allow it to dry. Then they’d coat the groove area with a soft wax. They wanted something kind of sticky, something that wouldn’t wear off rapidly. Then they would wax the main part of the bottom with whatever was appropriate for the snow conditions. Hard waxes are intended for cold snow conditions to help the ski get a grip on cold, dry snow, particularly under the foot where the weight is. In warmer, slushier conditions, soft wax helps the skis slide better. [Modern cross-country skis have scales which help them gain traction. The wood skis Oliver describes needed a grip, and wax accomplished this. Ski waxes come in colors (purple, red, blue, green) corresponding to their stickiness which also corresponds to the temperatures and snow conditions in which they work: warmer, wetter snow requires sticky purple. Green is for the coldest, driest snow.]
Toe strap
There are two ways of attaching a toe strap. One is to drill several 1/4-inch holes on the side of the ski, all the way through from one side to the other, and then chisel the wood out from between the holes to form a slot that passes through the ski where the strap can pass through. With that setup, you can move the strap around so that it wouldn’t wear always wear in one place.
But, if you just have a strap running straight around your foot, you will work against the rear edge of the strap all the time as you ski. You get around that by having two thinner straps passing through the slot, each with its own buckle system.
With the two buckles on top, you can tighten one a little more than the other to taper the fit. The strap around the toes can be tightened so it will be snug around your boot toe, and your boot can keep working in farther all the time. The strap around the instep can be a bit looser to allow for more motion of your foot.
The other way of attaching a binding strap is to nail it into the side of the ski. You need to cut a little notch to inset the strap into the side of the ski so that it doesn’t get raked against the snow all the time.
Another favorite way of binding the foot to the ski is to cut a band from an old motorcycle tire inner tube. You use fairly wide bands, maybe 1-1/4 inches. You pull a band over your leg, put your toe under the toe strap, then pull the band forward and hook it under your toe. I think maybe that gives you the idea. I ordinarily used that system with shoepacks, not with mukluks.
Most skis are slender in the middle, and they have a camber, an upward arch in the bottom which helps the ski to slide, but those that I am describing usually didn’t. They would slide if you were going ahead or downhill, but more often you would use them for walking, like snowshoes. Once you got a trail made with them, you could go right along with it.

Camber in ski. Drawing by Brady Wedman
Ski Poles
Ski pole use depends mostly on the person. The old timers preferred one pole. They could get a hold of it with both hands and brace themselves more. If they had a steep slope to go down, they’d stick it between their legs and use it as a brake.
Those poles were 7 or even 8 feet long. When you’re climbing, it’s nice to have longer poles so you can walk yourself up the incline. Poles were also handy when you were going over a trail and it had been snowing, you could use them to reach ahead to knock the snow off the bushes and let it fall away so you could get through.
The poles should be flexible, yet sturdy enough that you could put your whole weight on them if needed. Occasionally you are going to be putting a lot of pressure on them, using them with both hands like a paddle to protect yourself or boost yourself in some way. I guess if you laid the ends of the pole on something and stepped on the middle and it didn’t break, that would be a good test of the pole’s sturdiness and strength.
Birch saplings are pretty skookum; I liked them as ski poles. The diameter would be maybe 1-1/4 inches at the thick end. If I didn’t have birch, I would make the pole quite a bit larger, maybe 1-1/2 inches. You put a basket on the big end of the stick. [The basket is the round cone near the bottom of the ski pole that prevents it from sinking into the snow.]
I usually made the baskets bigger than the ones on ordinary ski poles, about 6 inches in diameter, using wire. I’ve made them by just bending a piece of willow about as big as my little finger, too.
I’d make two slots about 6 inches from the end of the pole, one above the other. I’d tie a thong onto the basket, run it through one of the slots, wrap a few turns around the rim, go back through the other slot, and so on all the way around. One time I just cut the coils off some bedsprings and used those as the basket. The bottom end of the bedsprings was nice and stiff and about 5 inches in diameter.
Using a wrist loop on the pole is a matter of individual preference. I had a thong through the top of the stick—just run through a hole there. I usually didn’t have it around my wrist. I’d put my hand through it and grip it against the pole with my thumb. It was just something to keep my hand from slipping.
One last thing. Skis and snowshoes are not interchangeable. When it comes to breaking a trail for a sled or a toboggan and pulling a load and such, skis are not as versatile as snowshoes.
SNOWSHOES
Using snowshoes and breaking trails
In the mountains of Idaho, an older friend of mine, Alfred, once told me of making snowshoes 7 feet long. The snow up there was powdery, and in the timber there was no wind to settle it down. He needed those big shoes.
Alfred and his wife were going to a trapline cabin [a simple shelter where a trapper can stay while moving around his trapping territory]. They were afraid the snow was getting to be too deep and heavy on the roof, and they wanted to shovel that weight off. These two were in their fifties at the time.
A younger neighbor of theirs who was in his early twenties wanted to go with them. He had a brand-new pair of commercial snowshoes. Alfred tried to discourage him, saying, “You are going to have a hard time on our trail.” The young man tried anyway but had to give up after a quarter of a mile because he was sinking too deep in Alfred’s track.
Ordinarily I will snowshoe a trail the day before I’m going to haul anything on it so that the snow has a chance to set up and the trail can become firm. If I’m going on a fairly long trip, I’ll make a trail out part of the way and come back. The next morning I’ll take the dogs out to the end of that trail, tie them up, break another length of trail, leave that until the next day, and so on.
When I’m breaking a new trail, I go along in short steps so I’m not leaving a bunch of soft snow between strides. Coming back, I overlap one side of the outbound track with one snowshoe and step on new snow with the other. I like to pack the center of the trail a second time to make it a little tighter. I do that because I hitch my dogs in single file, and I want to make a better trail in the middle for them. The sled itself can ride on the outside.
The runners on my sled are purposely spaced only 14 inches apart, so they’ll fit in a track that is the width of my two snowshoes. But with the snow packed down the width of three snowshoes one has more maneuverability around short bends. The wider trail also supports the sled better.
The longest trail I made in this manner was a little more than five miles, which took me two days to make in this manner.
Snow conditions determine how much time and effort it takes to make a trail. If you’ve got an extra 18 inches of new snow on top of what’s already there, it’s going to take extra work. In some cases, when you step down with your snowshoe, you can throw your weight forward onto the new snow and compact it. That’s hard work that is tiring.
After repeated snowfalls over an existing trail, there will be a ridge of packed snow down the middle of the trail. Having made the trail a little wider at the start, my sled has better ability to stay on firm snow. With the softer snow at the edges of the trail, one’s sled tends to tip on its side. When there is a lot of new snow on the trail, my leader dog must be able to find the firm part of the trail and stay on it, which a good leader will do.
Making snowshoes: Frame
I have a unique way of making my snowshoes. The curves in ordinary birch-frame snowshoes tend to straighten out, especially with repeated wetting and drying, so I bend my birch saplings while they’re still living.
In the spring, after the sap is up, I make some bending boards about 18 inches long and 6 inches wide. I put two blocks along one edge of the board, at the ends, and another block halfway down the opposite edge. I make holes in a couple of places along the board so that later I can tie the saplings in place.
Then I go out and find suitable saplings to bend for the frame. I look for a place where there is a profusion of saplings of the same size. I need four trees for a pair of snowshoes. I cut the branches off where the stem is a good size for the frame of a snowshoe—about 3/4 inch in diameter. I bend the sapling, hook it under one of the blocks at the end of the board, bend it around the block that is midway along the opposite edge, and then bend it under the block at the other end of the board. I tie the sapling in place so I can leave it through the summer, and the wind won’t blow it off.
In the fall, when the sap has quit running, I go back. By that time the sapling has been growing in the frame for a couple of months and has taken on the bend. I untie it, cut it off near the ground, and cut off the top. When I get the birch saplings home I peel them, tie them in a frame, and let them dry. Since they’re green, I put a little extra bend in them while they’re drying.
To make the frame for drying, I get a block of wood about 8 inches long, and a couple of sticks that are 4 feet long or so. I nail a stick on each side of the block, leaving the sticks extending maybe 4 inches past the block. Then I fasten a crosspiece to the sticks, right at the ends. I stick the thinner point of the sapling under that crosspiece and around the block of wood, and then tie it to additional crosspieces I’ve attached to the sticks further back. Two bent saplings will give me two rails, one for each side of one snowshoe.
Once the wood has dried, I cut the rails. The thin end of the sapling will go toward the front of the snowshoe. You want to have the heavier end behind, so that the front of the shoe will tend to tip up when you lift your foot to step.
Snowshoes are usually longer than the stride of the person using them. Commercial trail snowshoes are 10 inches wide and maybe 4-5 feet long. I make mine quite narrow and considerably longer than that, depending on how I am going to use them. If I’m going to be breaking trail through deep, fluffy snow, I make them 5-1/2 or 6 feet long.
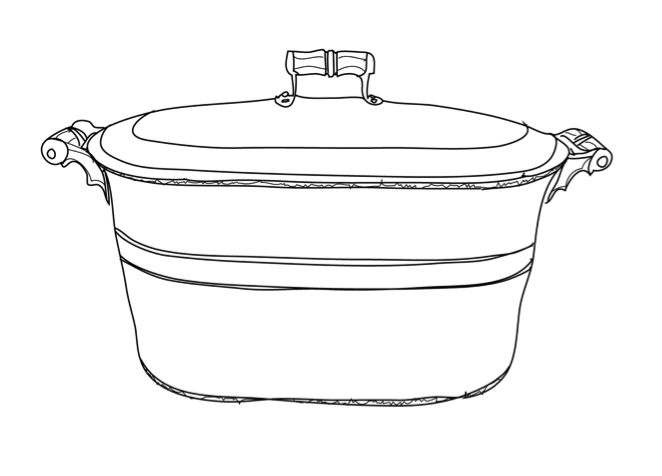
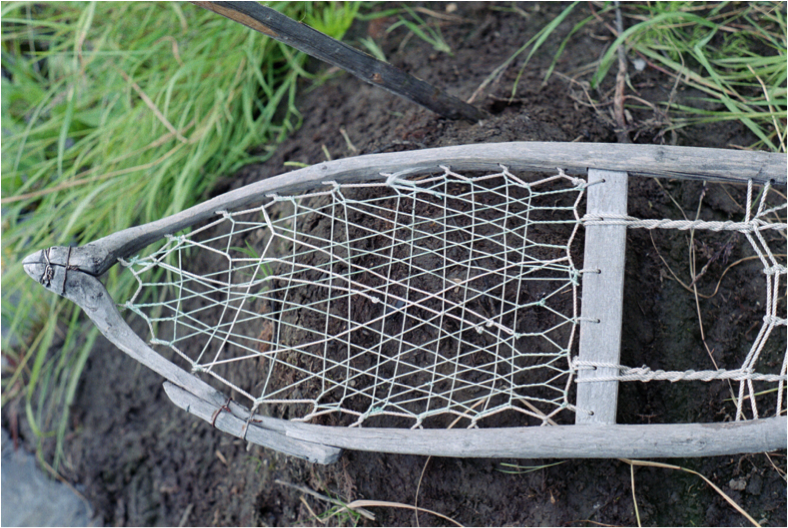
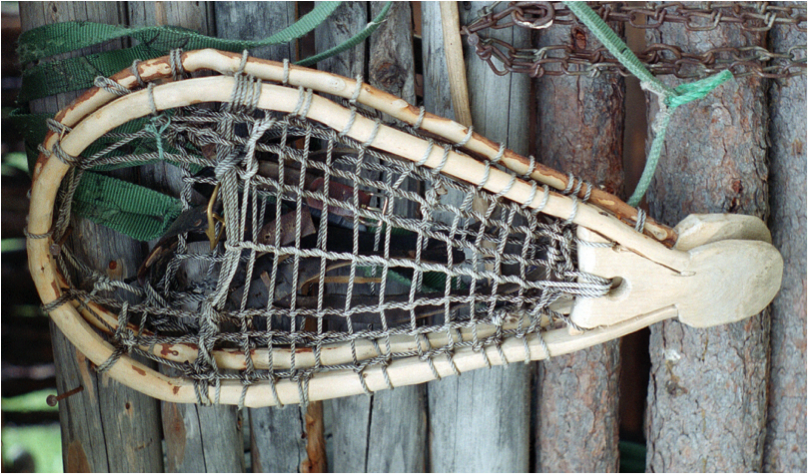
When you’re going through thick brush, a narrower snowshoe can be more maneuverable. I also like a pointed tip at the front of the shoe. It can navigate through brush more easily than a rounded front. Instead of overlapping the two sides to make a typical rounded snowshoe front, I tie the front ends of the rails into notches in a shaped piece of wood at the front end of the frame. That piece has a rounded bottom that curves up a bit, adding a little turn-up to the front of the snowshoe. That is the simplest way to make the front of a snowshoe.
Heavy-duty snowshoe tips, designed for going through brush, made by Oliver. Note the rails tied into notches in the wood on front end. Image from the Dammann collection
Roughly halfway back from the front I put in a crosspiece 3/8 inch thick, using a mortise and tenon joint. You put in another crosspiece about 16 inches farther back, not quite as long as the front one. Those outline the toe hole.
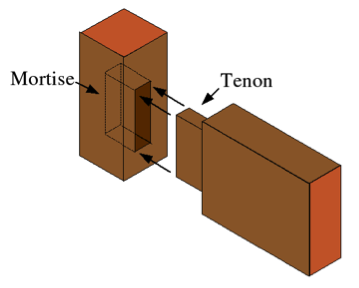
Example of mortise (hole) and tenon (tongue) joint. (Image credit 36)
Some people will make their snowshoes a little wider and put a third crosspiece behind the heel crosspiece to spread the tail and to make a little extra area. I don’t do that if the rails are thick back there. With thick rails, I can put the lacing in and it doesn’t need the spreader.
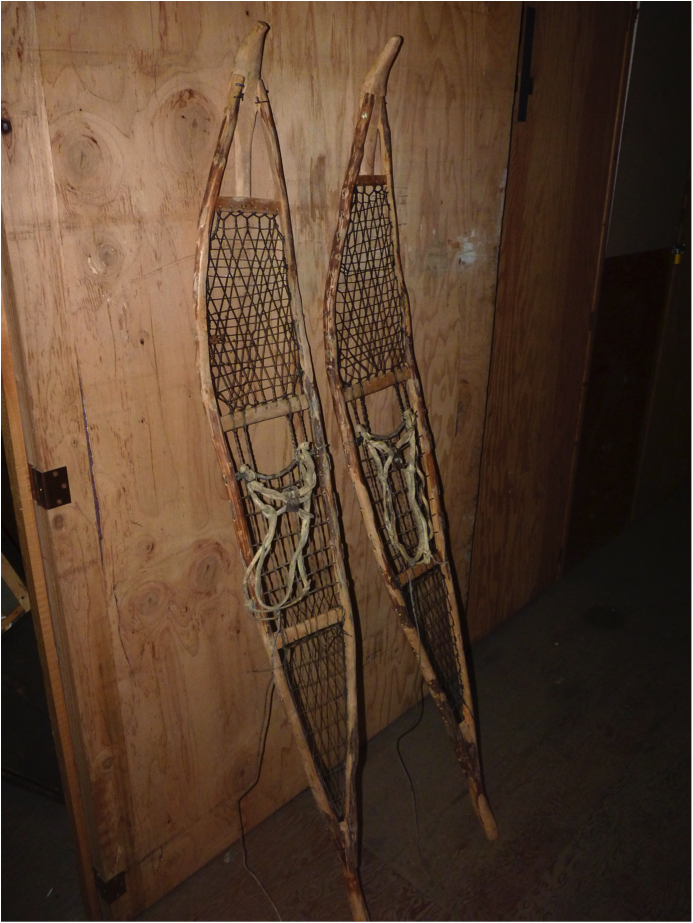
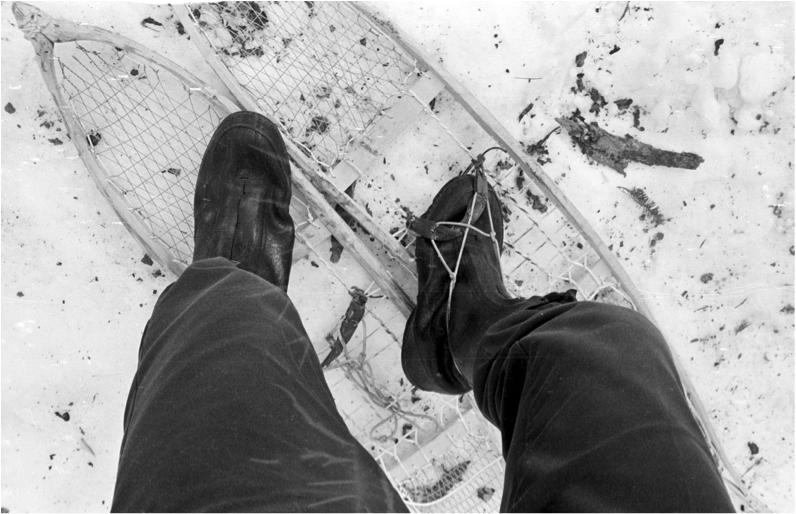
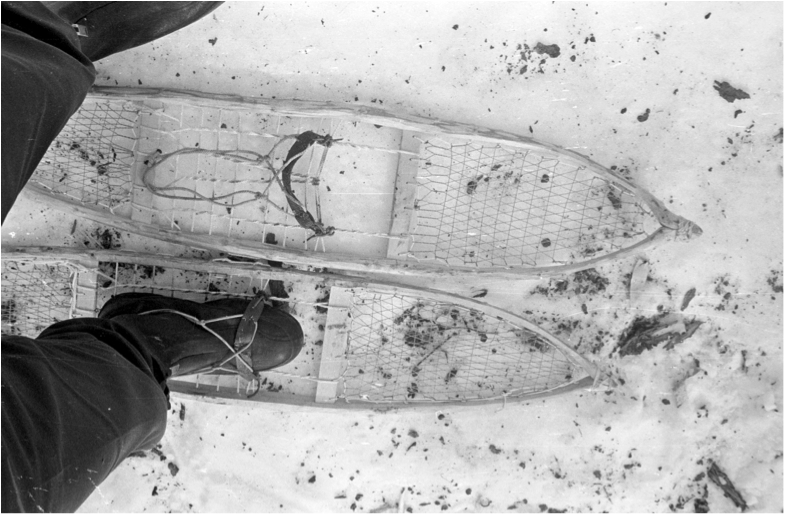
Snowshoes.
Image from the Dammann collection
For the tail of the snowshoe, I find a curved piece of wood, a stick somewhat comparable to the thickness of the rail saplings. I bring the rails together against that and usually put a rivet or a small bolt of some kind through them to hold the back end together. That tailpiece will stick out 6 inches or more behind the end of the rails. It curves up, because otherwise it will dig in when you back up.
Just ahead of the front crosspiece, your rails should start to curve up gradually—but no abrupt curves. That way, when the lacing is tight, it will form a slant so that when you move your foot ahead, the snow will fall off the webbing. If it were flat and you were to go through deep snow, the snow would accumulate on top of your snowshoe.
Webbing
I use two different types of webbing. One is nylon net twine. You can get that in black, white, or green. For ordinary use I always get the black. It’s tarred but not sticky, and it lasts longer out in the sunlight than other colors.
I usually use No. 9 or No. 6 net twine for the mesh in the front and back sections of the shoe’s webbing. The 6 is a fine twine. For the webbing under the foot, I use No. 12. It’s real strong stuff.
The other webbing material I used to use was babiche—rawhide lacing I made from caribou skin. I like that for the front and back sections, but for the underfoot section I prefer a heavier, stronger material made from either a moose hide or an ugruk skin.
One nice thing about nylon is that you don’t have to be so particular about protecting your snowshoes. It’s also a lot better in the springtime because it doesn’t soak up water and get soft and baggy as babiche does.
I can imagine that for someone who grew up in town and didn’t have dexterity trained into his hands, working with babiche and rawhide thongs to make webbing might be somewhat of a problem. But for me, it was just a matter of common sense. I grew up fooling around with all kinds of handicrafts, so I was somewhat educated. I’d had a very wide variety of experiences with cutting things and making things. Later, when I had to deal with a new situation like lacing those northern hides, I’d already had the experience of making thongs out of the leather tongue of a shoe, so I didn’t find it so daunting.
Weaving patterns for webbing
The webbing or lacing makes it so the snowshoe won’t sink down into the snow. If you don’t have a pattern to show you how a traditional snowshoe is laced, there are books on the subject. The Alaska Trapper’s Association published a how-to book about building boats, fish wheels, and snowshoes. The author is an expert who writes about those particular skills. That would be a good place to start to learn about weaving webbing. [Dart, Joe. Alaskan’s How to Handbook (Alaska Trapper’s Association, 1981).
Oliver’s pattern for weaving the top portion of the snowshoe. Image by Devta Khalsa
When I’m lacing the foot part of the snowshoe, I have a toe cord consisting of three or four strands at the back of the toe hole, close together under the ball of the foot. The next strand will be back 1-1/4 inches from there, moving towards the heel. You don’t want the strands too close together because the snow will pack under your foot. Under where the heel will be, I make a few side-to-side passes that are a little closer together, maybe 1 inch apart.
Center section, showing the toe hole lacing.
Image by Curt Madison
That cord then switches direction by going through or around the crosspiece by the heel. From there I go underneath the cross cords all the way up and around the front crosspiece; then pull it tight. Then I start back, wrapping the cord around itself. I make a pass around the toe cord and continue wrapping the cord all the way to the back crosspiece.
This twisty wrapping pulls the bottom cord up against the cross cords making it very snug. If your snowshoe is fairly narrow, this will be the side of the toe hole opening.
When I go around the crosspiece in back, I make a half hitch [a type of simple overhand knot] and go ahead at an angle. When I come to the toe cord, I take a wrap or two around it, and come back from there, using the same twisty wrap as outlined above. I continue in this way until I’ve filled in the entire center section of the snowshoe.
The Inupiat don’t leave much of a toe hole in their snowshoes—they depend on flexing their toes. Their harnesses also fasten near the end of their toes, so when they pick up their foot that slings the snowshoe ahead.
I prefer to have a toe hole big enough that the toe cord goes under the ball of my foot. My toes can tip down into the hole as I walk. My foot is held in place by the binding.
Bindings
The binding consists of a toe strap and a harness that goes around the back of the foot.
To make the toe strap, I fasten a strip of leather or webbing 1 inch wide to the main toe cord at the back of the toe hole. That strip needs to be long enough to accommodate the height of your foot as wells as the width of the toe hold opening. There is a loop sewn into each end of the strip.
To make the adjustable harness put your boot snugly under the toe strap, center a rope or leather thong around the back of your heel, and run the ends of the thong forward through the loops at the ends of the toe strap.
Then pass one end of the thong across the instep of the foot and take a couple of half hitches around the cord that is coming from the heel on the far side. Repeat with the other end. It doesn’t hurt anything if this leaves you with a few inches of cord hanging off to the side. If you have a lot of cord left over, you can tie both ends together behind the heel. Adjust the harness so that your heel can easily rise and fall with each step of the snowshoe; your toes should be able to dip through the toe hole and rise again, remaining secure under the strap that crosses the top of the foot. Both the harness and the strap should be snug but not uncomfortably tight.
Once I’ve adjusted the harness I don’t have to tie it again, unless I want to wear different footgear.
How to enter Oliver’s snowshoe harness
To put the snowshoe on, I pick up the harness and then put my toe through sideways. I nestle my heel down in there so that the harness comes behind my heel. Then I pick my heel up high enough that I can pivot my toe under the toe strap.
Images by Curt Madison

1) Slip your toe through the main loop
2) Lift your heel and pivot your toe under the toe strap
3) Slide toe ahead and lower your heel.
This can all be done with your mittens on.
Quite often I fasten a string a couple of feet long to the back of the harness so that I can reach down and pull the thong up while I put my toe through. It’s a lot easier to put your foot through when you’re standing than when you’re crouched. You don’t need to have a string to lift the heel strap, however. You can nudge it up with the tip of your toe and scoot your foot through.
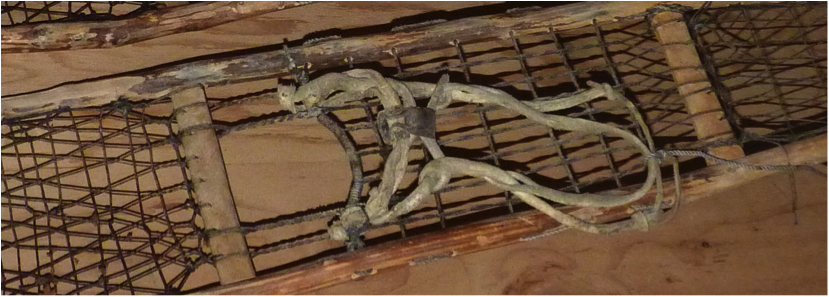
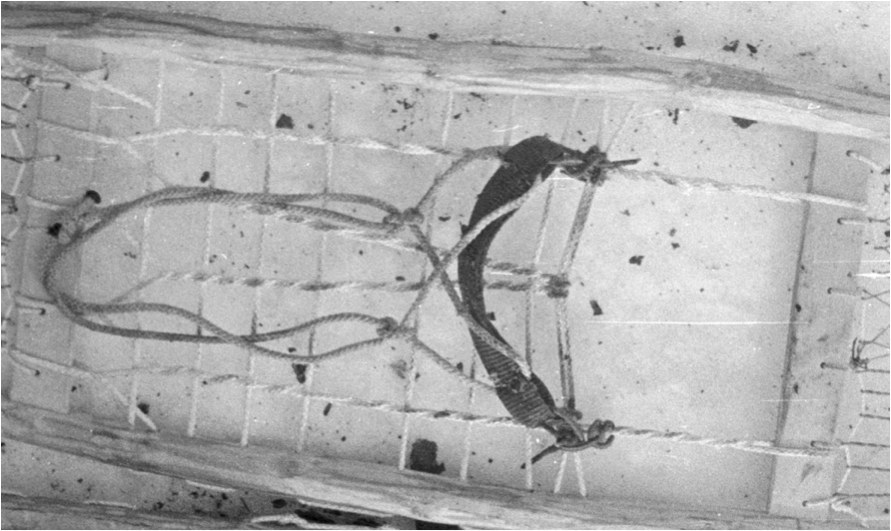
Rawhide bindings and lift cord.
Image from the Dammann collection
If you make your harness out of fairly thick rawhide cord, make the ends of the cord a little narrower. These narrower, more flexible ends are easier to tie.
If you use twine rather than rawhide for your harness, you won’t have as much trouble keeping things adjusted when things get wet in the springtime.
All of this is to give people a rough idea, but there are many ways to approach the bindings. The drawing below offers another approach to the harness, following Henri Vaillancourt’s method.
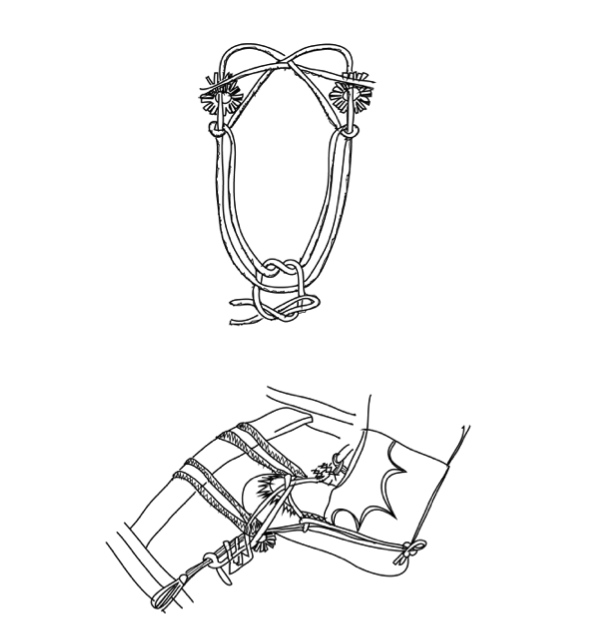
A snowshoe harness and the harness in use. The entire harness is made from a single piece of rawhide.
Drawings by Brady Wedman after Henri Vaillaincourt
Some of the old-timers would just take a pair of worn-out shoepacks [a warm, waterproof laced boot] and fasten them down to the snowshoe in some way. Then, when they wanted to snowshoe, they’d just put their feet into the boots.
Instead of that, you could cut a band from an old inner tube from an old motorcycle tire.
You put the band around your ankle, put your toe through the toe strap, and slip the rubber band over the toe strap and then down under your toe.
To get into this kind of harness, you have to kneel down and use your hands. That’s why I prefer the siwashharness with the string on the back. It’s easier to use. [Siwash is Chinook Jargon for a native of the northern Pacific coast, from Canadian French sauvage ‘wild’.]
You can also make a kind of sandal out of commercial leather with a strap that goes around the heel.
Ordinarily there isn’t a left snowshoe or a right one, but invariably one will be a little more inclined one way or the other. I don’t plan on that, but sometimes it works out better to use one snowshoe on a particular side.
Ski Poles
More often than not, I use two ski poles when I’m snowshoeing, mostly for balance. I like to have poles maybe shoulder-high, say 5 feet.
When the snow is deep and there is brush underneath, your snowshoes might carry right across, but there can be a vacuum under the brush. You’ll be going along and all of a sudden one of your snowshoes will sink, throwing you off balance. You need to support yourself or catch yourself on that side. Then, a little ways farther, the other one goes down. Sometimes both go down. Poles come in useful.
Bearpaw Snowshoes
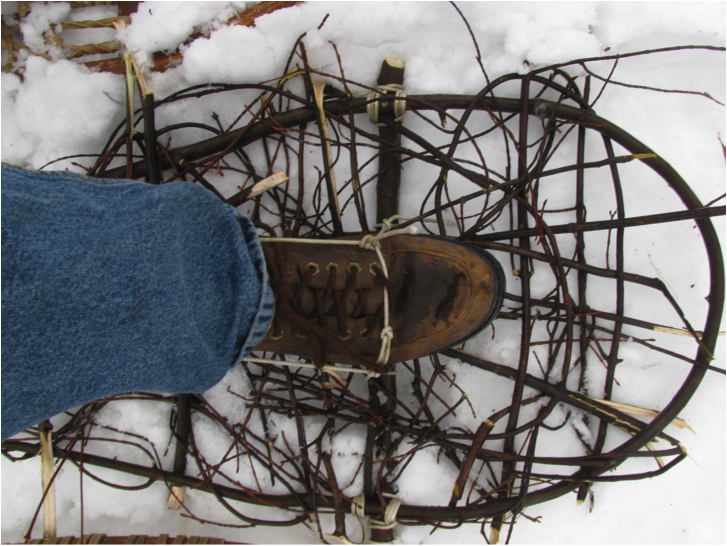
Ordinarily I would use my long snowshoes for breaking trails, but I also have a pair of smaller bearpaw snowshoes.
Bearpaw snowshoes are rounded on both ends and shorter than trail snowshoes. I make mine quite short, 16 inches long by 12 inches wide, because I use them on trails that I’ve made the day before. By that time the snow has more or less set up, though it’s by no means firm enough to walk on without a snowshoe.
When you walk, count on lifting your foot up and swinging it far ahead so that one track overlaps the other track.
Oliver’s handmade bearpaw snowshoes.
Image by Devta Khalsa
To make bearpaws, I find a flexible sapling. Birch is best. In this case, I’ll cut the tree rather than bending it living. I peel it and trim the butt end to a girth similar to the rest of the sapling. Then I bend it all the way around to bring it back down to the tail of the snowshoe.
I make the heel of a bearpaw similar to the heel of a big snowshoe, but it’s extra wide. As usual, it has an upward curve on it so I can back up. That tailpiece is notched out on each side and is maybe 3 inches wide, kind of a duckbill shape, and it flares out to a much greater angle where the rails come back around.
When you’re bending wood, what happens is that the grain on the outside of the bend doesn’t necessarily stretch a whole lot, but there are layers of soft summer wood in there that get compressed and bend. Of course the wood must be thawed out if you are making the snowshoes in winter. It helps to soak the sapling a bit with a towel, or in a big pan on top of the stove to increase the flexibility before making the bend. Also you don’t just depend on bending to squeeze the summer wood—you help it along by striking it with your hammer. Sometimes I’ll drape the wood around the horn of my anvil and pound it, flexing the wood as I go along. That’s a big help because otherwise, you’re apt to have quite a few sticks that break, and then you have to start over.
I don’t ordinarily have crosspieces on bearpaws. I just put a couple of extra strands at the back of the toe hole to leave room for my foot. The back part is webbed in, but I just weave it back and forth instead of using the typical crisscrossed type of webbing.
Elmer Kreps has a book that explains how to make bearpaw snowshoes very well and gives step-by-step instructions. Here I am talking about an adaptation to the usual way. [E.H. Kreps. Camp and Trail Methods (Columbus: A.R. Harding, undated), 157-175.]
Improvised snowshoes
If you need to improvise snowshoes in an emergency, you can tie maybe five or six long sticks together at both ends. They don’t have to be too stiff, since you have a number of them. Back in the middle you force them to spread them out by tying them to a crosspiece or two. You’ll need another for a heel crosspiece to keep the sticks far enough apart.
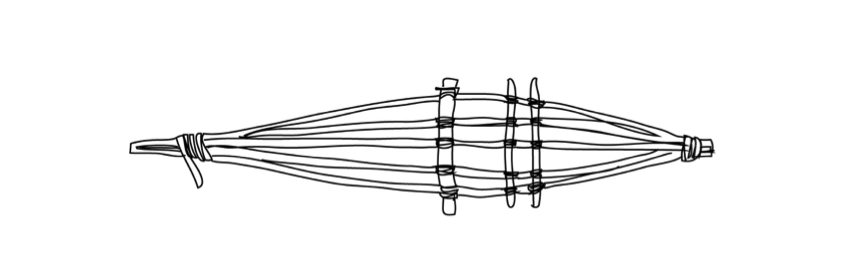
Stick snowshoe such as Oliver describes.
Drawing by Brady Wedman
The small ends of the sticks are the shoe’s “front.” You tie sturdy twine from the front juncture to the heel crosspiece to spring the front end up. There’s no place for a toe hole, so your foot is going to have to flex.
You are making these for immediate use, so you can make them out of green wood. They will be heavy, but if you peel the sticks, they will dry surprisingly fast and lose weight in a few days.
In a real emergency, anything that makes your foot bigger would be a help, even a spruce bough. I have never had occasion to need to make emergency snowshoes.
Another idea for emergency snowshoes. (Image credit 37)
From Margaret’ chapter 12:
Eventually the two homesteads were set enough to rights that Oliver and the Hannans could resume their normal lives, but the grizzly was never far from their thoughts from then on, nor was that the last they saw of the animal.
However, by the next April, 1996, Oliver’s thoughts were less on marauding wildlife and more on designing a new type of snowshoe.
The snow in this area is of a different quality from over at Ambler, maybe not so much wind or laid down in bigger flakes or something. We never get the real hard solid crusts in spring. Can almost walk on it, but sink in a bit and break thru [sic] often. Thud: something my system don’t take without some strong complaint. So I started making a pair of beavertail snowshoes….In case you’ve never heard of beavertail snowshoes, I haven’t either, but figured there should be some so made them. They are smaller than bearpaws and different shape[with] upturned tail so I can back up.[April 23, 1996]
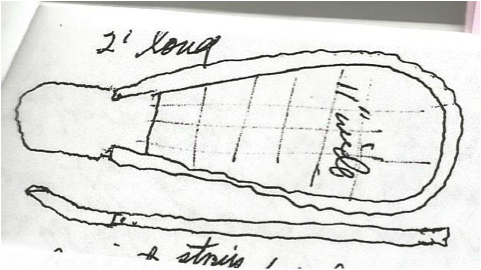
Oliver’s sketch of beavertail snowshoe
When the weather cooled off and solidified the snow the next day, Oliver tested his new snowshoes and found them acceptable. He thought he would probably get a lot of use out of them that spring, and had modified the harness so he could just slip into them with his rubber boots and save himself from having to twist around to buckle heel straps.