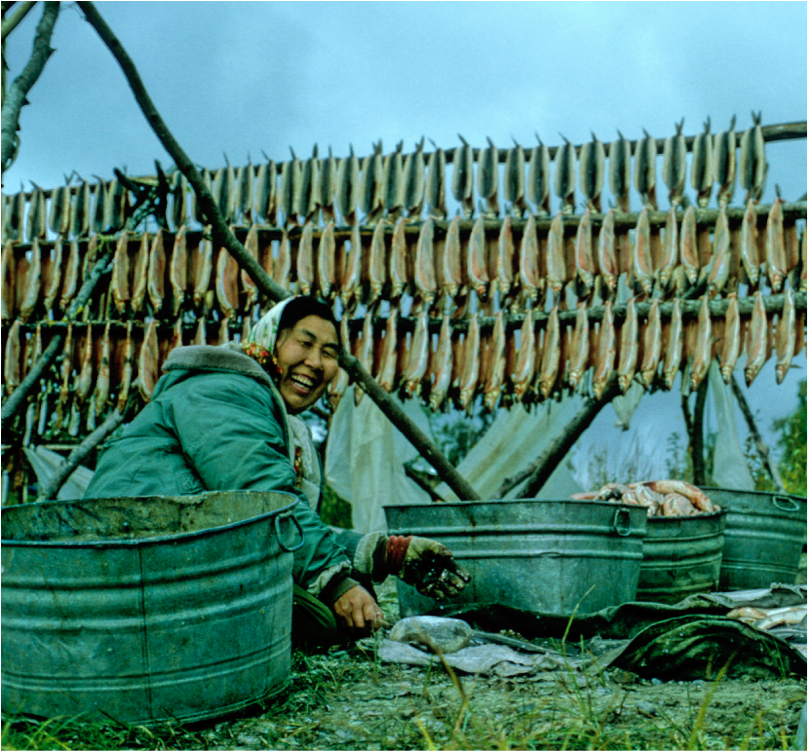
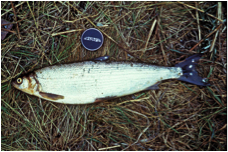
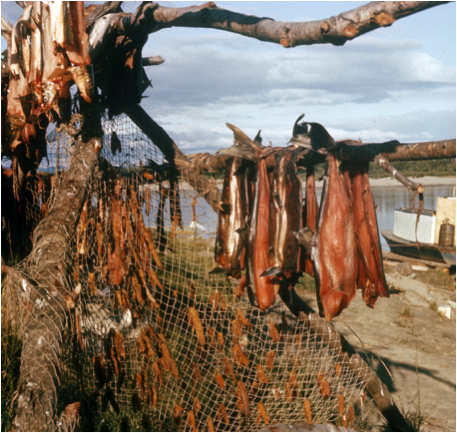
Minnie Gray drying fish to preserve food for winter. Image by Sasha Wik
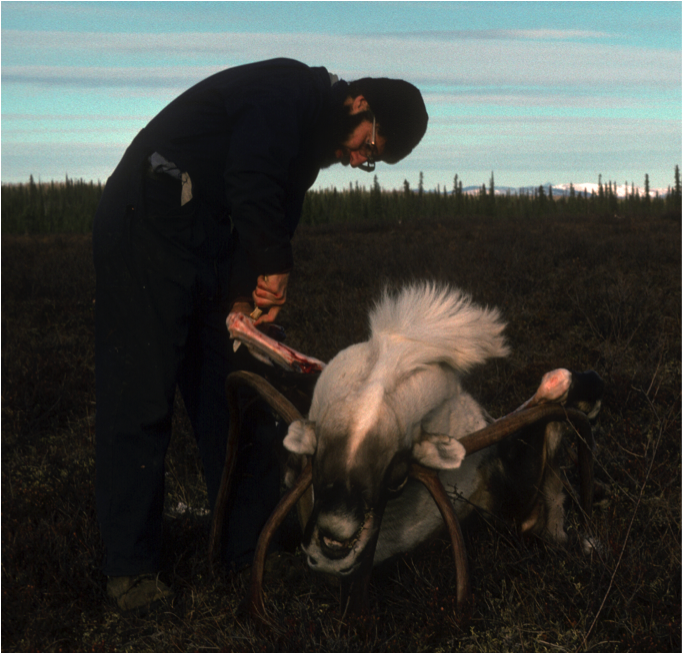
HOW TO BUTCHER A CARIBOU
Once a hunt is successful, the animals must be gutted immediately to prevent spoilage. I open each of them and dump the guts right there where they lie.
If I get several animals and I don’t have a lot of time, I might skin one or two, but the rest of the skinning waits until I get them home. Skinning takes a fair amount of time for each animal when one intends to use the valuable hides. Leaving the skin on the carcasses while transporting them home keeps the meat clean. Late in the fall when the caribou carcasses will freeze quickly, a whole animal with its skin on stores better than a skinned, cut up animal. A whole animal will keep for several months in a cache without becoming dried out.
There are some advantages to skinning the animals in the field. The skin comes off easily and quickly when the animal is freshly killed. If skinned the animal can be cut into chunks that are more easily handled. If I’m hunting back some ways from the river and must carry the caribou to the boat, smaller pieces are easier to carry than a whole caribou. The mess is left there in the field and there is less to take care of once I return home.
Gutting the animal
There are two positions to gut an animal, with it hanging, or with it lying on the ground. I seldom hang an animal to gut it, but on occasion I have.
If I do hang the animal to gut it, it’s easier to hang it by the head, rather than by the hind legs on a gamble stick [a short stick used to hang a carcass from its hind legs]. When you cut the guts loose, they fall out more easily and make less mess.

Don Williams gutting a caribou. Image from the collection of Joyce Denslow.
It’s easiest to work with an animal when it’s lying on the ground, belly up, a little on its side. I prefer to gut it in that position.
First I slit the skin from the lower edge of the brisket down to between the hind legs, and skin it back a bit on the sides. [We considered the brisket to be the portion of meat from the lower front and side of the ribcage.]
To slit the belly skin I insert the tip of a small very sharp knife through the skin being careful to not cut through the abdominal casing. Once the tip of the knife is through the skin I insert the first two fingers of the hand not holding the knife, inside the skin to guide the knife. The knife and my fingers then glide along cutting only the skin but not the abdominal casing which is being gently pushed down and protected by my two fingers. This makes skinning easier and prevents a lot of mess.
Sometimes, I’ll slit the belly down the both sides rather than down the middle. This gives me a larger piece of the belly skin for making mitten liners or babiche. babiche. [Thongs of rawhide or sinew used as cord, lacing, or webbing. See also Oliver’s essay, “Making Rawhide and Babiche.”]
The skin on the belly is thinner and the hair is shorter than on the back of the animal. The rest of the hide with its longer hair and thicker skin provides more warmth for making outer clothing or for using as a mattress pad.
I work the hide back a ways on each side of the slit by fisting it: pulling the hide with one hand, working my knuckles between hide and body, and prying the skin away from the body.
I’ve usually chosen a clean place to gut the animals such as the tundra or a pebbly beach. If not, I’ll spread a clean tarp out to keep the animals clean while I’m gutting them.
This abdominal pouch that I so carefully kept from puncturing while slitting the belly skin, swells up pretty quick once the animal dies. Now I’d cut a little hole in it to let the gas out.
Next, I cut the joints on both sides of the brisket and lay it open. Sometimes I just cut one side of the brisket loose and open it up, reach in, and score it along the opposite side so that it will fold back, and leave the meat hanging there.
The guts are all fastened together, so I reach inside to the animal’s throat, cut the windpipe and esophagus, and work the various parts free in a top-down manner. I may have to use my knife to loosen things up. When I get down to the bottom ribs, I cut the diaphragm loose from the bones on both sides. Then I remove the diaphragm, the liver, and the stomachs all in one connected piece.
When I get down to the large intestine and the pelvis, I reach down into the carcass and squeeze out the pellets in the end of the large intestine. They fall out the anus onto the ground. I don’t want a bunch of caribou leavings in there so it’s easier to get rid of them before removing the intestines. I pull the intestines up into the carcass, and cut them off all in one piece and roll them out onto the ground.
I salvage the liver, the kidneys, and the heart.
I save at least part of the small stomachs[see further discussion about the stomachs, below]. You can open it, dump the contents, and scrape it out a little bit. When you get home, you can wash it and cook it. It’s good to eat.
I also save the ichauraks. [Ichauraks or mesenteries are membranes stripped from the small intestines, relished and valued for their fat.].
There is a fair amount of blood pooled in the carcass. The Inupiaqs ate this as a blood pudding. I drain it out on the ground.
Once all of the guts are removed, I scrape any remaining mess out from the carcass with my hands, sometimes sloshing it with a bit of water, or if there is snow wiping handfuls of snow around inside the carcass to clean it.
I flip the caribou over onto its belly with the legs sprawled to either side, and leave it while I work on other things allowing any remaining blood to drain out.
Removing the skin
When I have a lot of animals to work on and depending on the conditions, I may skin some of the animals while in the field or I may skin them all back at home. I may leave the animals whole and with the skin on if it’s more convenient for hauling. Sometimes I can get two whole carcasses in the sled, side by side, by offsetting them.
If I’m not able to take all of the animals home immediately I turn them over on some brush with the belly down so the carcass can drain. That way they won’t freeze down to the ground, and snow won’t blow into it too much.
When skinning, I generally start by skinning the legs and cutting the leg skins off close to the carcass so that they are long enough for making mukluks. When I’m rushed I cut the legs off and skin them later at home.
Dan Denslow carefully skins the legs of the caribou, the best part of the hide to use for mukluks. The curve of the knee is used for the ankle of the mukluk.
Image from the collection of Joyce Denslow.
Then I continue skinning the whole animal, from the belly area where I had slit it earlier and working on around. I work the hide back bit by bit by pulling the hide with one hand, working my knuckles between hide and body, and prying the skin away from the body with my fist.
Ordinarily, if it’s a young bull or a cow, I can pull the hide off easily.
If it’s a big bull or an old animal, it can be hard to pull the skin off. Especially near the hind legs the hide is tough and hangs on. Then I may have to use a knife a bit and work patiently. Sometimes I use the back of a hatchet to get the skin free. I hold the hide, pull it out, and beat on it a little bit with the back of the hatchet to make it come loose.
I cut a ring around the head behind the ears and pull the entire hide off in one large piece, or in two pieces if the belly has been cut on each side into a separate piece. I lay the hide out flat until I’m ready to fold it for taking home to continue the drying there.
I butchered a goat one time. I bought the goat from Keith[Keith Jones, a former area resident]. I wanted the meat, and a neighbor of his wanted the skin to make a drum, so I was fisting it off all the way and being very careful not to score the hide.
This was difficult and slow in some places, and finally the other guy who wanted the drum got impatient. He asked why I didn’t just take a knife and cut it loose. I told him that a goat hide is thin, and could easily be ripped. A little slip of the knife could have really damaged it, or left its thickness less than uniform, so I fisted the whole thing off.
Later, after the drum-maker had made the drum, he mentioned how the skin was so nice to work with because there were no thin spots on it.
Breaking down the carcass
After gutting and skinning the animal, I begin breaking down the carcass.
I spread the front legs and cut them with the shoulders off the rest of the carcass. They cut loose easily. Then I cut the hind legs and pelvis free all in one piece. That’s not such a big piece that I can’t take it into the house to work on it back at home.
Then I turn the remaining carcass over so it’s lying belly down, cut along the spine, and take the backstraps [the meat along the spine] along with the back sinew. I save that sinew, but I don’t usually take it off—it’s easy enough to separate it once I get home.
The backstraps lie along either side of the top of the spine and are known commercially as boneless loin. The shorter tenderloins lie along either side of the underside of the lower spine, near the pelvis.
Quite often the tongue and the backstraps are the first things we eat. Caribou tongue is a rich and tender treat. It tastes much better than a beef tongue.
I score the inside along the ribs where they fasten to the vertebrae allowing me to push the ribs apart to break them loose. I may need to wiggle my knife along the vertebrae to cut each rib free while I’m pushing the ribs outward. I don’t like to hack the ribs off with an axe or a heavy knife as some do. That leaves sharp little bones. I’d rather disconnect each rib as I come to it.
There’s a good joint right behind the head, where it joins the neck. If you find the right place, it’s easy to cut the head free at that joint. The same is true where the last vertebra joins the pelvis, especially if you cut from the inside. However, the vertebrae in between have quite a few obstructions making them harder to separate. With patience I can do it, but otherwise I cut the back bone in sections with a hack saw.
Organ meats
The “bible” [the omasum portion of the stomachs] was the part that I usually saved and cleaned up. I liked it the best to eat.
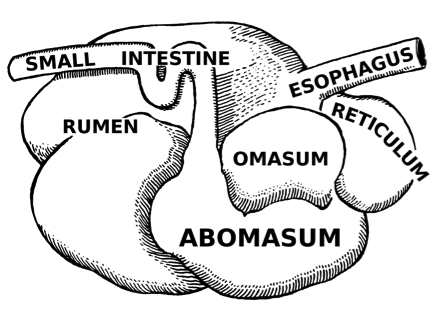
The omasum, also known as the bible, the fardel, the manyplies and the psalterium, is the third compartment of the stomach in ruminants. (Image credit 88)
The bible is hard to clean, but after I learned to eat the stomach contents, I never worried about cleaning it too much. The bible and the contents are quite a treat for the Inupiaq people. They save the big paunch with the contents still in it. Sometimes they put some liver or little pieces of meat inside, sew it back up, stick it under the bed, and leave it to ferment for a few days. They don’t want it to get too warm, but they don’t want it frozen either, or else it won’t ferment.
I had something of a reputation for trying to eat anything they could eat, so whenever they had some of that, they usually got it out and offered it to me. They just got it out from underneath the bed. I have to admit that it had a strong smell, and a strong taste too, but eventually I learned to like it, and even fermented some myself, the same way they did.
I’d fish some of the contents out, put cut-up heart and liver back in there, sew it up, and lay it on a piece of hide under the bed or some other place where it would stay cool but not frozen.
My family did not like this food. Ricky [Oliver’s elder son] might have eaten it with me; I don’t remember. I know that Rene [Oliver’s wife, Lorene Cameron (pronounced “Reenie”)] didn’t like the smell of it and didn’t like me to have it in the house, so I didn’t make this food often.
Most white people would not appreciate that smell, at least I didn’t. I don’t like the smell of the gut contents of a caribou when I’m working on it, either, and both the smell and the taste change as it ferments. But after you get used to it, it’s not bad.
There are globs of fat in and around the lower intestines. Fat is valuable. I save the intestine fat, though it’s quite a job to pick it off. [You can also make liver sausage out of the fresh lowermost intestine by turning it inside out and tucking one end inside itself and working it all the way through. That puts the dirty side out, where it can be washed really well. Once it is clean, snip off the very ends, where there may be a little contamination from the bowel. That gives a nice clean casing with all those gobs of fat inside. You can stuff the casing with mashed up cooked liver and onions. But this sometimes takes more time than most people have during the busy fall season.]
I remember one time splitting that intestine, and just spreading it out and drying the whole thing. My wife wasn’t interested in doing that sort of thing. The farther she could stay away from the stinky guts, the happier she was.
Kidneys are not one of my favorite parts of the animal, but we did eat them. We split them and boiled them. Nobody though they tasted good, but we ate them anyway. The only part of an animal that we threw away was the lungs. Quite often they went on the garden, and sometimes I’d cut them up in little pieces and cook them up with the dog feed. When I was a kid, my family raised our own beef and hogs, and of course we didn’t waste any of it. I don’t know if I ever had any beef bought from the market when I was growing up.
I used to like the brain. But nowadays, with all this scare about Mad Cow Disease, I’d probably be a little leery of eating it.
I boiled the brain to prepare it. I didn’t make a practice of making a soup out of the brain; I don’t have much of a stomach for soup—I want something solid to eat. But if I have broth left from boiling meat, I do like to drink it.
If I were planning on tanning my caribou skins, I’d take the brains out of the skull, spread them on a piece of cloth, and dry them. When I got ready to use them [brains can be used in the tanning process], I put the cloth with the dried brains into a kettle and boiled it until all of the fat came loose. It’s a type of fat that mixes into the water pretty well, almost like fish oil. I used that in my soak water to soak the caribou skin before tanning.
We used to cook caribou heads until the meat was more or less falling off. There is a lot of tissue on a head. When we boiled the meat, the broth would set up as it cooled, and little pieces of meat could be cut off the head. That’s what we called “head cheese.” It was one of my family’s favorite dishes. It can be eaten hot or cold, and it melts when you heat it.
To harvest the sinew [in this case, the fibrous tissue that runs along both sides of the spine of the animal], the first thing you do is cut the thin inner skin under the hide that covers the sinew tissue. The strips of sinew on both sides of the backbone are fastened together right where the spine attaches to the pelvis. You work your knife in to pry the sinew loose there.
When you get that part up a little bit, slit a short hole lengthwise to make a handle for your finger to grip it. Cut the sinew loose from the pelvis and start pulling it up, scraping the meat under it loose from the sinew with the edge of your knife.
It’s easier if you’ve taken the shoulders off the animal already and have been careful not to cut the end of the sinew when doing that. But even if the shoulders are still in place, you can usually pull the tips of the sinew out. Scrape the sinew as clean as you can, then wad it up, put it in your pack moist, and take it home.
At home, thaw the sinew and unroll it. Sometimes I wash it a little bit. It’s got some very sticky juices in it which will allow you to stick it to the side of a building or onto a cache leg to dry; it will stay there by itself. After the sinew is dry, peel it off from wherever you stuck it, and put it away in a dry place.
When you get ready to use the sinew, simply peel little fibers off the sides, and use each piece like thread. The tip at the shoulder end will be so thin that you can thread it through the small eye in a needle. The fiber gets bigger toward the pelvis end.
Sinew is good thread for moccasins or mukluks. If your moccasins get wet, the sinew swells up and seals the stitch hole. Ordinary fabric thread doesn’t do that.
Peeling sinew threads was like knitting for the Inupiaq women. They would be pulling the sinew apart and laying strands back together, twisting two or three of them together, depending on what purpose they planned for it.
They twist one side and hold it, twist the other side, and roll both sides together as far as they go, and do it again. Sometimes they also wet the sinew strands with their lips and roll them on the top of their thighs, on their cheek or on their arm.
Then they coil it up and put it into their sewing basket until they need it. Sometimes they lay quite a few of those strands together, side by side, and wrap a little sinew around the whole bundle. That way they have enough to sinew to sew for a whole evening without having to stop to make more. When they wanted a strand, they just pull one out from the bundle. [This was in the days when they still used to make mukluks. Things really began changing with Lyndon Johnson’s Great Society programs in the 1960s, and federal money began flowing into the villages. Modern, commercially-made products became more available. That’s when even the Inupiaqs started wearing shoepacks with felt liners instead of their traditional skin footwear.]
Bones, antlers, and hooves
My family almost always saved the caribou bones even after we’d taken out the marrow. The bones were useful for several purposes.
To get more nutrition out of the bones, we’d fill a five-gallon can full of smashed bones. We’d boil it, and fat would come out. After the water cooled, the hard fat would be sitting on top of the water. We liked that fat—it was especially tasty. We used it the same way as any other fat, usually for frying.
The native people in the past used the thicker bones to make arrow heads and projectile points of one kind or another, but while I was living there, it was no longer a part of the local culture.
I’d sometimes cut bones to make useful objects. Once the marrow is out, the bones are mostly hollow, so it was pretty easy to make little bowls or storage containers. That’s what I did with bigger bones.
Ordinarily I saved both antlers and hooves. I used antlers to make handles for files, knives, and ulus, and also for making net sinkers.
To make antler net-sinkers, I’d cut pieces 6 to 10 inches long, depending on the net and the antler. I’d dig out the porous, web-shaped material inside the antler. With the curved side up, I’d drill holes into the ends of the antler. Usually I’d just put a piece of cloth through that hole and tie the antler directly to the sinker line. If you make the antlers long enough and cut the ends off at an angle, they don’t tangle in the bet too badly.
Then I’d melt battery lead and pour it into the end of some of the bigger antlers to make them heavier. About every third or fourth sinker would have some lead in it. That way I didn’t have to fool around tying a rock on every so often. [Lead line is the modern alternative for antler net sinkers. A lead line is a rope that has weights embedded in it and is used to hold the bottom of a fish net down. Antlers are an older, traditional approach that can be made by hand.].
Hooves are worth saving . You can make a kind of neatsfoot oil that’s real handy out of the hooves. [Neatsfoot oil is a yellow oil rendered and purified from the shin bones and feet of cattle. Among other things, neatsfoot oil is used as a conditioning, softening, and preservative agent for leather.] You can harvest this oil by boiling the hooves.
I have also made snow goggles out of the black “fingernail” portion of the hooves. Once you get that portion cut loose around the top of the hoof, you can work a knife around the edge of it, and it’s not hard to get off. You can flatten it out if you boil it a bit first. Then you put it between a couple of boards clamped together to flatten it and dry it completely, after which you can cut slits in it for your eyes.
Keeping sanitary while butchering
Betadine is an antiseptic that’s used in hospitals. If I was at home and dressing small game or cutting meat, I liked to prepare a basin of water with a bit of Betadine added. Once I’d finished I could wash my hands and knives right away in that sterilizing water.
There is also a Betadine scrub that is thicker and more concentrated. That was good to carry on the sled or in my pack. If I happened to cut or scratch myself anytime I was butchering, I’d rub that scrub on my hands to prevent an infection.
Moss was my preference for wiping my hands and cleaning up my knife blade. It grew locally in many places and has antibiotic properties.
Cleaning your hands by wiping them on grass is not a good idea. Grasses can have sharp edges, and you can end up with little scratches on your hands that are magnets for infection during butchering.
* * *
The best thing about butchering is the delicious meals you’ll have all winter. But caribou does have hollow hairs that tend to break off. The Inupiaq have a saying: It’s a hungry, cold camp if there’s no caribou hair in your coffee and everything else!
CATCHING FISH
Catching fish is a necessary endeavor when living subsistence-style in Alaska. Fish provide a vital source of protein and nutrients for humans as well as dogs.
Blackfish
I’ve never used fish traps, but the Inupiaqs used traps to catch blackfish as they were moving up and down creeks in spring and fall. In earlier times, before people had good fiber for nets, they made fish traps out of willows.
When lake or pond water is low, blackfish burrow in the mud. [The Alaska blackfish is one of the few species of fish able to breathe air using a modified esophagus. As long as a blackfish can burrow in mud to prevent its skin from drying out, it can draw oxygen from the air through its esophagus until rain fills its pond and oxygenates its water, allowing it to breath with its gills again.]
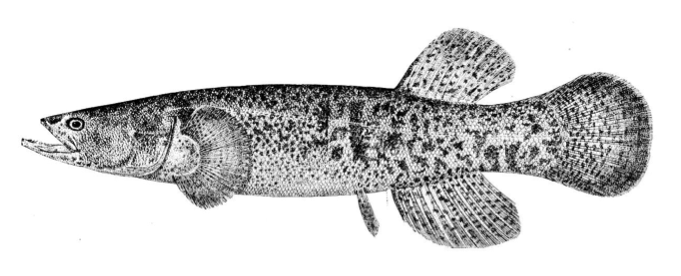
Alaska Blackfish, Dallia pectoralis. (Image credit 89)
In winter blackfish will stay under the ice, even in lakes that lose most of their oxygen during the season. They can tolerate very low concentrations of dissolved oxygen in the water. If the opportunity presents itself, the blackfish will rise to the surface to a hole in the ice and use their esophagus to draw oxygen from the air.
In some parts of Alaska, people make holes in the ice just to draw them up in this manner. The holes are a foot or so in diameter, and the traps are placed in such a way that blackfish can come up into them but can’t go back down.
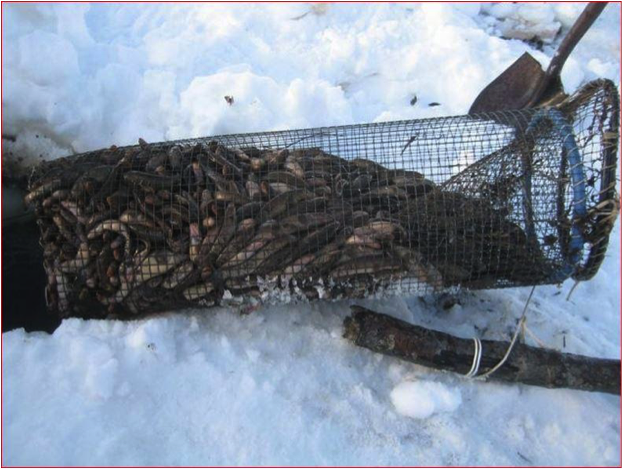
Blackfish trap freshly pulled from its hole in the ice. The fish enter the trap through the funnel end and can’t get back out. (Image credit 90)
A trap is one way to catch blackfish. Another way is to push a dip net down into a hole in the ice and catch whatever fish happen to be in there at that time.
In winter the muskrats make pushups near my lake homesite. [Pushups are winter food supplies stored over a hole in lake ice made by the muskrat.] Blackfish come up for oxygen in the holes the muskrats make. Sometimes foxes lie next to the holes, flipping fish out onto the ice to eat them.
I’ve also watched otters feeding on blackfish in places where there’s a grassy, muddy bottom. The otters eat while they’re floating out in the water, lying on their backs. Once they finish one fish, they’ll roll over, go back down to the lake bottom, and come back to the surface with another fish.
I’ve also watched otters diving off the broken ice for blackfish during spring break-up. Then they climb out on the ice to eat them, rather than floating on their backs.
I don’t eat blackfish. They are edible, and many people do eat them, but ordinarily I don’t take time with catching small fish.
Sheefish
The sheefish is called “God’s gift to the Inupiaqs.”
I’ve heard them say that. It ordinarily takes at least a 6-inch mesh to catch a sheefish, but I’ve had them get caught in a whitefish net. The bump next to the nose would get tangled in the mesh, and they couldn’t back out.
Oliver’s son Ricky with sheefish. Image by Lorene Cameron
A proper-sized net will let the fish get its head and gills through the mesh, but no farther. When the fish tries to back out, the mesh hooks under the flap that covers its gills, and it can’t escape. A whitefish net has a mesh that is a third the size of what you would want to use for sheefish.
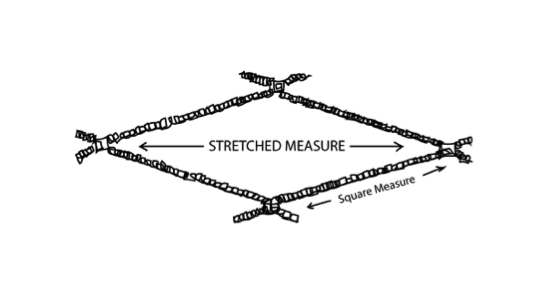
When speaking of net size, Oliver describes stretched measure, not the distance between adjacent knots, which is called square measure.
Drawing by Brady Wedman
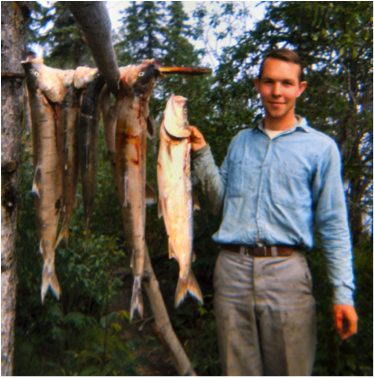
When sheefish begin to run, they school in eddies or backwaters and wait for a rain or more fresh water. When the water rises, they move up the river. We used to fish in pockets where the fish gathered with a rod and reel. Sometimes we’d catch a big one.
I have a picture of Dolly and Gordon Stalder, former schoolteachers in Ambler, holding a stick with a big sheefish hanging from it. The stick was at the level of Dolly’s chin and Gordon’s shoulders, and the fish’s tail was just touching the ground. That was a big fish for summertime.
One time, my friend and I drove his boat to a big eddy just above my place to set a salmon net. Another friend, Arthur Douglas, was checking his net nearby. We called to him, “Art! Bless this net. If I get fish, I’ll bring you one!”
When we checked the net the next day, there were four big, beautiful sheefish in it. We took one to Art and one to Maude Foxglove’s. Bessie Douglas happened to be visiting Maude. [Art, Maude, and Bessie were all local Inupiaqs. It is a tradition among them to share and barter what is caught, trapped, or hunted.]
Maude immediately put a piece of cardboard on the floor so that we could lay the fish down. Then she and Bessie got busy with their ulus. It was amazing how quickly they had the fish scaled and cut. Pieces of that large fish went to many other families that afternoon.
Maude was always appreciative of birds, fish, or anything anyone would bring to her.
Burbot (also known as mud shark or tittalliks)
There are several ways to catch burbot. We used to fish for them during and after freeze-up in the fall.
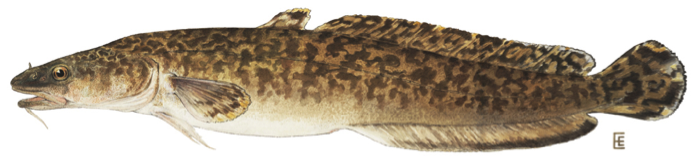
Burbot, Lota lota. (Image credit 91)
Burbot are bottom feeders. You can hang two, three, or four short little drop lines off a piece of strong 1/4 inch twine, each of them with a large hook. If there’s a little bit of current, you can tie a small piece of wood on the lower end of the line—not too big, just enough to catch the current and stretch the line downstream.
Shove that rig down through the water so that the tip of the pole is in the mud. Sometimes you have to wedge it in the hole to keep it down until the hole freezes. The next day just pull it out and take your fish off.
Use big hooks that have about a 1 or 1-1/4-inch gap between the barb and the shank. I used to make my own hooks out of wire that I could bend. Lightweight coat-hanger wire worked well.
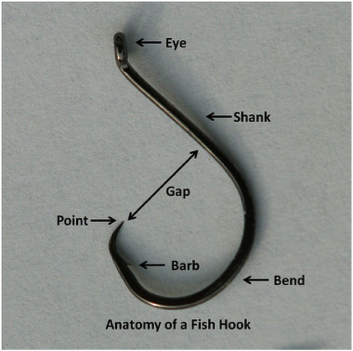
Parts of a fishhook. (Image credit 92)
To make a fish hook, take pliers and make an eye at one end of the wire, and then at the other end, bend the wire down and back up to form a hook that is a little deeper than it is wide. Bend in the tip of the hook a little to make a “V” for a barb, and then bend the sharp tip out a little.
For burbot bait you can use meat or other fish, whatever you happen to have. You put it on the hook’s shank in such a way that it completely covers the hook.
These fish have a big mouth. They will swallow the bait whole and the hook’s barb will catch.
Another way to catch these fish is by making a large hole in the ice and putting a pole across the current at 45-degrees. Put two to four droppers [hooks and lines] down from each pole. Each line has to be shorter than the one above so that they will all hang down pretty close to the bottom.
Some people go out at night, make a hole in the ice, sit on a caribou skin, and jig for the fish. [Jigging is a type of fishing using a lead sinker with a hook molded into it (called a jig). The jig moves the hook and bait through the water in a jerk, vertical motion. Jigging requires a person to feel for the strike and stay in contact with the lure.]
People fishing in this way need to tie a line on their jigging stick that is long enough to reach the bottom. They use a second stick that helps them to spool up the line to bring a fish to the surface once it is hooked.
When jigging with two sticks, you lift up with one stick when you feel the tug of a fish on the line. With the other hand, you sweep the second stick under the lifting line and raise it until it’s at about the same height as the line on the jigging stick, but 2 or even 3 feet apart. Then the line is dangling from the second stick.
Keeping the line tight, swing the jigging stick down and under the line and lift it back up to where it was in the first place. Now the line is going around both sticks and is dangling from the jigging stick again.

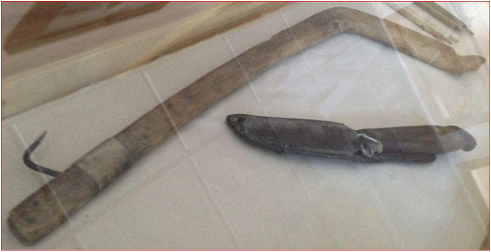
Using two sticks to jig for tomcod, Kotzebue.
Ambler people used the same system after dark for burbot.
Image by Lorene Cameron
Repeat this process until you’ve lifted the fish out of the water, always keeping the loops of line taut between the two sticks. This prevents you from ever getting your gloves wet.
I admit I’ve never tried fishing for burbot or tomcod in that way. I don’t have the patience for that process, but I did fish through the ice once in a while, mainly for pike.
Northern Pike

Northern Pike (Esox lucius) caught in the Ambler River, August 1966. Image by Pam or Ken Ross
I made a crude jigging stick out from an angle of wood that consisted of two arms at nearly 90 degrees. The shorter arm of the wood was about 8 inches, the longer length 18 inches. I drove a nail up through the end of the longer arm, and bent back the nail to act as a gaff hook.
Oliver’s jigging stick/gaff hook on display at the Cold Climate Housing Research Center, Univ. of Alaska, Fairbanks. Image by Dorene Cameron Schiro
The shorter arm would serve as the handle of the jigging stick. I cut a notch into it, 1 or 1-3/4 inches deep, from the side and perpendicular to the handle, down near the end away from the juncture with the other arm.
I made a slip knot in some fish line, tied it onto the tip of the longer arm just past the hook, and secured it by taking a half-hitch around the branch just below the hook. Then I wound the rest of the line longways from the tip of the long arm to the notch on the handle and back again.
I made the handle long enough that I could hold onto it between the base of the branch and the notch, and smoothed off the wood enough that I could spill the line easily when I was ready to begin fishing.
When I hooked a fish and the line was long, I’d reel it in by tipping the handle up just past vertical, so that the string was hanging between my hand and the notch. Then I’d tip the stick to the side, catch the line in the notch, and point the stick back down. With a little twist, I’d pick up the line in the fork at the shank of the nail, and tip the stick up again. I’d repeat these motions until I’d rewound the line and the fish was up on the surface of the water.
At that point I’d step on the line or hold it, use the nail at the end to gaff [spear] the fish, and haul it out onto the ice. Without the gaff, I would have often lost fish down my hole.
That under-ice jigging stick was my own original design. It saved a lot of tangle and mess, and I didn’t have to carry too many pieces of equipment.
I never owned a seine, but I have helped others use theirs.
To seine when the fish are coming upstream, go up the river to a suitable place.
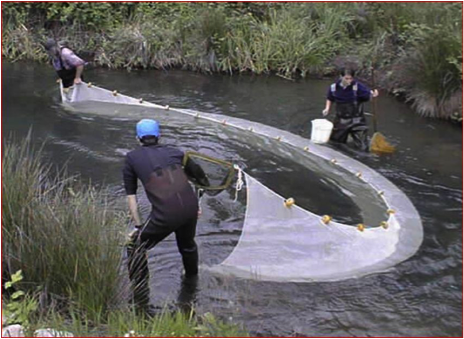
A seine net hangs vertically in the water, with its bottom edge held down by weights and its top edge buoyed by floats. Seine nets can be deployed from the shore as a beach seine, or from a boat. (Image credit 93)
One person rows out a boat to pull the end of the net halfway across the crick [creek]. Someone else stays on shore to handle the net rope on the inshore end.
The fellow in the boat rows downstream and pulls the net through the water faster than the water is carrying it, creating a belly in it, and then he brings his end back to shore. At that point both ends of the net are on shore, with a big belly full of fish still out in the water.
The next step is to take hold of the bottom line and pull it ashore, managing the top line so you keep the net bagged with the fish in it. When you get done, you’ve got a net full of fish on the beach, flopping around and all tangled up. You take them out, remove any sticks or debris, and go back out and do it all again.
If you get more fish than you can eat and you’re planning to use the remainder for dog feed, you can just put them in a pit in the ground. Line the bottom of the pit with willows and grass so the fish won’t freeze down. Cover the whole pit once it’s full of fish to keep the jays away.
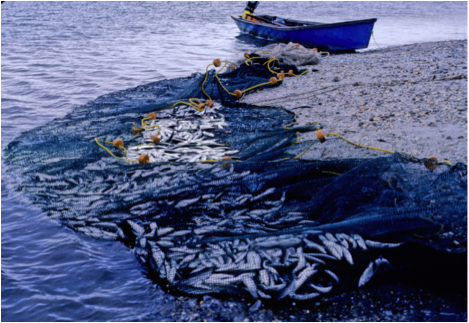
Seine with small whitefish [qallusraq, Least Cisco (Coregonus sardinella)] near Ambler, Alaska
Fish and image by Sasha Wik. Boat by Ole Wik
Qallusraq (also known as Least Cisco)
In the fall you can sometimes see the qallusraq [Least Cisco] migrating. They swim in a continuous band about 1 foot wide, right at the edge of the river, four or five abreast. They’ll get disturbed when you come near the river shore, but they quickly regroup back into their pattern.
Qallusraq, Least Cisco. (Image credit 94)
One time Ole counted them for a couple of minutes and estimated that there were 10,000 fish going by his place every hour. It wouldn’t have been that hard to make a trap and catch a lot of fish using a seine.
You could set the seine maybe 5 feet from shore, parallel to the beach, and wait until the disturbed fish started passing between the net and the shore again in their pattern. Then you could quietly pull the upstream end of the net to shore to form the trap. Once it was full, you could draw the lower end to shore to close the trap and pull it ashore.
Aged Fish
The Inupiaqs eat fish that have aged at cool temperatures for some time. They like it when the odor and the flavor is strong. They call it something that sounds like, “ool-yock.”
In the springtime they prefer fish frozen, but they’ll eat it when it’s thawing. If it hasn’t gotten much warmer than freezing, they don’t worry about spoilage. I’ve eaten quite a bit of this kind of aged fish, too, and never had any trouble.
Frozen aged sheefish taste a little like onions. I never ate salmon heads that have been buried and aged, but I’ve eaten fresh ones. [Buried and aged King salmon heads, also known as stinkheads, are a traditional food of the Yupik people of southwest Alaska.] People have gotten sick after eating stinkheads.
[Alaska has suffered an increase in cases of botulism since 1985. Traditionally, Inupiaqs allowed whole fish, fish heads, walrus, sea lion and whale flippers, beaver tails, seal oil, and birds to ferment in a grass-lined hole before being consumed. However, in the 1980s, people began using plastic containers rather than the grass-lined hole to store the fermenting meat. The risk of botulism is exacerbated when a plastic container is used, as the botulinum bacteria thrive in the anaerobic conditions created by the air-tight plastic.]
HOW TO DRY MEAT AND MAKE PEMMICAN
Nutrition
When eating a diet consisting mostly of meat, it is possible to get very sick if you don’t eat some fat or carbohydrates to balance the protein.
You can dry and eat a skinny animal, but if you’re in an emergency situation, it’s not going to help you a whole lot. Protein is not a good substitute for energy food—especially protein that has absolutely no fat. If you eat too much lean protein without fats or carbohydrates, you’re going to lose weight, and soon you’re going to have a kidney problem. [Eating protein in the absence of fats or carbohydrates can lead to “rabbit starvation” or protein poisoning, a rare form of malnutrition. The liver and kidneys have trouble metabolizing the excessive protein and its byproducts. Moreover, the protein is harder to digest, and without enough fat to balance it, just digesting and processing the protein takes up all the energy gained from ingesting it, leaving no net energy gain for the body to use to power itself.]
When the first pioneers settled the west, some of them had a real hard time and eventually had to kill some of their animals to have something to eat. By that time, the animals were so skinny that they weren’t much good for food, as they consisted of only lean meat, no fat.
I don’t care what kind of animal it is—if it’s really skinny, it’s not fit to eat. Rabbit starvation is what happened to Native Americans in interior Alaska when they were forced to live on skinny rabbits. [Rabbit meat is excessively lean, with very little fat.]
I don’t have any personal experience with rabbit starvation, but it’s been said that if you are in that situation, you want to eat the guts of the rabbit, too. But that’s just a rumor that I’ve heard; I don’t know if it will keep you alive. The Inupiaqs around Ambler have been known to dip the guts of a boiled ptarmigan in seal oil to add fat to the diet.
The Native Americans in the southwest would sometime resort to catching a rat and putting it in the fire to burn the fur off. They’d put it on a stone and mash it up fine to break all the bones. I’m not sure if they mashed it after cooking or before. But anyway, they ate the whole works—bones, guts and all. If you live out in the bush for very long, you get an educated tongue.
Drying meat in springtime
Meat that is dried in the open air, like spring-dried meat, is the best food. I prefer to dry meat that has not been frozen, because it has all the juices in it. With frozen meat, the juices separate out of the cells as it thaws. Nevertheless, it often happens that I have so much meat to take care of all at once that the most practical course is to freeze some of it, so I do.
In springtime I’d have caribou lying around, gutted and skinned. The flies would start coming out and accumulating on the sunny sides of buildings and trees, letting me know it was time to get that meat cut up and hanging on a rack. The day time temperatures were starting to be above freezing.
At that time of year it’s cool, so you don’t have to fuss about cutting meat in such a way that it will dry quickly. The flies haven’t bred yet, and aren’t laying eggs yet.
Quite often I open up a shoulder, cut it in layers so that it’s kind of unrolled, remaining in one piece, and just hang the whole thing up. You can also cut most of the meat off a spine and hang up the long backbone with the pelvis on it. You don’t have to worry about getting off all of the meat.
Ole Wik’s method for drying meat at spring camp
At spring camp I used to string a rope tightly between two trees and then wind a second rope around it, making twists that were 5-6 inches apart. Sasha [Ole’s wife] would cut our meat into thin sheets, and I’d hang the sheets on the twists in the second rope. The main rope would hold secure the meat.
After a day or so a crust would form on the outside of the meat, but it would still be wet where the two inner surfaces were touching. That moisture was a temptation for flies and gray jays, so on the second day I’d go along the ropes and unfold the meat sheets, turning them over so that the wet sides were facing out.
By that time the meat had stiffened enough that the two partially dried sides wouldn’t touch each other. They looked like little ladders with their legs open. After tending to the meat that one time, I didn’t need to touch it again until it was ready to be taken down.
Meat drying at spring camp. Image by Sasha Wik
Ole Wik’s two-rope system for hanging meat to dry.
Image by Sasha Wik
Oliver’s method of drying meat at spring camp
I dry meat by making two tripods, maybe 6 feet high, using three forked sticks each. I tie horizontal poles to the tripods, cut my meat in strips, and hang the strips on the poles. But then I do have to keep turning it, so that the part that’s over the pole gets dried, too.
A tripod system to hold poles for drying rack. Here, fish is being dried. Image by Betty Jo Goddard
Questionable meat
If you’re alert to it, you can smell when raw meat is getting ripe and is starting to spoil. Cooked meat, on the other hand, can be spoiled and you may not know it. Any meat that is questionable, I give to the dogs.
Dogs have more powerful acid in their stomach than we do and can eat things that we can’t, so just because a dog has eaten something doesn’t mean that we can eat it. [This is easily demonstrated by giving a dog something like a caribou kneecap 1-1/2 inches long and 3/4 inch thick. You might expect a dog to chew it, but more often than not, she’ll swallow it down in one gulp, like a pill. Their stomach acid can digest things we’d have to chew and chew to break down enough to digest.]
Drying meat in the fall or indoors
If you get caribou or moose meat in the fall, just before freeze-up, you can skin it and hang it up in quarters. A dry crust will form on it, and maybe a little mold, but at that time of year it’s cold enough that it won’t spoil. You can just leave it hanging up and use pieces of it, little by little.
When it gets colder, you can glaze it with ice. Cut a hole in the ice on the lake or river, dip your meat in the water, pull it out, and let it freeze. Repeat that process until you get it covered with ice. That keeps it from drying further. Once it’s well coated in ice, you can bury it in the snow or put it in a cache with some grass around it for insulation. It will keep quite well that way.
[In early winter, you can hang several large chunks of meat on a tripod pole system near a water hole and throw water over them. Every time you go for water, take the dipper and give the meat another coat. You can also toss soft snow on them while they’re still wet. After building up a layer of ice half an inch thick, store the meat in an old sod hut or cache, without any covering. That ice layer prevents freezer burn, and weasels and shrews can’t get at it. The little bit of drying and aging adds to the flavor. This makes for good quaq. Quaq is the Iñupiat word for raw, frozen meat or fish. It is invariably served with seal oil.].
I made a special drying device that hangs over my stove.
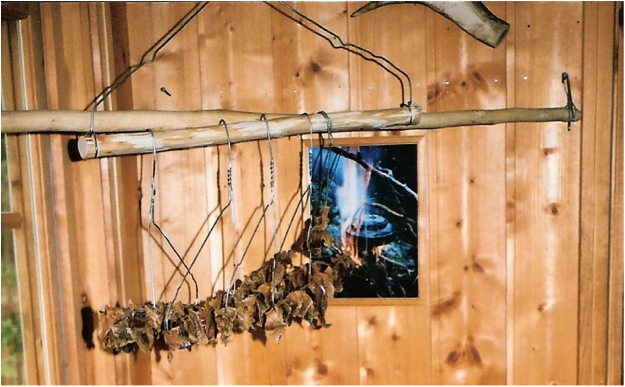
Simplified meat drying rack that Oliver made in Norway.
This meat is nearly ready to be taken down and stored.
Image by Heidi Dammann
It consists of a special crossbar and a number of removable L-shaped hangers made of clothes hanger wire. The business end of each hanger is shaped like a three-sided glovers’ needle and will easily pierce the strips of meat as I hang them. The crossbar is notched in such a way that the hangers are uniformly spaced and held rigidly in place so that the meat on one is not going to be touching the meat on the one next to it.
I can raise or lower the whole setup, depending on how hot the fire is. It wasn’t all that much effort to make that rack, but it sure makes it easier to hang meat. You don’t have to fool around taking the meat down and turning it, because each piece is exposed to the air all the way around.
Meat shrinks as it dries. When it’s dried enough, you can crowd the pieces together a little bit. At that point they’ll be fairly dry on the surface, and it won’t matter if they touch each other. Eventually you can take all the meat from two hangers and put it on one. You want to be careful to use the same holes, because the meat may split if you try to make a new hole when it’s hard.
You can use this rack in various locations, but usually I put it over the stove. No matter how you dry your meat, you have to dry it quickly enough that it doesn’t spoil.
After it’s reasonably dry on the outside but not yet brittle, you can hang it off to one side, and it’ll finish drying over a period of a week or two.
Sometimes for the final two weeks of drying, I make a couple of long bags that are 8 inches deep and long enough that I can tie them onto a pole or fasten them onto a shelf with a hook. I sew vertical seams to divide them into several pockets 12 inches wide. I put the partially dried meat into those pockets and hang the bag up under the ceiling where it is hot.
Pulverizing meat
Even after meat is dried hard, it still isn’t stable. When it’s exposed to the air, it oxidizes and gets old rather quickly, so I don’t keep it hanging any longer than needed. As soon as it’s brittle-dry, I powder it.
To pulverize dried meat, I crumble it up with my hands and then put it in a mortar I made from a stick of birch, and hammer it out with a pestle. That breaks it up finer than I can with my hands.
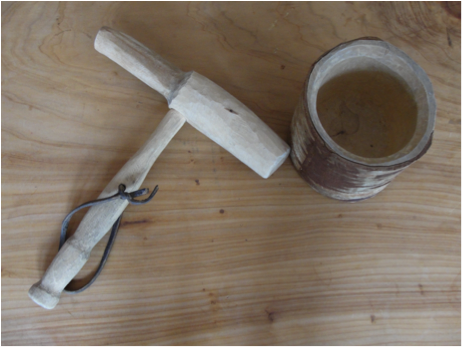
A pestle is a heavy pounder, usually made of stone or wood, used for grinding or crushing food or other substances. A mortar is the bowl in which the substance is ground. Oliver’s handmade mortar and pestle shown here. Image by Emily June Street
Next I run it through a modified meat grinder. A regular meat grinder uses a disk with little holes, and you’re continually having to take it apart to clean it. Tough membranes inside the dried meat choke the grinder.
So instead of a conventional meat grinder, I use a grain mill that’s designed to grind up corn. It’s quite a bit bigger than an ordinary meat grinder. That’s why I like it. The membranes go right through. The finished powdered meat I produce is like corn meal, not as fine as flour.
The grain grinders I like are not as common here as they are in South America. The one I have was made in Colombia. I found it in a store that caters to people from South America. They probably use them to grind corn for tortillas. [If you don’t have a specialized grain grinder, pick the tough membranes out of the meat before grinding.]
I either use the pulverized, powdered meat to make pemmican [if it has enough fat, see section on pemmican, later in this essay], or I put it up for later.
If I’m putting the powdered meat up for later, I take two plastic bags, one inside the other. Some plastic is designed for use with food and some of it is not as good with food. I use the baggies that are designed for food. I buy them in a big roll.
I put the meat powder into the doubled plastic bags, put them inside a cloth bag, and tamp them down with a little stick that’s rounded on the end. The cloth bag needs to be smaller than the plastic bags so that the pressure of the tamping stick won’t tear the plastic.
When I get the bag tamped down fully, I pull the top together and tie it. Then I lay it on its side on the table and hammer it out flat with my fist. It won’t be real flat, but will be flat on two sides. That also will fill up the space differently, so that if there’s a little air in the end of it, it will fill that up, too.
Meat put up that way will last a long time. I’ve had some that I stored in the cache and used two or three years later. Summertime heat didn’t seem to make any difference. Of course if a bear or a weasel or a mink or a marten got into the cache, that might make a difference!
When you’re ready to use the powdered meat, you can put it into a soup or stew, mix it with a little fat, or just soak it a bit and eat it with a spoon.
Drying cooked ground meat
I have a different way of drying ground meat.
During the winter I bring a big piece of meat into the house to thaw just slightly so that I can cut into steaks and roasts and the remainder into chunks that will be ground into hamburger. These pieces are then put back outside to remain frozen until I’m ready to cook them or to grind them. I primarily use the ground hamburger for dried meat. Once dried, I usually powder it up and put it away, or make pemmican of it. If I’m out traveling around, pemmican can be a complete and compact meal.
I cook the ground meat before drying. In Idaho, there are laws that require you to heat meat that is going to be dried. The critical temperature is 145 or 150 degrees. That kills off the bugs and also some enzymes. [Some enzymatic reactions cause spoilage or undesirable flavor and color changes to the meat.]
People have gotten sick from ground meat that wasn’t properly dried, so I cook the meat, or at least heat it sufficiently. I usually heat the ground meat in a pan and stir it. I keep checking it with an oven thermometer to make sure that it reaches the right temperature. Once it does, I pour off the juices.
To prepare the cooked ground meat for drying, I use a plywood rolling tray. It has strips of wood on each side that are 3/16 inch high, which serve to contain the meat as I am rolling it out on the tray.
I lay a strip of flat plastic on the rolling tray, wider than the tray itself. Sometimes I dribble the poured off meat juice on the plastic and let it dry there, since it has quite a bit of food value. If I don’t do that, I use it in cooking, or drink it as broth.
I put the ground meat on the plastic, pat it out, and put another strip of plastic on top of it. I take a round stick of wood and use it like a rolling pin to flatten the meat. It’s long enough that it rides on those container strips along the edges of my tray. The meat spreads flat between the container strips
When I have it all rolled out, I peel off the top layer of plastic and slide the bottom layer onto a cardboard drying tray of similar size, meat and all. I set that on a couple of poles above my stove. I like to dry the meat in the house, because I have better luck controlling flies indoors.
When the meat is semi-dry, I take the edge of a spatula, cut the meat into large squares, and hang them. Once ground meat has dried somewhat, it has enough glue in it to hold it together in a hanging position.
I usually have some poles that are made like the racks I described for coat hangers above, except that I drove nails into each side of them and cut the heads off, leaving 3/4 inch of the nails sticking out. I just drape the partly-dried meat square over one of those poles.
I put that stick on the table and push pieces of meat onto the nails. Then I hang it on a pole, with the meat vertical, and let it finish drying. It’s important that the fat in the meat has also dried. Fat won’t dry as quickly as the meat itself.
When everything is dry, I crumble the dried, cooked meat into little pieces and pack it in gallon-size plastic bags. Sometimes I score [cut the surface] the meat while it’s in the drying tray. I’ll lay three or four pieces on top of one another and put them away like that, but I don’t keep much that way. There’s too much air around it and it deteriorates.
As soon as the weather is cold, I put fattish meat in a cold hole, where the temperature is below refrigeration temperatures. The cool temperature helps to keep the fat from going rancid. Once the nighttime temperatures are freezing, I can put the meat up in the cache, where it will stay frozen. Even if we get a warm spell for up to a week, it will be OK. It won’t thaw much, because it’s packed tightly in large bags.
Pemmican is a paste of dried meat mixed with fat and other ingredients, originally made by Native Americans. When making pemmican, I use the fattiest of my powdered meat [see above section on pulverizing meat]. I put it into a kettle, and pour hot rendered fat over it. I push a stick into the hot mixture, plunging it up and down in several places. The fat runs down into the little depressions made with the stick. I know I’ve added enough fat when I can submerge all the meat particles completely in the rendered fat.
Sometimes I add dried berries or black currants to pemmican. That makes it special.
While the mixture is still soft, I wrap it in layers of Saran Wrap. I make small enough pieces that I can eat half of it at one time and have another meal out of what remains.
You have to make your pemmican about fifty percent fat by weight in order to successfully preserve your meat. That’s a little more fat than what you really need, nutritionally speaking. I eat pemmican along with dried or very lean meat so that I can get enough fat to feel satisfied.
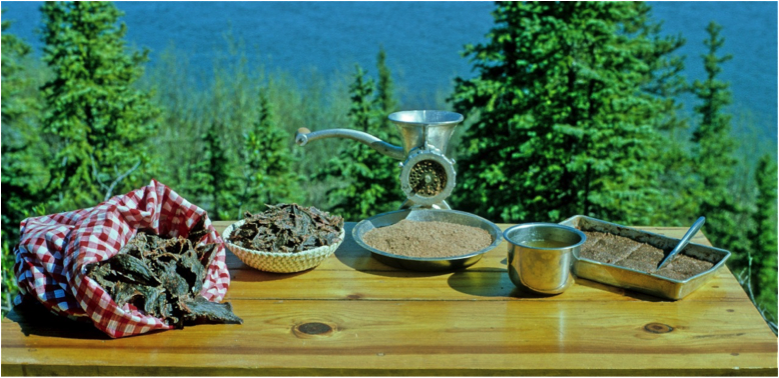
Sasha Wik’s method of making pemmican. Left to Right: Dried caribou meat in sack; dried meat with membranes removed; freshly ground dried meat; bowl of melted caribou fat; finished mixture pressed into pan and scored with a table knife.
Image by Sasha Wik
HOW TO DRY FISH
Different fish are cut and dried in different ways. The first thing to know about drying fish is how to cut them for the process. To do that you need to know what kind of fish you have.
Salmon
With salmon, first you take out the guts, and then you split the fish from head to tail, leaving the flesh and the backbone fastened together at the tail like an old-fashioned clothespin.
The flesh along both sides of a salmon’s backbone is quite thick. So, after you’ve split the fish along one side of the backbone, you usually stick your knife through between the main flesh and the backbone on the other side, run it down along the backbone, and take the backbone out. That gives you two filets and a backbone that’s separate but still fastened to the tail.
You cut off that backbone, leaving it maybe an inch long, or a little more. Then you drape the split fish over a pole, connected tail at the top.
There’s not much meat right at the tail where the fish touches the pole, and if the skin side is in, it will tend to stick to the pole. It’s better to start drying with the skin side out, and then as soon as it dries a little bit, turn the fish over, putting the flesh side up.
You can’t leave it that way very long because the part of the fish that’s against the wood is not exposed to the air, and can’t dry. You may have to turn it another time or two to keep it from spoiling. If you don’t dry those tails pretty quick, the flies get to working under there. Then that place rots and comes apart, and the whole fish falls to the ground. [The tail part of the fish that is right on the pole remains moist longer than the rest of the fish. It also gets hotter because of its exposure to direct sunlight. Eating a half-dried fish where these parts are still moist and “off” is a big mistake. It will force you to spend a lot of time in the willows with your backside exposed—especially unfortunate during the mosquito season.]
That little piece of backbone you left attached to the tail helps to hold the filets up away from the pole, and aids the drying underneath the tail.
Another way to aid the drying is to slice some gashes almost all the way through each side of the flesh before you hang the fish up. Space the cuts about 1-1/4 inches apart and at such an angle that the flesh hangs open. All those cuts aid drying, but they’re also an invitation for flies.
Flies like little moist pockets that don’t dry right away. Any place that’s damp, they want to get in there and lay eggs.
I think the Inupiaqs usually take the head off before hanging. I did, anyway, because that’s a place where it’s really hard to keep out the flies. Besides, the dogs have to eat something. They don’t like raw salmon and shouldn’t eat it, as it can contain a parasite that is harmful to them, so I’d cook up the salmon heads with corn meal for them.
A few of those heads went into our own cook pot, too. They’re the favorite part of the fish for many of us, especially the little pieces of meat under the cheeks.
I made a screen house for drying up my fish without flies, but it didn’t work very well. The screen was porous, but air didn’t move through it fast enough to get the fish to dry quickly.
Eventually I just made a fish rack. I put four posts in the ground, fastened a couple of cross pieces onto them, and then added hanging poles across those, spaced close together.
I kept a little fire going under the poles. The rack has to be out where there’s a little air movement, but if there’s too much air movement, the smoke won’t go where you want it to—and it takes quite a bit of smoke to discourage flies.
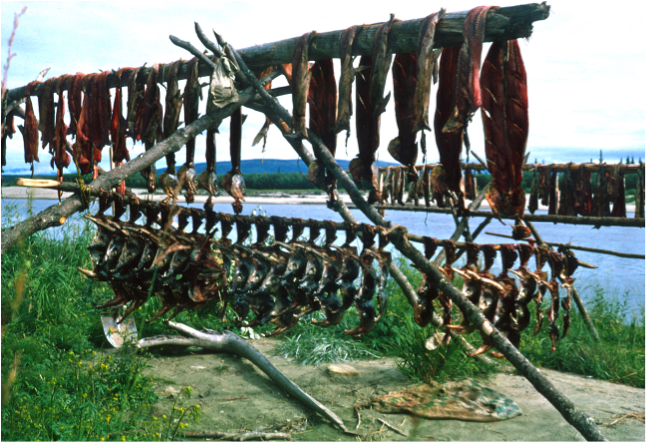
Salmon drying on rack.
Image by Dorene Cameron Schiro
Whitefish or other smaller fish
For drying fish smaller than salmon, you cut in from the back, right close to the dorsal fin. Then you cut around one side of the rib cage, turn the fish over, and do the same from the other side. [See the drawings for cutting whitefish below. Op cit., pp. 157-58.]
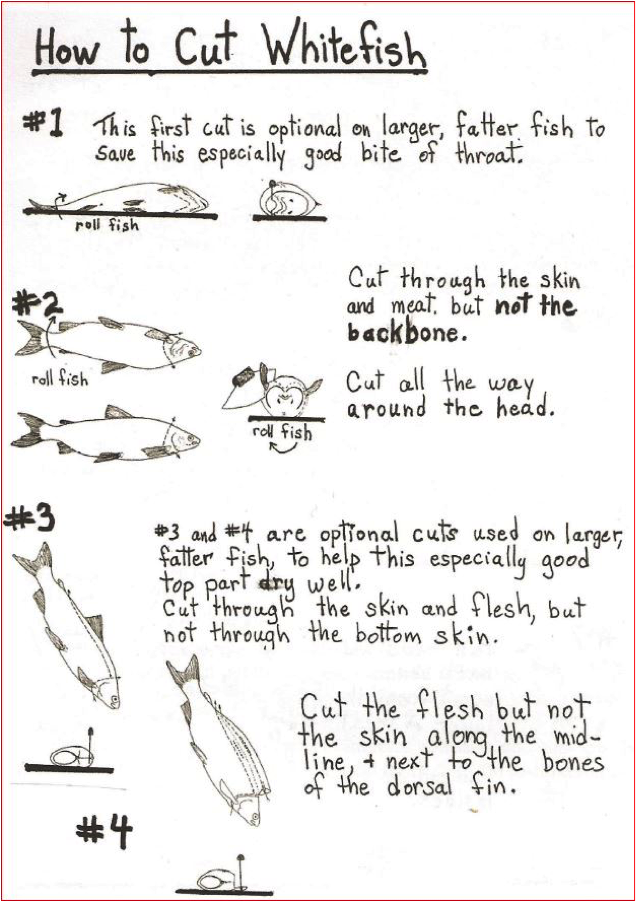
Image by Anore Jones
If the fish are caught not long before freeze-up, when the weather is not too hot and the nights are cool, you can leave the guts in. Again, the filet and the backbone stay fastened together at the tail and are draped over a pole with the guts and head on one side and the fleshy filet on the other side. If it’s a fairly big filet, you can gash it as described in the section on salmon so it’ll dry faster.
Another thing to consider: there are eggs and milt [the semen of male fish] in some of the fish. You should take them out separately. You can hang the eggs on a taut piece of fish net to dry them. Sometimes eggs are hard to get off after they’ve dried, but they’re good food. The livers are good, too. To eat the milt, you just boil it when it’s fresh.
To eat the eggs fresh, you can mash them up in a little bowl and then mix them with some berries. That’s a delicacy. Sometimes you can mix other things with the eggs. Use your ingenuity. [A favorite dessert among the Inupiaqs isittukpalak, which consists of whipped raw fish eggs and cranberries. Anore Jones gives the recipe in her work. Op cit., p. 164.]
In fatter fish, the fat drips out as the flesh starts to dry and shrink. Leaner fish don’t do that so much. I’ve never managed to do anything about the dripping fat except to let it drip. Good luck with keeping the critters away from that fat, and for having the right kind of weather for drying. In the Yukon, people build a really big smokehouse for hanging their fish. With the heat from the stove and the smoke, they can dry up those fish even in bad weather. [It is often the case that the weather gets bad and stays that way for days just when the fish racks are full of beautifully drying salmon. The fish start to stink, get covered in white slime, fall apart, and fall to the ground.]
When the weather was bad, my plan was to catch just enough fish to keep going. In the summertime you can have rainy spells that last quite a while, so finding a good span of time for drying fish can be tricky.
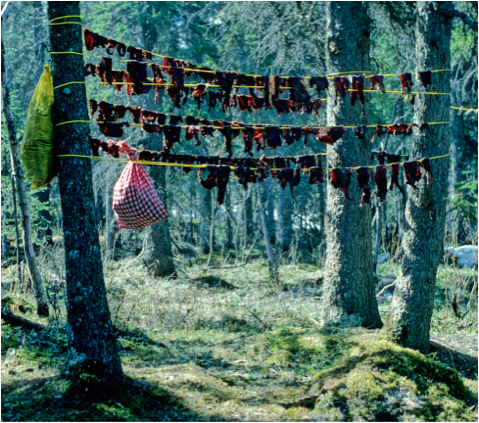
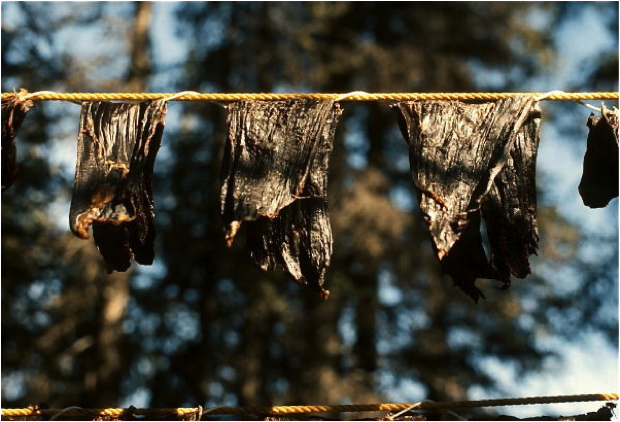
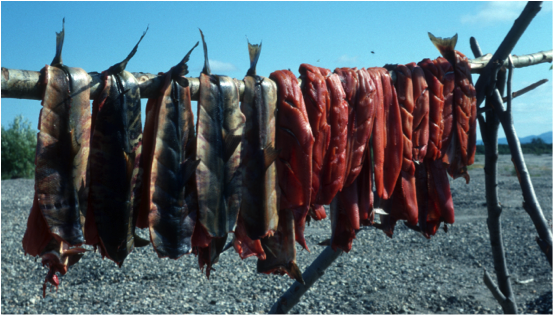
Fish drying in the Alaska sun. Image by Joyce Denslow
Storing and using dried fish
Years ago, dried fish were tied up in bundles for sale or trade as dog feed, and sometimes as people feed, too.I used to make up bundles of twenty-five fish.
Then I’d have a unit of fish that was useful in bartering or selling. At Kotzebue they would have stacks of these bundles sitting on the porch at the store, and you could go and buy as many bundles as you wanted, depending on how many dogs you had to feed. You could cook those fish along with whatever else you had for dog feed.
Sometimes dogs could eat dried salmon, but fresh salmon would make them sick. It’s best to cook it well for them. They could eat whitefish or sheefish raw—or any way they want—without getting sick. Dogs have more acid in their stomachs than we do, so they can eat fish in a condition I’d avoid.
One time I was withneighbors who lived along the shore of Hotham Inlet, near Kotzebue. They had some frozen fresh whitefish, and when it came time to feed the dogs, they made a big fire and stood the fish on their noses in the snow. As soon as the fish were halfway thawed, they’d turn them around and thaw the other side a little bit. They then tossed them to the dogs.
You can also feed frozen fish to your dogs without warming them, but then the dogs have to use some of their energy to thaw the fish before they can digest them.
If you have hung your fish carefully and tended them so they’re wholesome and haven’t had a chance to spoil, you can take them down when they’re only half-dried, cut them in pieces, and boil them. That kind of fish is a favorite food with me and my family and many Inupiaq people.
Dried fish can be kept in a cache. Properly dried fish are almost indestructible, unless critters get at them. [But beware that the oil in fattier dried fish can go rancid.]
One of my favorite ways of keeping dry fish for a long time is to cook them before drying.
They don’t need much cooking—fish cooks pretty quickly. Then I pick the flesh off the bones and put it on a tray for drying.
Or sometimes after it has cooked I may grind it, or mash it and roll it out onto trays the way I described for ground meat drying. I let it get fairly dry, grind it again so it’s a powder, put it into a bag, and tamp the bag to get the air out. That way I can keep fish in the cache in plastic baggies inside of cloth bags, just like I keep dry meat.
I just open up the top of the bag, spoon out what I want, and tie the bag up tight again to keep as much air out as possible. You can boil the powdered fish and mix it in with other things, or eat it as it is. It’s already cooked, so it’s pretty much ready to eat. Another way to eat it is to mix it with seal oil, other oil, or even butter.
Pike are not as fat as the other fish, so they dry up nicely. If you’re careful, you can filet them and get all the little forked bones out.
When you’re fishing for pike, it’s nice to have a little stick with a notch in the end of it to reach into the mouth to dislodge the hook. A gaff comes in handy, too. One time, when a big pike got loose just as I was about to pull it out of the water, I just reached into the hole, put my thumb into its mouth, grabbed it by the jaw, and pulled it out of the hole—never mind the teeth. From that experience I learned, when you grab a pike, grab it by the eyes!
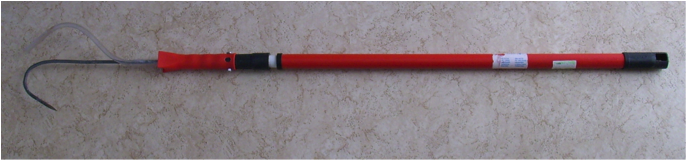
A gaff is an unbarbed hook fastened to a handle or pole for landing large fish. (Image credit 95)
FIREARMS
I used to carry a .44 magnum revolver with a 10-inch barrel, and I did pretty well with that. But if I ever had to shoot that weapon without having a chance to protect my ears, I was going to damage my hearing, so I got rid of it.
I now have an old .65 Carcano Italian military carbine with a Mannlicher type action. I carry it for self-protection, mainly against bears. [A carbine is a firearm with a slightly shorter barrel than a rifle or a musket. Many carbines are shortened versions of full-length rifles that shoot the same ammunition. Carcano is an Italian-made bolt-action military gun. The Mannlicher action, named after its designer, Ferdinand Mannlicher, employs a straight-pull bolt action, as opposed to the rotating pull of other rifles. It has a high rate of fire with reliability and sturdiness.]
I’ve whittled both my barrel and my stock down nearly to skeletons, but the gun still has a strong action, and the barrel is quite sturdy at the chamber. When the gun has a full magazine—six shells, plus one in the chamber—it weighs under five pounds.
The length of the barrel is 18 inches. The stock is long enough that I can keep the action away from my eye.
The hexagon barrel is a fairly good size. I filed it down—not next to where the cartridge chamber is, but on down toward the muzzle, where it tapers more.
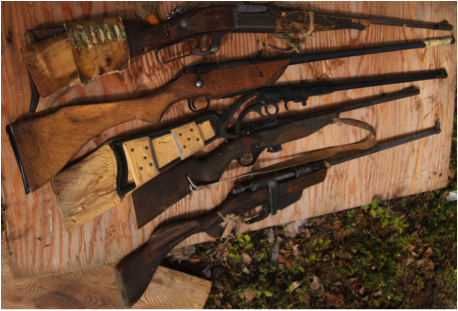
Oliver’s guns, including his modified Carcano rifle.
Image from the Dammann collection
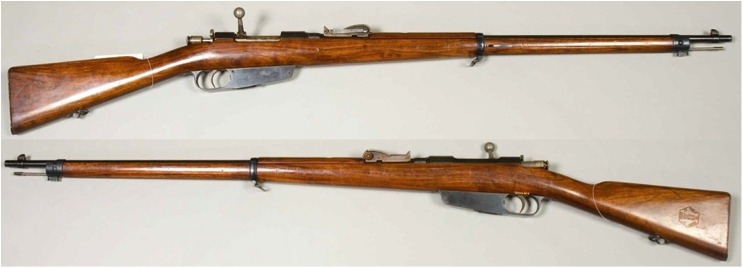
Early model of the Italian Carcano Rifle. (Image credit 96)
My Carcano goes with me regardless of where I’m going. It’s the lightest and handiest rifle that I have. The .65 cartridge is remarkably effective. It has a well-designed cartridge case.
These guns were made in Italy, a small country that was not exceedingly wealthy. They were designed for simplicity of manufacture, and they were designed with one particular cartridge. They have rifling that starts out slow and increases in twist toward the end of the barrel. [Rifling is the helical grooves in the barrel of a gun or firearm, which impart spin to the bullet. This spin stabilizes the bullet, improving its accuracy.] The only drawback with the Carcano is that the twist in the rifling is not enough to stabilize a long bullet, even though I didn’t shorten the barrel much. In the old black powder guns that shot a round ball or eventually slugs, the rifling might have had one twist in 2 feet or even in 30 inches. That amount of twist will give a ball enough spin to stabilize it. But if you try to put longer slugs in that barrel, they won’t stabilize—they’ll cut keyholes in your target and so forth.

Example of rifling. (Image credit 97)
When I first got the Carcano, I bought a box of cartridges with 160-grain loads. Sometimes I carried them in the gun. At real close quarters, if I stood 15 feet away from a bear, those were fine. But if I were out hunting where I was shooting anything from a squirrel to a beaver or something bigger, I used hand loads. [The grain is used to measure the mass of bullets. When calculating how much powder is needed for reloading, 7000 grains = 1 pound. Handloading is the process of reloading firearm cartridges or shotgun shells by assembling the individual components (case/hull, primer, powder, and bullet), rather than purchasing completely assembled, factory-loaded ammunition.]
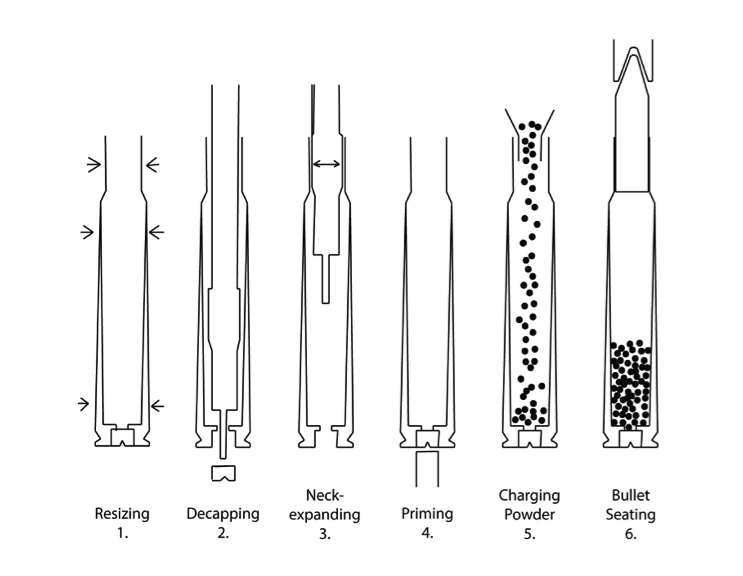
The handloading process: (1) The spent cartridge is driven into a mold to eliminate the expansion that occurred when it was fired. (2, 3) The spent primer is driven out of its hole and the neck is expanded back to its proper size. (4) A fresh primer is set in place. (5) A carefully weighed charge of smokeless powder is added to the case. (6) A new bullet is driven into the neck.
Drawing by Brady Wedman
I don’t know what the original factory loads were for that gun. I can buy 160-grain bullets to fit that rifle, but they don’t work well. They don’t punch round holes in my target. I think that some of the guns the Italians had that weren’t carbines must have had a little more twist to the rifling. They must have spun the bullets with more rotational velocity than the carbines like mine did.
To optimize my ammunition, I’d cut the base off of those 160-grain bullets and shorten them until I got down to 139 grains. At 140 grains, performance was just marginal. Some shot well, some wobbled, but 139 worked best.
To do the cutting, I mounted a breast drill horizontally on my workbench. I removed the bolt that held the side handle of the drill, put it up through a hole in my workbench and through a shim, and bolted it on with a nut, so the breast drill was fastened securely to the workbench with the side crank on top.
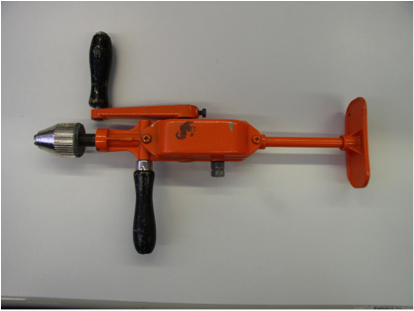
Breast drill. (Image credit 98)
I’d stick the rounded edge of the bullet into the drill’s round chuck, and saw off the bullet’s flat base with a hacksaw. I had various gauges so that I could leave the same amount of the bullet sticking out of the base of the cartridge each time.
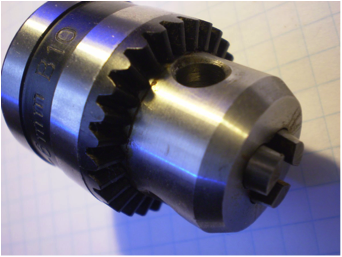
The chuck is the device that holds a drill bit in place. Oliver inserted a bullet rather than a bit. The chuck held the bullet in place for cutting. (Image credit 99)
I’d leave the bullet a little long, and true it up by turning the drill. Having a bullet in the breast drill was like having it in a lathe [a machine for shaping material using a rotating drive that turns the piece being worked]. I used a very coarse file while the bullet was spinning in the drill, and file it off so that it was true on the back end. Finally I’d chamfer [round off the edges of the flat end] it to make the bullet sink into the case when I went to reload.
It’s important to have the back end of the bullet true. If it’s not, gas will scoot out of the side that clears the barrel first and upset the bullet. With my shorter bullet in the cartridge, that would have been a problem if I had cut more off, but there was still enough with the sides parallel at the back end of the bullet that the rifling gripped it well and no gas escaped around it.
I didn’t carry the Carcano in a holster. I just dropped it into a bracket of wire on a wide belt. I could get that rifle out and into action quicker than I could a holstered revolver.
Once, I shot a bear. It had gotten into my cache while I was away. A grizzly bear can stand over 9 feet, and my cache was only 9 feet high. It’s lined with dog feed bags. I have a brace on the legs, and the end of the brace is right under the door, which is in the end of the cache. The cache is made with upright poles, and the sides slope a bit. The slope might make it harder for a bear to climb in, and the rain sheds better.
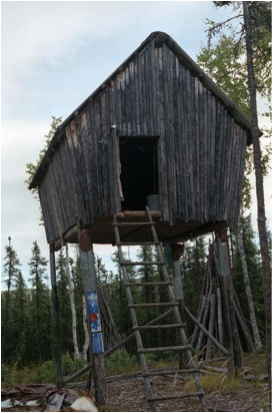
Oliver’s high cache. Note the sheet metal rodent guards nailed to the uprights. Image by Devta Khalsa
Since the door of the cache is in the slanted side rather than in the bottom, I had to have a way to hold the door shut. I ran a wire from the door down through the floor and tied it to the brace. The bear stepped on the brace and broke it, turning the door loose, and it swung open.
My rodent guards [sheets of steel nailed around posts to prevent damage from rodents] were not long enough—the bear was able to reach above them. By stepping on the stub of the brace, he was able to get his claws up over the sill of the cache and get inside.
He got in there and—well, enough said. You can guess what happened.
I had two dogs at that time. A grizzly usually won’t run from one dog, but two dogs was too much. He didn’t want to leave “his” cache, but with my dogs chasing him, he took off and ran down my trail towards the lake.
While he was running, the dogs were silent, but when he’d stop and turn on them, they’d make a big commotion. That happened every few minutes. Eventually the dogs drove the bear back toward the cache and my house.
I was standing in front of the house and heard the commotion coming closer. I started walking toward the cache, and was forty feet from it when the bear came out of the woods, running toward the cache with the two dogs behind it.
Just before the bear got to the cache, it saw me. It turned sideways and started in a different direction.
I had my sight on it and was tracking it with the gun, but before I could get the shot off, the bear was too close to a cache post. In my hurry, I didn’t realize that. The round went through the post and hit the bear, and then the bear took off. The dogs chased it off the property.
If a bear makes up his mind, he can move fast, especially those big bears. I think that was the nearest I ever came to being charged by a bear. I don’t know what the bear would have done if the dogs hadn’t been chasing it. I expect I would have shot it before it had a chance to do much.
Another time, after a young couple in the neighborhood had moved to Minchumina, I’d go by their place to check on it.
One day in I went there and found that a bear had gotten into a cache. Their caches were only 7 feet above the ground. Tin on the posts protects against black bears, but the grizzly bear was able to reach above it.
The floor poles were small, 2 1/2—3 inches in diameter. He chewed through two of them. He couldn’t climb in through that hole, but he pulled out everything that he was able to reach.
When I arrived, the bear wasn’t present. The dog I had then was young, about a year old. I didn’t want it chasing a bear, so I tied it to a cache leg while I was gathering up what I could salvage. My rifle was leaning against another leg.
I’d made a shelf in the cache that was over 9 feet above the ground. I had the ladder up through the hole and was putting the salvaged stuff back into the cache and then setting it up on the shelf. The dog started raising cane, and I surmised that we might have a visitor. I stepped down a couple of steps on the ladder and took a look.
It was a full grown black bear, a boar. When a bear stands on its hind legs, it can be very impressive. I turned around and started giving it a good cussing, and with the dog and me carrying on, I backed up to where I could get my rifle.
By that time the bear was just too close. It had gotten down on all fours and was looking at me and then at the dog. I didn’t know what he was going to do, and if I waited for him, I wouldn’t have a lot of time to react. I had to take the initiative, so I shot it with that .65 Carcano.
The bear decided it was outgunned, and it ran into the brush. I was tired and not in the best of health. I didn’t want to follow the bear into the brush with that little gun and a puppy, so I headed home.
A little later, I started to go back to find the bear, but that gun was heavy, and I was tired. I figured it was just foolishness. I didn’t invite that bear, and while I didn’t want to leave it wounded, I decided to give up. I went back home. I was too tired and too shaky.
The next morning my neighbors arrived with a visitor, and they were going to spend the night at their place. It’s a heck of a job to come around that lake on either end, inlet or outlet, so they fired a couple of shots to alert me, and I went down to the lake, saw them on the other side, and took the canoe across to get them.
I told them there might be a wounded bear hanging around not too far from the cache, so the fellow went to look for it, first thing. The bear was dead. It had only gone about 40 feet, where I couldn’t see it.
Up close, that little rifle did a good job. That was the first big game I had shot with it. A bear sometimes takes several shots, unless you can break the backbone with your first.
On those bears, there is a little patch of the front leg, kind of behind it. When I shot, the bear was beginning to move, so that’s what I aimed for, and I hit it. That bullet’s velocity, as well as my proximity to the bear, made quite a lot of concussion and hydraulic pressure around the bullet wound. The bullet was still in the carcass. It did strike the heart.
FISHING WITH NETS UNDER THE ICE
When I first lived in Kotzebue, I used to weave my own fish nets. There was always a net in progress hanging on a forked stick I had nailed to my bedpost. Anytime somebody visited or if I had some spare time, I’d sit making netting like an old lady with her knitting.
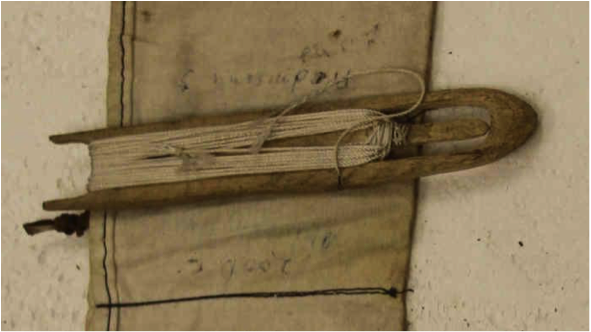
Net-making begins with a net needle loaded with suitable twine. (Oliver has loaded heavier twine on this handmade needle for general-purpose lashing.) Image by Molly Rettig
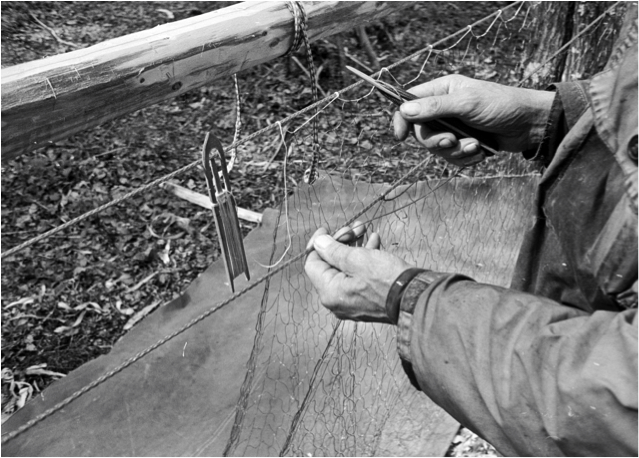
Net-making. Image by Curt Madison
Later, when nylon mesh became readily available, I just bought the webbing. I stopped making my own nets.
When I’m getting a net ready to put under the ice to fish, I make floats out of blocks of spruce root. The wooden floats are roughly 10 inches long. The floats have to be long enough and bulky enough that they won’t tangle in the net or pass through the holes in the mesh. A 4-1/2-inch mesh net is the right size to catch big whitefish.
The spruce wood float is shaped something like a pear, thin on one end and bulky on the other. Each side is smoothly rounded. A hole is drilled crossways through each end near the bottom for attaching it to the net.
I tie the floats every 5-6 feet along the top line of the net. When the net is in the water, the floats buoy the webbing, but not enough to lift the lead line or sinkers attached along the bottom of the net. [A lead line consists of a woven hollow-core nylon rope with a string of small lead weights inside and serves to keep the bottom of the net down.] With lead line, there is nothing to snag the meshes—an advantage that is appreciated by anyone who once used the traditional sinkers carved out of caribou antlers. Sinkers were also once made out of pieces of cloth sewn into bags and filled with sand.
If you happen to get a big run of fish, the float line will sometimes rise, come in contact with the bottom of the ice, and freeze in. For that reason, use light string to tie the floats to the net, so that the floats can break free if needed as you pull your net from the water. If the float line were to freeze in and be very securely attached, you’d lose the whole net.
To get your net under the ice, chop a hole in the ice where you want one end of the net to be placed. Tie a rock or other weight to a long rope, the length of your net or longer, and lower the rock to the bottom. Chop a second hole several feet away from the first. From here reach under the ice and snag the rope, using a long, slender pole with a piece of caribou antler attached to the end as a hook.
The thicker the ice, the more advantage there will be in making an elongated hole, so that your pole will have a shallower angle and will reach farther. You can also make a second pole with a fork on it to push the rope forward toward the next hole. That way your holes can be farther apart.
Snag the rope with the hook and pull it through the second hole. Hold the rope in place by looping it around a stick staked near this second hole or over a stick laid across the top of the hole. Then let the rock sink back down to the bottom. Repeat this process through as many holes as you need to accommodate the length of your net. Make your last hole about 3 feet wide for ease in setting and checking the net.
You will then have a rope under the ice from the first hole to the last. Remove the rock, tie one end of the net to one end of the rope, and then haul on the other end to pull the net into the water. It helps a lot to have another person who can feed the net into the hole.
The net sinks down right away as you are pulling the net through the hole into the water. One you have the net stretched from your first hole to your last hole, you want to fasten each end of it to a spreader stick which is just a bit shorter than the width of the end of the net. This stick is vertical, held down by a rock at the bottom, and held up by a rope through the surface of the ice. The end rock is heavy enough to anchor the end of the net, but light enough to drag along as you pull the net in and out of the water to check for fish each day.
The rope emerging from the ice at each end of the net is tied up to an angled pole that is anchored into the ice. By chipping a small hole to insert the pole into the ice, propping it up at an angle on ice chips and then freezing it in place, you have a secure tie-off for each end of the net.
Both end holes will freeze over each night, so you’ll have to chop them free to check the net. To avoid cutting the rope as you chop, you can tie your rope to a stick that has a hole drilled in each end. That way it is the stick that freezes into the new ice, not the rope. Tie those sticks up to the poles that angle over the holes.
So, now you have a net attached to a rope underwater, stretched between two holes, and anchored at either end by a weighted stick and a rope tied up to through each end hole to a secured angled pole above.
The bottom line of the net is held down in the water by the sinker line, the top of the net is held up by the floats and the spread stick helps to hold the shape.
The long rope used to pull the net under the ice is left attached in a continuous loop with the net, so that you don’t have to worry about losing the rope under the ice when you pull the net up to check it for fish. The long rope is above the ice while the net is below but is pulled along under the ice as the net gets pulled out each day to remove the catch of fish. The rope is then used to pull the net back under the ice.
When it’s time to check your net, chop both ends free from any new ice. Then pull the net up through the larger hole. The long rope which is still attached to the end of the net is drug under the ice as the net is pulled up. Pick out the fish as you go and toss them on the ice to start freezing. Stack the net in an orderly fashion so that you can easily pull it back under the ice.
Once you’ve picked the fish out of your net and it’s ready to go back into the water, go to the hole at the far end and start pulling on the long rope to pull the net back into the water.
The net may have frozen while it was lying exposed on the ice. You don’t want anything to hang up on the ice as you’re pulling it back into the water, so it’s important that you have made your floats smooth and with rounded edges.
Once the net is back under the ice secure both ends once again to their stakes and stack the fish onto the sled ready to take home.
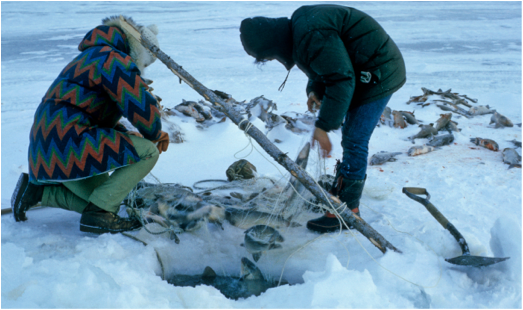
Taking fish from the net. Image by Sasha Wik
In winter when the qausrilluk [Broad Whitefish (Coregonus nasus)] are running under the ice, I like to catch only the big ones and let the smaller ones go through, so I use a larger mesh net.
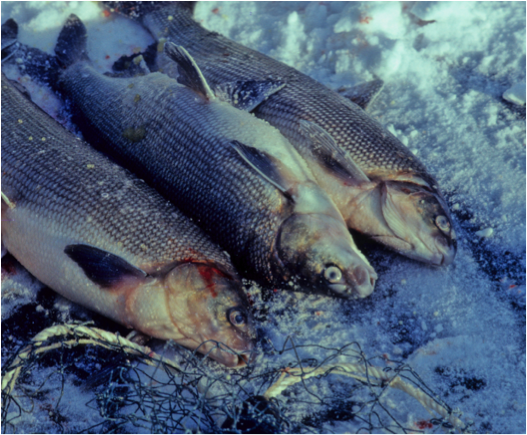
Qausrilluk. Image by Sasha Wik
I use smaller mesh when I set a net in the mouth of a slough in the summertime, after the floodwater has started to run out. Those summer fish, the qaalġiq, tend to be smaller, and have smaller heads.
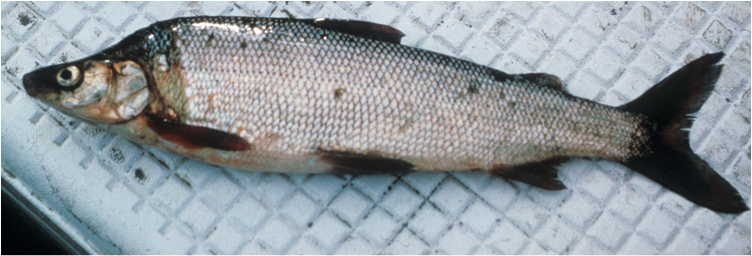
Oliver describes the qaalġiq, or humpback whitefish (Coregonus pidschian) that he caught during summertime. (Image credit 100)
One fall there was a duck that hadn’t taken off when the other ones left. I figured maybe it was not getting enough to eat and was too skinny. As soon as I’d load up my sled and leave after checking my net, the bird would come and pick up the fish eggs left on the ice, partly frozen down. It was just trying to survive.
I began cutting a fish into little pieces that the duck could eat. I’d throw them out on top of the snow, away from the area where the water from the net had frozen everything solid. After two or three days of that, the duck had taken off.
At Manley Hot Springs, there’s a bridge across the river. Downstream from the bridge, the hot springs drained into the river. No matter how cold the weather got, that water never froze over. Some years there would be two or three ducks that spent most of the winter in that open water. They made it through until spring.
I had to store the fish I caught during the winter. To do that, I stacked them on the ground in a cache that had sides built up, but no roof. The sides were about 3 feet high, with some willows in the bottom. [Arctic willows are more like a shrub than a tree, and grow only to about 6 inches in height.]
I’d let the fish lie out until they froze before I packed them in, because if you put them in while they’re soft, they’ll freeze together into a big mass. Then I’d put some snow over them, and cover the whole thing with a tarp to keep the wind from drying them out. It would also protect the snow so that it wouldn’t melt too much in a thaw. These stacks of whitefish would feed both dogs and people through the winter.
When we wanted to cook a fish, we’d often stick the whole thing in a roaster pan and shove it in the oven. After it was cooked we could pull the scaly skin off and get at the flesh and the liver and the eggs. Of course you can cook them in other ways too, but that’s about the simplest way. Eating them raw and just slightly thawed is delicious and nutritious, too.
HOW TO SNARE RABBITS
When rabbits were plentiful, I used to make tip-up snares to catch them. The basic idea of a tip-up snare is to ensnare a rabbit as it runs along its trail, using a counterweight to hang the animal in the air after it is snared. When the rabbit runs into the snare, it inadvertently triggers the tip-up counterweight mechanism, which jerks the rabbit into the air.
Rabbits have main trails that they travel, and almost every rabbit that’s around the area will eventually use that trail. These trails are easy to find when rabbits leave their tracks in the snow but harder to find in the summer.
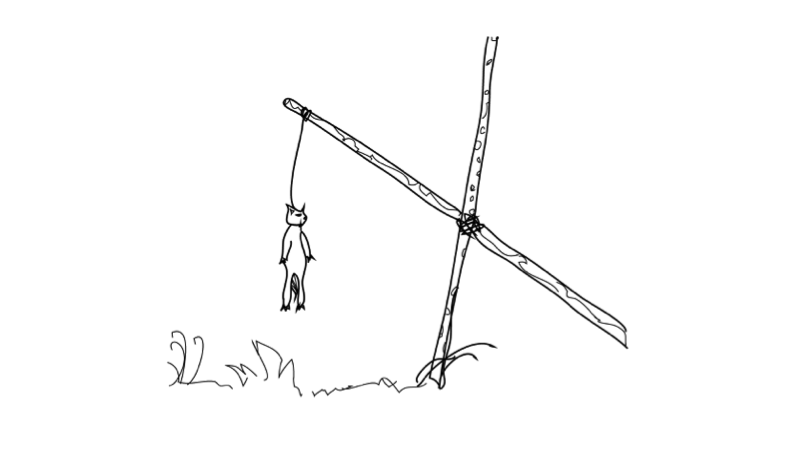
An animal caught in a tip-up snare.
Drawing by Brady Wedman
When it’s cold, you need traps that are easy to set up with less-than-agile hands.
Here’s my method for setting the tip-up trap:
• Find a standing tree with a rabbit trail close to it.
• Cut off a fairly heavy stick from another tree, 6 or 7 feet long—something that tapers considerably, with a small top and a big butt. Smooth the stick’s surface all around, removing excess material that might get in the way of the stick’s motion. This becomes the tip-up stick.
• Position the tip-up stick with the butt end on the ground so that it crosses the standing tree at a point about a quarter of the way from its thin end to its thick end. That will be the fulcrum point where you fasten the tip-up stick to the tree with a loop of twine. How high you position the loop on the standing tree depends on the length of the tip-up stick.
• The tip-up stick has to be long enough that when it trips and the butt end hits the ground, the snare, which is on the thin end, doesn’t end up too close to the standing tree. When the snare draws up around the rabbit’s neck, the end of the tip-up needs to be high enough that it’ll lift the rabbit entirely off the ground to hang. Otherwise it prolongs the animal’s agony.
• Attach the tip-up stick to the tree in such a way that it can easily pivot. I tie two ends of twine together to form a circle of twine. I put the whole circle behind the tree at the fulcrum point, and then I pass one side of the circle through the other side and pull it snug around the tree. I now have the circle of twine, passed through itself, wrapped around the standing tree. The excess portion of the twine circle will be hanging freely.
• My circles of twine are quite large to start with. I can shorten them by wrapping extra turns around the standing tree or around the tip-up stick later on as I adjust the set-up for proper balance and tautness.
• I sling the excess loop under the tip-up stick and wrap it around the tip-up stick, there at the fulcrum point but on the side towards the stick’s smaller end.
• I adjust the excess loop so that it will reach around the tip-up stick and cross over the part of the twine that is coming from the standing tree.
• I separate the excess end of the loop, lay it across the twine coming from the standing tree, grab that twine, and pull it up through the excess of the loop. Then put a twig or dead branch in there to act as a toggle to keep the twine from pulling back down through the loop. The loop has to be short so that the stick draws up tight, yet loose enough that the tip-up stick can pivot.
Your tip-up stick is now ready, fastened to its standing tree. The butt end will be on the ground. The thin end will be up in the air.
Next you will attach your snare to the thin end of the tipping stick. You will position the thin end close to the ground with the butt end up in the air and set the snare’s trigger. When the rabbit trips the trap, the heavy butt of the tipping stick falls, leaving the rabbit hanging from the snare on the thin end.
I fashion the trigger from another loop of cord that’s fairly long. I wrap it around the base of the standing tree and pull it tight. Then I pull the thin end of the tip-up stick down and hook the free end of the loop over its tip. That holds the tip-up with the heavy end up in the air, but not straight up. That way it doesn’t have a lot of leverage to start with, and the trigger can be rather delicate.
The thin end of the tip-up stick is bare wood. I whittle the tip with a knife so that it tapers a bit, depending on the size of the stick. It’s not whittled to a point—I tapered it just enough to make sure that the trigger loop can pull down easily off of the flat end. If the taper is too short, the end will be too steep, and then the trigger will release too easily.
The end of the stick is pointing downward at a pretty steep angle. When a rabbit gets caught in the snare and thrashes, he’ll pull down on the snare quite a bit, so the loop doesn’t have to be too easy to pull off.
I make the loop of the snare about 4 inches in diameter. A rabbit’s neck is only 2 inches at the most. I attach the snare on the tip-up stick a couple of inches from the end of the pole, above where the trigger loop comes around the tip. Then I tie a simple wire hook to the snare. It goes over the trigger loop, with enough slack so it doesn’t take too much struggling for the rabbit to hit the end of the snare.
This all takes a bit of judgment. You want the snare loop to be up a few inches from the ground. You put a stick across the trail that causes the rabbit to duck his head to go under it, right into the snare loop.
At the same time, you don’t want the rabbit to stick his foot through it before he gets his neck in it, so I’ll also put a twig underneath the loop. When he’s hopping with his nose down, you want him to lift his head up a little bit to put it through the opening.
I also put two little sticks vertically on each side, so that the rabbit sees a hole big enough to jump through. He sticks his head in there, and the snare pulls up around his neck. When he struggles, he pulls the wire hook down, and the hook pulls the trigger loop off the end of the tip-up. The tip-up then “tips up” and lifts the rabbit off the ground.
If I make the setup with some care, I very rarely miss. I usually come back to find that there’s a rabbit there, hanging a foot or two above the ground.
* * *
Sometimes I set up a different kind of trap on a well-beaten trail. I’ll make a pile of birch limbs in one place, and another one 10 or 12 feet away on the trail. Then I’ll make a little fence separating the two piles and set two or three snares along it. When the rabbits smell those freshly cut birch branches, it draws them over. When they run back and forth between the two piles of feed, they get caught in the snares.
Sometimes I’ll fell a small tree across the rabbit trail, cut holes through the branches beneath it, and set my snares in the openings of the branches.
Rabbits often feed on the spruce tips left on the snow when you cut a spruce tree, so you can use spruce tips as a bait.
You can reset that same snare in the same place and probably catch two or three more rabbits there. If I don’t get something after a couple of days, I take it down and try someplace else.
As the snow builds up, rabbits will eat the bark off of trees, higher and higher. If it gets to the point that they’ve got the snow tramped down and can’t reach any more bark, they’ll go someplace else and start over again.
In the summertime, rabbits don’t necessarily follow a beaten down trail as they do in winter. They wander around looking for something to eat. It’s harder to snare rabbits in the summer, but there are usually other foods more available then so it’s not as important a food source.
MAKING TRAPS
I only remember two things that my father specifically took time to teach me when I was a youngster. One was how to make a fire with a bow drill. The other was how to make a Figure-4 trigger trap.
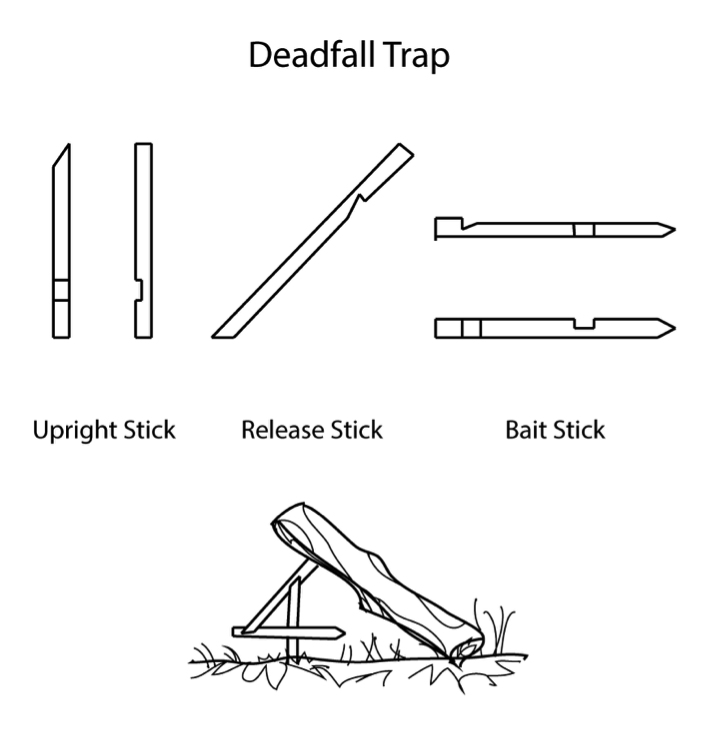
Figure 4 deadfall trap. The animal triggers a baited stick beneath a deadfall log, causing the log to fall and pin it. The stick drawings show how to make notches for a figure-4 trigger and bait set-up. Drawing by Brady Wedman
Promontory Peg Trigger Trap
You have everything you need right there in the forest to make a Figure-4 trap, but it takes an extra arm and a hand sometimes to get everything set up. I prefer to make a promontory peg trigger trap. People used them long ago, when they only had sharp, rough edges to carve the wood of the trap pegs.
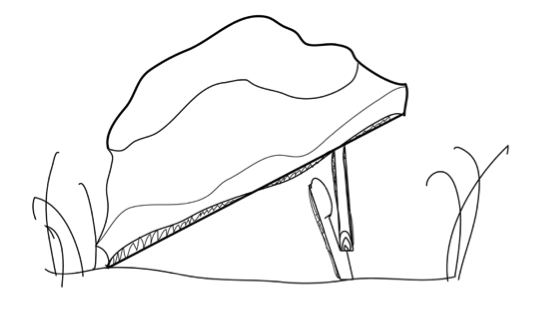
One variety of a promontory peg trigger. When an animal pulls on the bait on the top of the lower stick, the trigger falls apart and the weight [in this case a rock] comes down. Drawing by Brady Wedman
To make the pegs that hold up the weight, take a round stick, pinky-finger-sized or a little bigger. The length will depend on what kind of animal you want to catch. For a marten or a mink, it only needs to be about 5 inches tall.
Cut a notch halfway through the stick, turn it over, and cut a notch halfway through from the other side, but up a little higher along the stick. Then you split the stick apart between the notches and whittle the split sides flat. Those flat sides will be in contact when the trigger is put together.
One of the halves becomes the foundation stick, and the other becomes the support stick. The bottom end of the support stick sets on the notch of the foundation stick. It has to have enough bearing surface to hold up the weight.
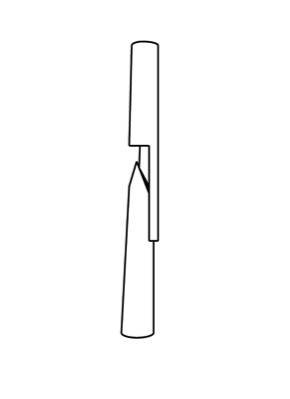
This example closely resembles the shape of the foundation (bottom) and support (top) sticks of Oliver’s trigger. Drawing by Brady Wedman
The foundation stick may need to stand on a little chip of rock or wood so that the weight of the deadfall won’t push it down into the ground. The shoulder of the notch where the other stick rests should be up 1-1/2 or 2 inches above the ground, and it will be positioned toward the inside of the deadfall.
Now you can either just put a bit of bait on the top of the foundation stick, if your sticks can stack up in such a way that everything is stable, or you can make an extra bait stick as in a figure-4 trap. The bait stick helps to hold the other two sticks together and runs under the deadfall. To make a bait stick, cut a notch in another stick that is wide enough to fit over the other two sticks to hold them together. Whittle that bait stick notch so it only hooks a bit, so it doesn’t take much to trigger it.
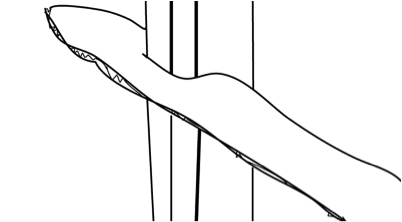
Detail of promontory peg deadfall bait stick connection. Drawing by Brady Wedman
Cut the notch in the bait stick so the stick slopes upward a bit once it is in place. That way the bait is angled up, and the animal has to pull down on it to get it loose, making triggering the trap more likely.
The animal can come into the trap from either side. When the deadfall weight is in place and the bait stick is tripped, the main sticks will buckle outward, and the deadfall won’t fall on the sticks. All you will have underneath is the little slender bait stick. You don’t want much underneath the trap when it’s tripped, except the animal.
A more robust version of this kind of trap involves a fall log and a bed log for it to fall onto, both maybe 3 feet long. If needed, you can make a frame by driving a couple of stakes on each side of the logs to ensure that the fall log will come down square onto the bed log.
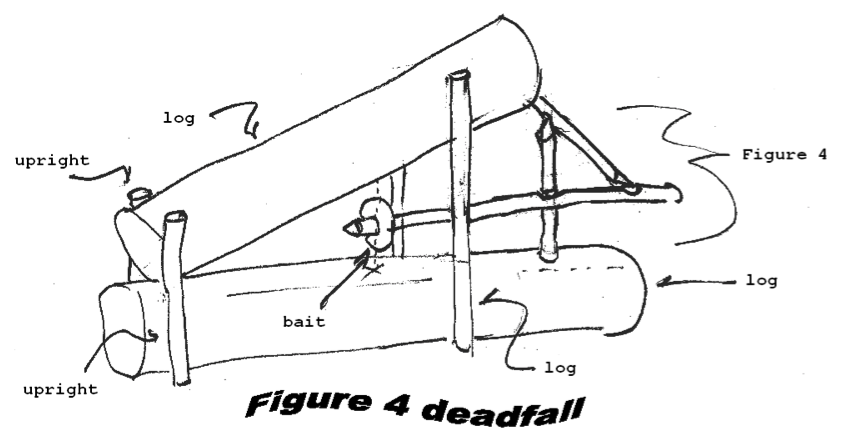
Example of a bed log and a falling log for trapping climbing animals, such as squirrels or martens. Note the figure-four trigger. (Image credit 101)
The trigger has to be placed so that the fall log will drop on it.
If you’re going to make a frame so that the animal has to go between the logs to get in there, the deadfall should be deep enough that the bait is well inside. Ideally, the animal will be caught by its chest.
If it’s going to snow, you can put some branches over the top of the trap so snow won’t get around the trigger, even if a big snowfall buries the whole works.
You can set the pieces of the trigger together and hold them with one hand, and then lift your log or rock and set it in place with the other hand. You could make half a dozen of these traps in the time it took for me to describe it.
Box Traps
[Oliver uses the term box trap to describe a trap in which an animal is caught live inside a box. One end of the box is open to allow entry for the animal. The trigger then causes a board to drop into the open end of the box, thereby trapping it inside the box.]
I make box traps out of suitably sized boards for whatever I’m catching, because it’s best if the box is just big enough so that the animal can’t turn around inside the box and cause a ruckus.
The bottom of the trap and the two parallel sides are solid boards nailed together. One end of the trap is closed off with a piece of hardware cloth instead of a board. The top board is hinged to fall down when the trap is triggered. At right angles to the the top board I nail another board that will close off the entrance once the top falls.
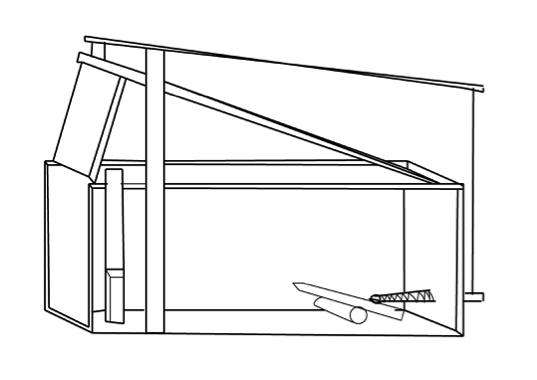
This image shows a box trap with the same kind of lid, frame and stick that Oliver describes, though with a different triggering mechanism. Drawing by Brady Wedman
I run the trigger mechanism up through a hole in the top of the trap, close to where the screen is. Then I have a frame that goes over the top of the trap, held up by a stick. A string that’s fastened to the entrance end of the lid runs up over the frame and hooks under a notch in the trigger stick.
If the animal bumps anything or tries to pull the bait out, the trap closes behind it. The trap now has a live rabbit inside. I can usually maneuver a piece of fairly stiff wire around so I can poke it through its heart or stab it some way to kill it.
Once I made a different kind of box trap to catch a marten that had gotten into my cache. I had patched its entry hole into the cache and thought that was the end of it, but he managed to get in again. I had to get rid of the thing, even though it was out of season and the fur wasn’t prime.
The boards on the top and bottom of the trap were maybe 4½ or 5 inches wide, and the side ones a little taller. I didn’t have any hardware cloth to close off the back end with, so I drilled holes 1/2 inch apart all around the back end and wove pieces of wire back and forth from side to side and up and down to make a screen.
At the front entrance I mounted a light drop-down gate. I bent pieces of coat hanger wire into very long staples, ran them through some holes that I had drilled into a stick of wood, and mounted the stick crosswise at the top of the opening on the inside.
The staples were long enough that the gate would lean at an angle when it was closed, with the tips pointing back and resting on the trap floor. Since the box was narrow and the marten couldn’t turn around, he’d have no way of raising the gate to get out.
A marten is not like a rabbit. Rabbits aren’t very pushy, but if a marten wants something, he goes for it. I used beaver meat as bait and caught him during the night.
I don’t use box traps much. They’re too much trouble to make and move around. But that one didn’t take up much room in the cache, and if I ever needed it again, it was there.
The main time I used box traps was when I was a kid; my dad showed me how to make them. We kept rabbits, and when they got loose, that’s how I caught them so I could put them back in their cages.