SLEDS
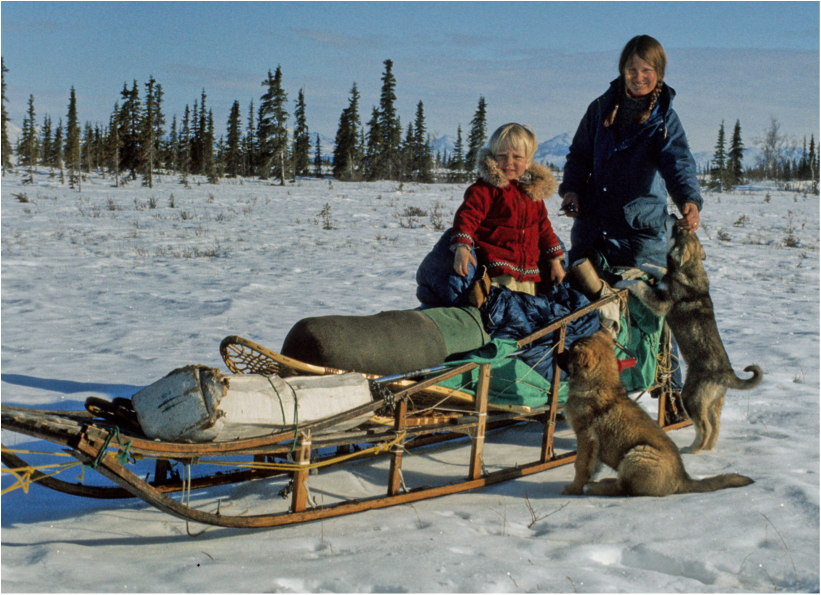
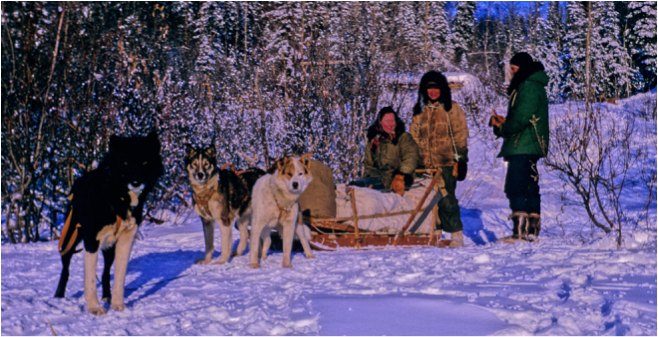
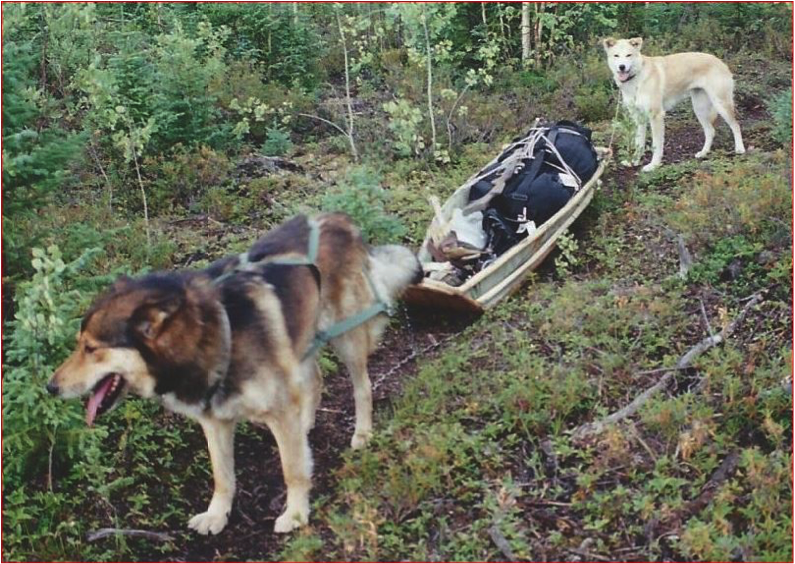
Sasha and Kalle Wik with puppies and basket sled. Image by Ole Wik
A variety of sleds are used in the North. Basket sleds can transport gear or people. Two-piece bobsleds can haul long logs or other larger items. A ski sled serves as an easy-to-transport and easy-to-build alternative, while a sledge is a basic sled for multi-purpose hauling. Toboggans can be used to break trails as well as haul loads.
BASKET SLEDS
I’ve made several basket sleds, although I don’t have any right now. They are in common use, as they are a very useful sled for traveling, for racing, and for carrying light- to medium-weight loads. They can be pulled by a dog team or by a snow-traveler. Here I’ll primarily describe basket sleds intended for use with dogs.
It’s beyond the scope of this essay to describe all the details about basket sleds or to give a step-by-step guide to building one, but I can give a few pointers about details I’ve learned over the years for getting your sled to work optimally. I’ll start from the bottom, with the runners.
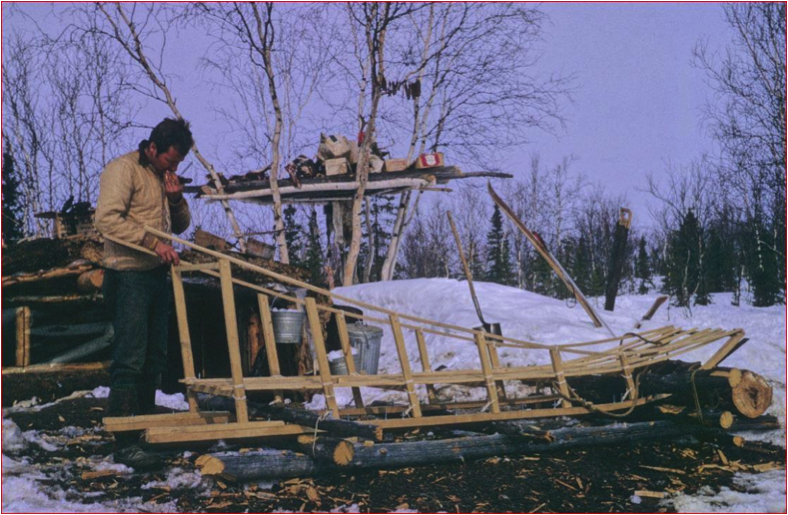
Don Williams building his basket sled in front of his sod iglu. Spring 1965, Ambler area. Image by Ole Wik
Runners
Of all the wood types we have in the North, tamarack is the best for making runners for a basket sled. It slides easier and is harder than birch, spruce, or poplar. It’s also easy to bend, though it is a bit brittle.
If tamarack is not available, then birch is the next hardest wood. Poplar is a fairly light wood. In a pinch you can use it to make a semi-solid sled runner for a basket sled and then shoe it with birch or tamarack or metal.
When a trail is used repeatedly, it solidifies and forms a crown along the middle as the snow builds up. A sled used in that situation has an advantage if the runners are a little closer together at the front of the sled than they are at the back. For a 10-foot sled, a 1-inch difference is about right. Make the difference smaller for a shorter sled, and greater for a longer one.
Having the runners closer together towards the front creates better tracking behind the dogs and less opportunity for the sled to slide off to one side or other of the crown in the middle of the trail. When the sled does begin to slide to one side or the other, the upper runner will have more purchase on the trail than the runner on the lower side. With the additional purchase, the upper runner will angle the sled enough to get you back on the trail. Also the runner on the lower side can slide without grabbing or biting into the snow, which could cause the sled to tip over.
You can achieve a similar effect to the difference in spacing of the runners by either tilting or curving the bottom of them. If your sled has wooden runners, curve the bottom of the runners a little, in cross section. That way the center of the runner will be in contact with the surface of a hard trail, but a wider area will support the sled when it’s sliding on soft snow.
If you have an iron or steel shoe added to your wooden runners, tilting the runner works well. To do this turn the sled upside down and lay a straight-edge across both runners so that the inside edge of each runner is against the straight-edge and the outer edge of each runner is down 1/8 inch or more. When the sled is back upright you will see that the angle of the runner is tilted so that the outer edge of the runner is higher by 1/8 inch or more. With this tilt, when you’re traveling on a firmly packed trail or on ice you’ll be running on a very narrow inside edge. The sled will pull easier because there is less friction due to less runner area on the trail. The tilted runners will also bite into the crusty snow or ice, preventing the sled from swinging side to side. When you’re back on soft snow the full width of the runner will again support the sled.
These considerations about the tilt of the shoe and making the front part of the runners narrower apply to all sleds.
Brake
The brake of a basket sled consists of a metal brake fastened to a long thin board attached to the bottom of the sled basket. The two long runners extending behind the basket of the sled are for the musher to stand on. The brake is suspended between these two runners just behind the basket, making it easy for the musher to step down onto to slow or stop the sled.
The thin board, about 6 inches wide, attaches under the crosspieces supporting the basket of the sled. The forward end is securely attached to the crosspieces about a third of the way from the back. The rest is only loosely attached, so that when I step on the brake, that board can bend down to drop the brake towards the ground. The board tends to move side to side, so you need to tie ropes from the back of it to the frame further forward. If you were to tie it right square at the back, it would be so tight that it would interfere with the brake’s dropping. If it’s tied ahead on the sled 3 feet or so, there will be enough give that you can depress the brake board enough to reach the trail.
In some cases, the brake is made with long sides so that it can be suspended on two springs fastened in a “V” shape to the handlebar area. In that case the brake board doesn’t require bending.
The brake itself should be hinged to the board so that it will go fully down into the snow when you step on it.
You can make a brake out of a piece of angle iron fastened onto the back of the board. Cut teeth into the angled part that’s facing down. These will sink in to the snow when you step on them firmly and stop the sled. The sides of the brake should curve up to keep your foot from sliding off. Both curved sides extend upward about 1-1/4 inches. There is a hole in each side for fastening a spring that holds the brake up when not being used.
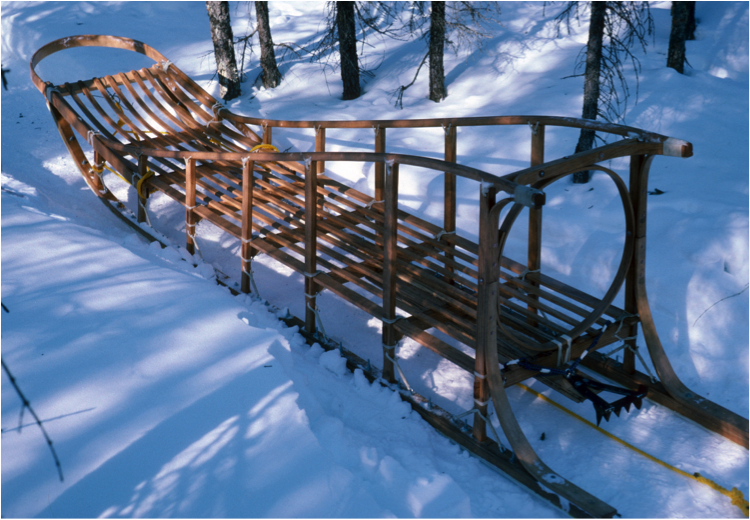
Basket sled. Notice the brake board and the spiked brake.
Image by Dorene Cameron Schiro
Sled anchors
While your foot on the brake slows and brings the sled to a stop, it’s necessary to anchor the sled in place before you walk away from it. A few dog teams are so well trained they will not run off with the sled, but most are not. Even well trained dogs can get excited when another dog team or a herd of caribou run by.
My favorite anchor was made from a piece of rebar, folded in the middle and bent at each end to form two hooks that bit into the ground or snow or ice. Those hooks had to be bent at an angle that allowed a tug to pull the anchor in deeper. I welded a foot piece across it to make a little platform where I could put my weight. [If an anchor of the type that Oliver just described happens to pull out and tip over so that the tines are pointing upward, it will then slide freely as you watch your team dash off without you. Many people used actual boat anchors, which will grip very securely in any position.]
I adjusted the anchor rope so that I could hook the anchor over the crossbar on the back of the sled when the sled was moving. Some folks also attach a long piece of rope to the anchor that trails behind the sled with a bulky knot at the end. Then should they inadvertently fall off the runners, they can grab the line and pull the anchor off of the sled and bring the sled and dogs to a stop, hopefully before dragging and bouncing the musher too far along the snow while he holds tightly to the end of the rope!
Sometimes it’s convenient to tip a sled on its side when you’ve stopped for a length of time and the dogs are still in harness. The sled itself, when on its side and not on the smooth runners, acts as an anchor. When I would check my net out on the ice, I’d anchor the back of the sled and also tie my lead dog to a piece of metal that I’d stuck into the ice. Anchored both fore and aft, the dogs wouldn’t be able to move around and get tangled.
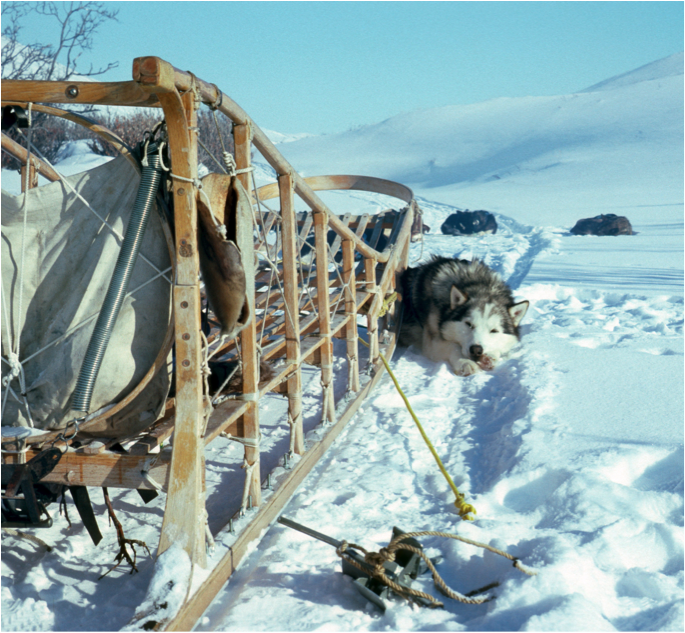
Sled anchor of basket sled in the foreground. Image by Dorene Cameron Schiro
Yoke
The dogs that pull the basket sled wear harnesses. The back of each harness is attached to a tugline that’s attached to the central gangline. The gangline is attached to a yoke on the sled itself. The yoke is usually made of heavy rope in a V- shape. It is tied to the sled 1-2 feet back from the front, to a crosspiece on the underside of the basket. Extensions of that same rope are tied further back to the stanchions or uprights of the sled, on each side, for additional strength. I usually tied mine to the second stanchion back.
The farther forward your yoke is fastened, the more control of the sled your dog team or towing force has, and the more difficult it is for you to steer the sled and shift it back and forth. By attaching the yoke a little further back, you will gain more control steering the sled, helping it to stay on the trail.
The length of the yoke is also important. When your dogs start around a curve they will exert more pull on the outside leg of the yoke than on the leg on the inner side of the curve. The longer your yoke is, the more sensitive your sled will be to your team’s change in direction. On the other hand, if you’re snaking back and forth on a crooked trail, a shorter yoke will give the driver more control from the back of the sled. You learn to shift your weight while standing on the back of the runners and even throw your weight from side to side to help steer the sled and keep it on the trail.
I fastened the yoke to the gangline with a large aluminum ring. The anchor rope was also attached to the gangline. It went back from the gangline, through the ring and under the basket, coming out underneath the sled behind the second stanchion, and then to the back of the sled where the anchor rode either in its own holster or on top of the handlebars. As I am right-handed, the anchor line came out on the right side of the sled.
Sometimes, especially in the spring, trails will almost invariably slope, so that your sled will constantly be pitching at an angle. To help control this pitching, I made the yoke inherently off center, with the longer arm of the yolk on the side where the anchor line was tied. That would naturally cause the sled to track toward the shorter side of the yoke. In my case, with the anchor coming out on the right side, the sled tracked to the left.
For normal travel, I’d put tension on the anchor rope when I stowed it atop the crossbar by the handles. That would pull the yoke’s ring back and would make both arms of the yoke equal, so that the sled would track straight ahead. As conditions changed I could tighten the anchor line even more to make the sled track toward the right, or slack it off completely so that it would track to the left.
That adjustable feature was very handy if the sled started to pitch off the trail on a slippery slope. As I adjusted the tension, the yoke would pull the front end of the sled back uphill.
For a short run across a slope, I could adjust the yoke by pulling or slackening the rope. For a longer run, I could change the tension by moving the anchor.
If my sled anchor happened to be on the wrong side for the particular slope, I’d take the anchor rope up to the front of the sled where I could run it underneath the sled, and pull it out on the other side. Then I’d set the tension so that the yoke pulled more on the downhill side.
I may have dreamed that whole system up; I never saw anybody else do it. It’s just common sense. The alternative is to run alongside the sled pulling the front end up, and that will tire you quickly.
I usually preferred two other types of sleds—a much simpler ski sled that was easier to build and more useful with a single dog, and a heavy sledge for dragging behind snow-travelers. [This is a word that came into use in Ambler with the introduction of snowmobiles.]
BOBSLEDS
A bobsled is made from two short sleds coupled together. Bobsleds are very convenient when you’re hauling long cargo like house logs.
Usually, rather than make a bobsled, I’ll use two ski sleds that I already have. Those ski sleds are almost flat, without much upturn at the front. I can put one of them ahead of the other pretty easily.
To convert a ski sled into a half of a bobsled, you place two sturdy pieces of wood lengthwise on top of the sled. The pieces of wood should be the length of the sled’s platform or maybe a little shorter.
Then you securely fasten a crosspiece, called a bunk, to those lengthwise pieces. The bunk is usually 2 inches high and 8 inches wide. Its purpose is to distribute load across the lengthwise pieces.
The bolster is a heavier piece of wood that lies above the bunk. It is about 5 inches wide, 4 inches thick, and as long as the width of the sled. It could be even longer, though if it sticks out too much to the sides beyond the runner line, it could snag on obstacles along the trail.
A heavy bolt, 1/2 inch thick goes through the middle of the bunk and up through the middle of the bolster. The bunk has to turn all the time, and the bolt acts as an axis on which it can swivel.
I usually use a piece of plywood for the bolster, but I’ve also used hardwoods from fork lift pallets. Birch works well and is more available near my homesites.
The first bobsled I made, I tapered the underside of the bolster from the swivel point in the center towards the ends, so that it was thicker at the center. However, it was hard to turn when it had the weight of a load on it. I made a big washer to put on the bolt before I mounted the bolster. Its purpose was to provide space to allow the bolster to turn more easily under load. This was especially important when I cam to a place on a trail where the sled was inclined to tip.
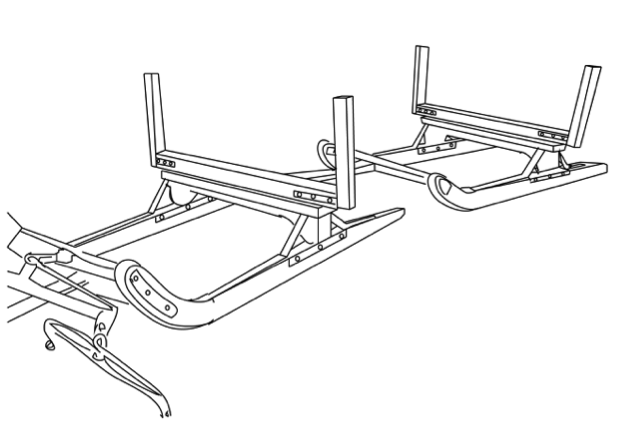
This drawing of a horse-drawn bobsled shows the bolsters resting on top of the bunks. A load of logs would hold the bolsters in a crosswise position, while the bunks would be free to rotate as the sled negotiates turns. Drawing by Brady Wedman
The sled will be going over rough spots on the trail, and your load has to be high enough so that your two sleds have some room to flex up and down.
The back sled is set up the same way as the front. If you have one sled that is longer than the other, it goes in the back.
Ideally, both the front and back sled will swivel. If only the front sled swivels, the back sled tends to track off the trail when you go around a short curve.
If I have only one sled that will swivel, I make a cross yoke between the two sleds. I tie ropes from the back ends of the front sled to the opposite sides of the front ends of the back sled. This yoke keeps the back sled tracking behind the front one. For example, if the front sled turns to the left, the yoke tugs the back sled, forcing it to swivel to the right, and it then follows the track of the front sled in a smooth arc.
When I haul logs, I load them with the butt ends toward the rear, so that the main load is on the longer sled and the front sled can turn a little easier. However, you can also put one butt ahead and one butt behind, so that each sled will have more or less the same weight.
To tie down my load, I make a loop of rope at each end of the bunk, long enough to almost meet the matching loop from the opposite side of the bunk once the sled is loaded. I fasten the separate tie-down to the two loops and cinch the load down.
To make the loops I drill a hole through the bunk from front to back near each end and thread rope through to form the loop.
My tie-down rope is about 10 inches long. Standing beside the sled, I tie it to one of the loops, I then finish it off by tying it to the tie-down on the first side, where I started.
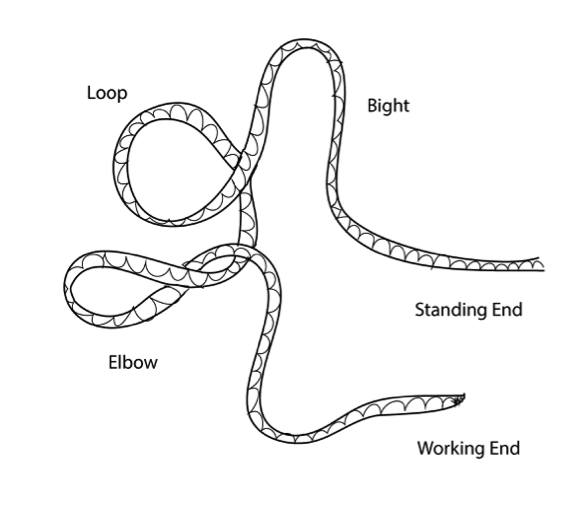
Rope Terminology. Drawing by Brady Wedman
I have pulled a bobsled behind my basket sled that is being pulled by a dog team. Since a bobsled doesn’t have brakes, I could only control my speed by depressing the the brake at the back of the basket sled where I would be standing. I ordinarily would only do this in relatively flat country with a few ups and downs but no steep pitches.
To control the bobsled behind me, I fastened a gee pole onto the front of the bobsled. [A gee pole is a long wooden pole lashed onto the right side of a heavy dog sled for steering.] I could hold onto the gee pole and turn it from my position on the back end of the runners of the towing sled. In some situations, I ran along ahead of the bobsled holding onto the gee pole to control it.
If you’re hauling five green logs of any size, there is a lot of weight. That can be dangerous. Your gee pole needs to be sturdy and fastened to the bobsled in such a way that if you trip, it will hold you up so you won’t get run over by the bobsled. This set-up is not for anybody who is not strong and active. You need to be coordinated and aware.
If you are carrying a heavy load on a steep incline, a chain brake is helpful. Wrap chains temporarily around the runners of the rear sled, one chain on each runner. Prop up first one side and then the other side of the sled while you wrap the chains several times around each runner from front to back. These chains provide drag through the snow to slow the sled down. A chain brake is not very effective in really soft snow as it can’t get enough purchase. When you have soft snow conditions, you would snowshoe over the trail ahead of time, making it plenty wide and adequately straight. Let it set up overnight so that the chain brake will have solid snow to work against.
Charlie Jones, a local and a friend, had a bobsled. One time we were fishing for sheefish out on Kobuk Lake. Charlie came with a long team of dogs pulling a 10 or 12 foot basket sled, and behind that a bobsled with a bunch of kids in it. They set up a tent with a wood stove, and had firewood to keep warm. It was a real production. The greatest number of dogs I ever used for the bobsled was four, but he had quite a few more than that.
I learned a lot of this information about sleds from Charlie. Some people know how a thing should be done, but they don’t necessarily know why. You ask them why they do it their way, and they say, “We always do it this way.” Charlie was different. He knew why, and he could tell you.
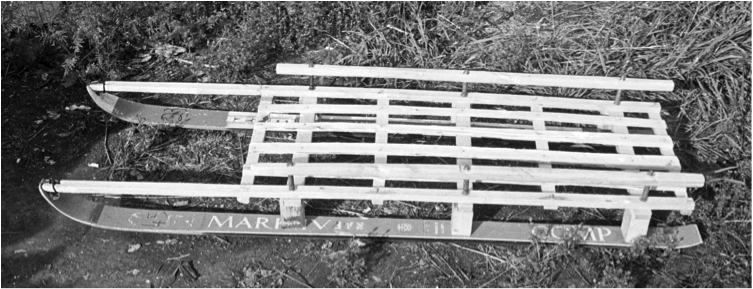
MAKING A SKI SLED
When I was living in Ambler, I built a small ski sled that was designed to fold up so that I could carry it in an airplane. One side could fold against the other side, making a narrow package that was perhaps a third longer than the overall length. It was compact for easy storage and transport.
I used it when my friend Dan Denslow and I hunted caribou together. He was a busy man and a pilot, and he couldn’t hunt on the same day that he flew. So, he flew me down by Onion Portage where the caribou were crossing, or were arriving and hadn’t yet started to cross.
I outfitted the sled to use when gathering the caribou carcasses after we’d shot them. I’d skin the carcasses and cut them up into pieces that were suitably sized for Dan to load into his plane and haul back to the village.
As the name suggests, the runners for this type of sled were made from old skis. The skis were wider in the front and back than they are in the middle. I planed the edges of the rear part of the skis down to be the same width as the center. I left the front wider.
Then I needed to get the camber out of the skis to make it easier to steer. To do that I took a rip saw and cut off the thicker wood at the center part of the ski, parallel to the top and bottom surfaces. That made the ski-turned-sled-runner uniformly flexible.

Camber is the upward arch in the bottom of a ski. Drawing by Brady Wedman
After taking off this wood, I heated the skis and clamped them into a frame that was wide enough to hold the entire sled. I designed it so that the skis were a little bit closer at the front of the sled than the back. [This causes the sled to self-correct and slide straight ahead if it begins to go off course.] I just left the runners flat from side to side, rather than setting the inner edge a bit lower as I would with a metal shoe on a heavy sled. [See Oliver’s essay “Basket Sleds” for more information about inner edges and shoes.]
Older skis were made with glues, which, if heated carefully, allowed the skis to take a new bend once the glue cooled. I provided a reverse camber by putting a shim under front and back ends of the skis. That raised the front end a bit, aiding the sled in climbing over humps. Most of the weight of the sled’s load was aft of center. [Aft is nautical and aeronautical term meaning toward the rear.]
Next I cut some wood blocks from a little pole and drilled holes down vertically through them. They were essentially short stanchions, about 2-1/2 inches long, that simply connected the skis to the sled deck.
In this sturdy sled, Oliver used ordinary commercial downhill skis, using blocks of wood to connect the skis to the deck.
Image by Curt Madison
I put a carriage bolt up through the bottom of the ski, through the stanchion, through a crosspiece, and then through a piece that was parallel to the sled on top of the crosspieces. That took a rather long carriage bolt, 8 inches or so. I filed off the sides of the bolt head so that when the bolt was passed up through the bottom of the ski, the heads were embedded in the wood within the ski’s groove. [There is a shallow, rounded groove that runs the full length of the bottom of a ski.]
I usually used four or five crosspieces on the sled. The first one was back about 18 inches from the front of the skis, behind where the ski started to curve up. This placement of the first crosspiece permitted a bit more spring in the runners. If the front part of the ski was too short and stiff, it was much easier to break off the end.
After I drilled holes for the bolts and put them in, I assembled the rest of the sled.
The sled bed slats were fairly light and about 2 inches wide. I spaced them a couple of inches apart to prevent snow from balling up on the surface of the sled. I used whatever wood I happen to have, but I liked birch because it was strong and flexible, and it didn’t break as easily as spruce.
Oliver designed a special rip saw that cut on both the forward and the backward strokes.
It allowed him to cut a tree trunk down into planks, and then into long strips which he used for slats in his sled. [See the essay “Rip Saws.”]
Image by Sasha Wik
I nailed the slats down with a single nail at each crosspiece.
Ski sled. Image by Curt Madison
The outermost bed slat fastened to the front of the ski with twine or cord. I usually drilled a hole crossways through that slat, drilled two holes through the tip of the ski, laced it round and round, and tied it off. That was a pretty critical place, as it took a lot of abuse. A bolt or other rigid fastener would likely have caused trouble there.
The back ends of the skis were bent up a bit, like the front. That end took a lot of strain when the sled was coming off of a hump with a heavy load, so I put the last crosspiece fairly close, in order to brace it and prevent it from breaking off.
One time, I put a reinforcement on top of the runner. It was thick enough that I could taper the end to fit the curve at the back of the ski. It was about 1/2 inch thick right underneath the last stanchion, and ran ahead a little ways. As I recall, I glued it on. I only did it that one time, and haven’t had any problem on other sleds without it. The runner is not intended for a person to ride on like a basket sled’s.
I used ski sleds with one dog, often to haul firewood—I just stacked the wood and tied it on.
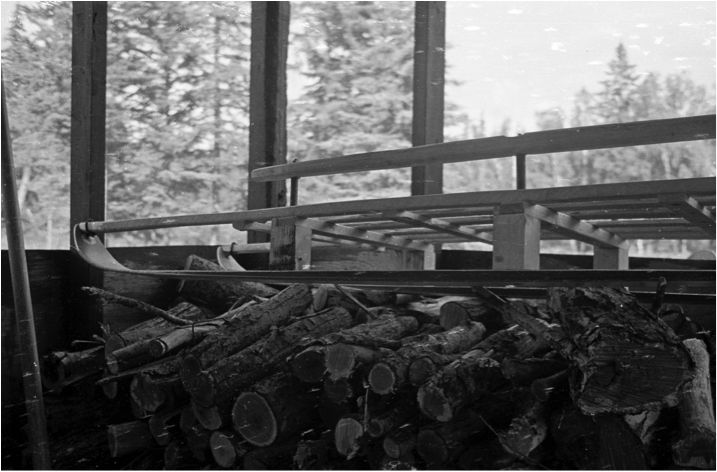
This kind of sled was also convenient when I needed to haul a couple of long poles or small logs. Poles or logs longer than the sled can get hung up in the snow as the sled moves along. When I planned to haul these longer items I raised the sled bed by tying a heavy piece of wood, like a 4×4, across the back of the sled and another behind the front crosspiece. These were tied to the crosspieces. I left these top pieces 6-8 inches wider than the sled to provide support for the load. I loaded the logs with the butt end forward so that the balance point was behind the center of the sled. The added 4x4s prevented the end of the log from touching the ground and also allowed for better distribution of weight. The same system could also be used with other types of sleds when hauling long materials.
A sled rigged for carrying firewood logs. This one is pulled by dogs, and Oliver can stand on the ends of the runners.
Image by Curt Madison
If you wanted to add a basket to the ski sled, you could tie a couple of small sticks to the front of the sled for top rails, with a couple of uprights to brace them, and add a crosspiece at the back for a handlebar. That will give you something to push on if you need to, and will help to keep your load in place on the sled. You can also lace a rope from those low top rails of the basket to the outermost slats of the sled bed in order to keep things from falling out the sides.
I usually added a brush bow to the front of the sled. This deflected the sled when it ran into a tree or another obstacle. The brush bow was made from wood or other bendable materials to form a rounded “bumper” at the front of the sled. Since the sled was pretty low to the ground, I didn’t want the bow sticking too far ahead where it would dig into the snow when coming over a bump or when there was soft snow. The bow needed a little give, as I wanted it to break loose on severe impact. I tied the back end just tightly enough to hold it in place against a small impact. On a severe bump, I wanted it to be able to break loose.
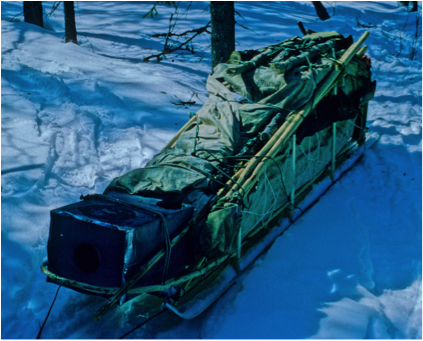
Oliver’s hybrid ski sled/basket sled, Kobuk Valley, 1975.
Note the brush bow at the front, curving beneath the woodstove box.
Image by Sasha Wik
Sometimes instead of a more elaborate brush bow, I just lashed one sapling on each side of the sled with the small ends ahead, and tied them together. I could also have boiled or steamed a piece of birch and bent it on a frame, but I didn’t usually bother with that.
There are various ways of pulling a ski sled. I usually attached a light chain that ran from the front crosspiece around the outsides of the sled and up to a ring, where I tied the tow line.
If I was pulling it myself, I attached a long, doubled rope. I stepped into it or slipped it over my head and down to my waist. Then I pulled the bight that was in front of me ahead and put it over my head and shoulders, around the back of my neck, so that the rope ran under my shoulders and back to the sled.
That worked pretty well, but quite often, especially if I was helping a dog, I just threw the loop over one shoulder. By fastening it to the upper part of my body, it was not as jerky as it would have been if it were fastened to my waist.
I usually fastened a sled bag on the back of every sled, as it was a handy place for small items needed while on the trail. I carried a piece of candle or paraffin, and when I stopped to put the sled away, I rubbed some on the bottom of the runners. It kept the frost from building up on the runners, which would drag heavily. With the paraffin, the overnight frost rubbed right off as soon as I started up again in the morning.
I never used any wood preservative on the sled, but it might have been a good idea. I ordinarily used the sled when the weather was cold, and the rest of the time it was under shelter to protect it from wet weather.
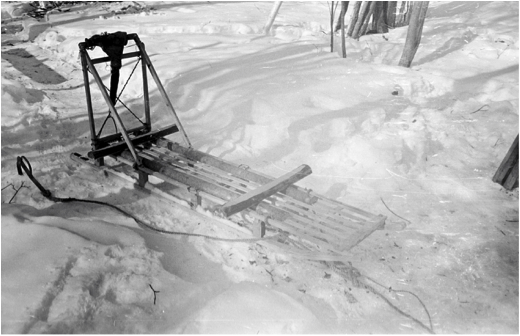
MAKING A SLEDGE
A sledge is a low sled on runners, traditionally pulled by draft animals, in this case, dogs. A sledge is easier to build than a basket sled, it is sturdy and built to haul heavy loads. It is not as flexible, light, or maneuverable as a basket sled.
You can make a sledge with solid wood runners using ordinary lumber. I made the boards for mine out of logs using a rip saw.
Making the runners
The sledge’s runners are substantial. They are vertical on the outside edge, while on the inside they taper up from the running surface, so that the top of the runner is wider.
If the bottom of the runner will get a metal shoe, make the runner so that the metal will extend past the wood. That way the wood itself will not be dragging against the snow causing friction.
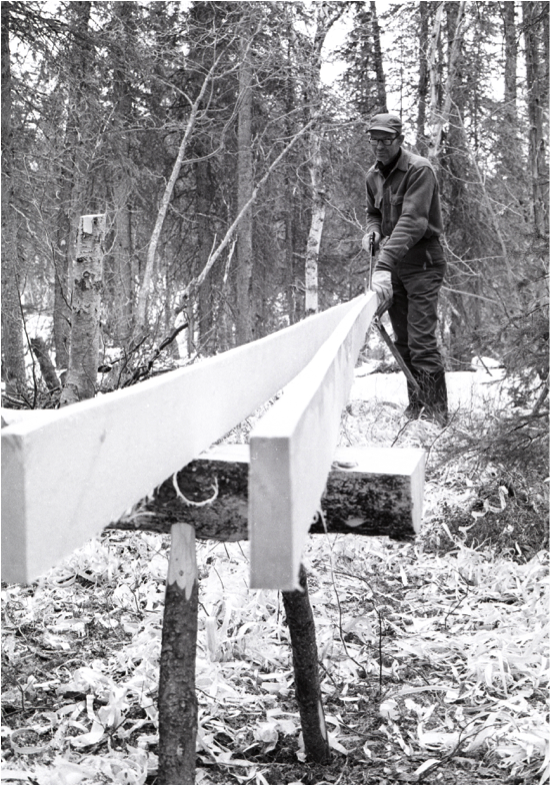
At the front of the sledge, the runners need to upturn. You cut the board to make the upturn. Plane the curve where the runner hits the snow, so that the runner tapers gradually. On most ordinary rises you encounter on the trail, this gradual taper will smooth out the climb. A gradual upturn also gives your tow line a better purchase on the front of the sled when making a turn.
This sled shows the substantial, gradually upturned runner. Image by Sasha Wik
Cut the back end of the runner board down halfway to form an extension to stand on. If it is a heavy sledge, you don’t need a really long extension out back to hold your weight up.
On the other hand, if the sledge is short and stubby, it will bounce up and down in front, making steering difficult. You can get around that by having a longer piece of runner under you for the standing extension. That gives your dogs a big advantage in pulling the sledge, as it distributes the musher’s weight better.
Oliver and his daughter Dorene as they prepare to leave Ole and Sasha Wik’s place after a visit. Ole stands at far right. Note that Oliver is standing on the flat place at the end of the runners. Image by Sasha Wik
Making the sled bed
The simplest way to make the sledge’s bed is to nail boards to the top of the runners, crosswise from one runner to the other, spaced a bit apart. Then, using large nails, fasten a long piece of wood to those crosswise boards on top of the runners on each side.
With use, that top strip is going to loosen. On an uneven trail with a load, your sled is going to flex a little after it’s worn in, but the flex is limited. By having the tops of the runners wide and the ends of the crosspieces well-nailed, the sled will hold together and be useful for quite a while.
Lashing the sled
Ordinarily when I’m lashing a sledge, I cover the load with a canvas or tarp. I’ll have a tie-down rope fastened to one side of the sled in the middle of the load, usually with a clove hitch [two successive half-hitches around an object].
I tie one end across the load at the back of the sledge, the other at the front. I lace the rope in such a way that I can cinch the load tightly. I usually put my foot on the load and wiggle it as I draw up the rope to tighten it even more. After jarring along for some distance under way on the trail, I stop and tighten the lashing again.
Hitching the sledge to a snow-go
I prefer to pull my sledge with dogs, but these days many people hitch a sledge to a snow-go. As far as the hitch itself goes, it has to be long enough so that it doesn’t hit the tracks when you make a sharp turn, and it should be a bit flexible.
Some people use ordinary ball hitches for the connection to the snow-go. That works well.

A basket sled hitched to a snow-go. Image by Sasha Wik
* * *
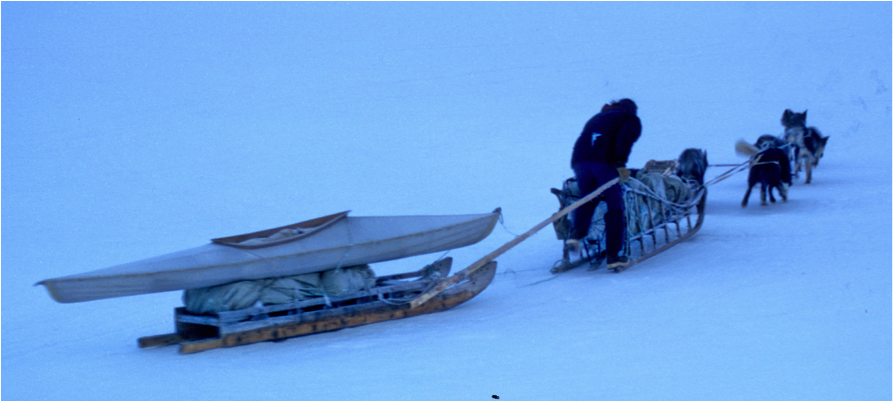
Ole Wik and Tinnik haul a small sledge to spring camp, Kobuk River, 1975. Image by Sasha Wik
Keith Jones, one of Oliver’s lifelong friends, taking a load of gear across the river to spring camp, Kobuk River, 1973. Image by Sasha Wik.
TOBOGGANS AND THEIR KIN
When I moved to my lake homesite, I took two sleds with me. One was the little fold-up sled that I’ve described elsewhere. The other was a 9-foot toboggan that I’d made. I cut 2 feet off the tail so that I could get it into Cy Hetherington’s plane. [Cy Hetherington was the pilot and owner of Hot Spring Aviation, Manley Hot Springs, Alaska.] For quite a while those were the only two sleds that I used.
My toboggan was a rather special design that I’d worked out. It was 14 inches wide and 7 feet long. I sized it to trail behind me in the tracks of my snowshoes. I could haul a pretty good load of wood or other items with it.
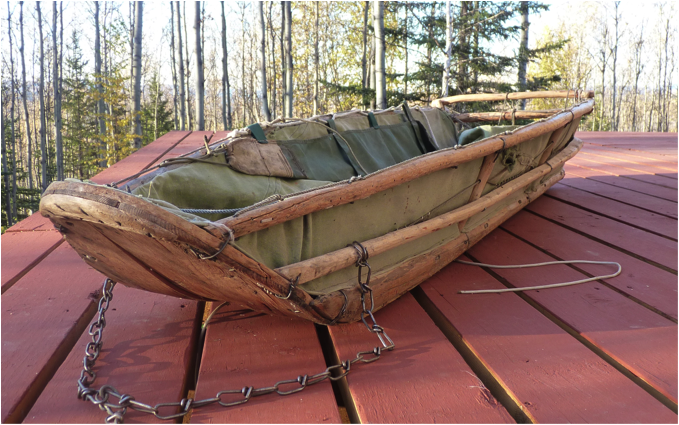
Oliver’s toboggan. Images by Dorene Cameron Schiro
When you make a snowshoe trail, it’s not perfectly straight on the sides. Often I used my toboggan as part of breaking the trail as I snowshoed along. It would tend to level the snow a bit.
Typically when making a trail I would go out with the toboggan more or less empty and come back with a load in the same day. The snow could set up a little bit in a couple of hours, but you couldn’t count on it. It sets up better if you break trail and wait overnight. [Setting up is when snow crystals are physically disturbed, for instance by stomping on them as in breaking trail. The crystals are broken and then refuse by freezing into larger crystals in a process called sintering. By morning a broken trail will harden nicely.]
For a yoke, I tied a light chain on the outside of the toboggan, fastened with several wraps of lighter wire. The chain was 3 feet long and a little heavier than a dog chain. The links were the twisted wire kind, but I have also used a welded link chain.

Detail of Chain Yoke
I pulled this sled myself or had my one or two dogs pull it as I didn’t have a team of dogs at the lake. If the toboggan were to start to overtake me on a downslope, it would ride over the chain yoke, which would then act as a brake or a rough lock. The yoke had to be gradual enough and long enough that the sled would be fairly responsive in that kind of a situation. I used a chain for the yoke because a rope would have worn out.
There was a short piece of chain tied to the center of the yoke, and then a tow line. When I was man-hauling the toboggan, I used a soft cotton rope, 1/2 inch in diameter, that was doubled and had a loop in it for the tow line.
Some people would wear a loop like that around their waist. I never liked that. I usually carried it over one shoulder and under the other arm. By having it over the upper part of the body, it didn’t jerk as hard as it would have on my waist. The sled was probably traveling 8 feet behind me, or more.
I worked out a similar tow line for the dog. I had a 2-foot piece of rope that went back from the dog’s harness to the end of the tow chain that attached to the yoke.
The tow chain was long enough so that some of it would still be sticking out in front of the sled after it had run ahead over the rough lock. That was important when I was using a dog—I didn’t want the toboggan getting too close to the dog. It took a while for a dog to get used to the threat of being overrun.
If the sled overran the chain, the dog could usually pull the rough lock back out and get the toboggan going again. It was quite automatic, unless the rope or chain got tangled up on something.
Using the toboggan in the summer. Image by Dorene Cameron Schiro
Building the Toboggan
One day when I was out getting firewood, I cut a dead tamarack that had unusually straight grain. It was about 8 inches in diameter or a little over, and had been dying for quite a while. It had very little sapwood on the outside. I cut off a piece almost 10 feet long and saved it. It came in very handy.
As I’ve mentioned before, tamarack slides on snow the best out of all the Alaskan woods, because it is hard. If tamarack is not available, then birch is the next hardest wood.
You could also use commercial hardwood for runners or for the bottom of a toboggan. It would be heavy for a toboggan, but not that much heavier.
Anyway, I ripped my tamarack trunk down through the middle and ripped a board off each side, about 1 inch thick or maybe slightly more. Then I ripped another board, about 3/8 inch thick. The three boards were 5 inches wide and tapered a little bit on the ends, since they’d come from the top of the tree. The two thicker boards were for the outside of the bottom of the toboggan, and the thinner one was for the center of the bottom. [By “ripping” Oliver means cutting with his rip saw, which cuts with the grain of the wood. Most rip saws cut on the forward stroke only. Oliver used a rip saw of his own design that would cut on both the forward and backward strokes. See the essay “Rip Saws.”]
I planed the edges of the thicker boards down so they were rounded in cross section, to act like runners on the underside of the sled. On a hard trail or on ice, the toboggan would slide better, and would also turn easier.
I cut a little groove on the inner edge of the two thicker boards, like lapstrakes [thin strips of wood that run along the sides of the hull of a boat, overlapping the top edge of the strip below]. I thinned the edges of the center board down a little bit more so that when it was mounted to the bottom of the toboggan, the lips of the two outer boards would lap over it and keep snow from coming through there.
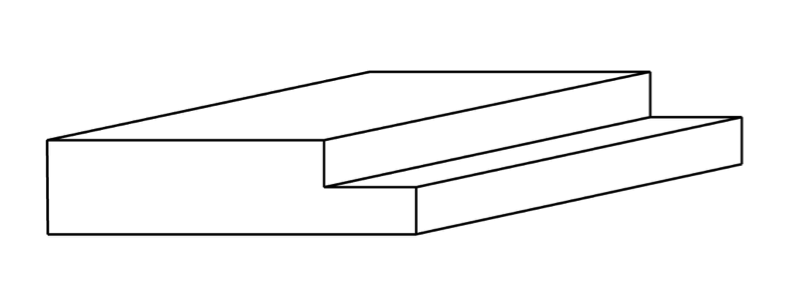
Oliver’s “little groove” was essentially a long rabbet. The “stair” in this image is a rabbet. Oliver’s rabbet ran down the entire length of his two outer boards. The thin “bottom steps” on the outer boards then overlapped the thinner center board. Drawing by Brady Wedman
Then I shaped the front 18 inches or so of the board ends by thinning them down to about half an inch, or a little less. I stuck them in hot water to soak, put them on a bender similar to what I described for skis, bent them up, and left them to dry. The front of the toboggan rises about 6 inches as it curves up. All of these dimensions are estimates.
There will be noticeable differences between the wood a tamarack tree grew during different seasons in this climate. The early or summer wood is going to be softer, and wear away over time on a sled, leaving the harder late or winter wood.
I didn’t want the hard winter grain feeding out in such a way that it would be catching on the trail once the summer wood wore away, so I attached the boards to the toboggan with the heartwood interfacing with the snow and the butt ends forward. [The heartwood is the wood nearer the heart or center of a stem or branch, often darker in color from the sapwood.]
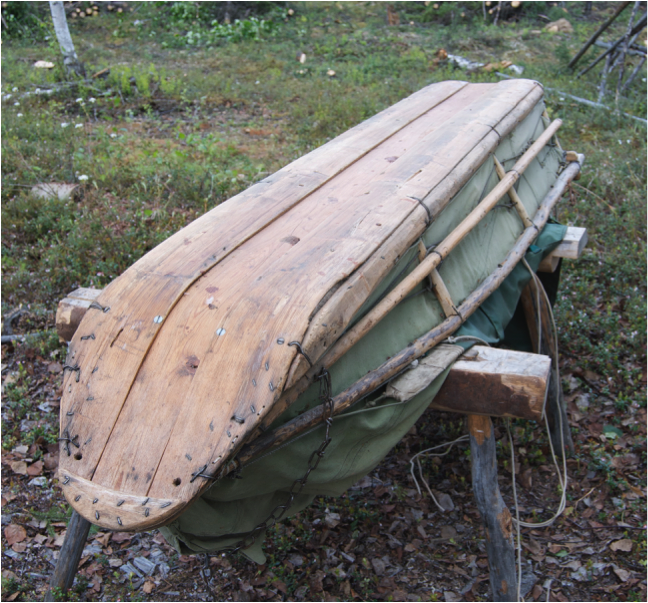
Bottom of toboggan. Oliver was always trying new techniques. The sled bottom in this photograph is attached differently than Oliver’s description below.
Image by Heidi Dammann
I put cross pieces on the inside of the toboggan every foot or so. They were not heavy—maybe 1-1/4 inch wide x 1/2 inch thick. I tied the crosspieces to the bottom. I made two holes through the bottom board for each tie-down and cut out a little groove between them to house the cord, so the cord wouldn’t drag against the ground.
The front of that toboggan didn’t curl up and around and over—it just came up like a sled runner. I cut a couple of thin boards left over from my tamarack and fastened them onto the sides so that the bent part would stay up there.
The side pieces were about 3/8 inch thick. They were 4 inches high at one end and a little higher at the front, and they helped to hold the shape of the entire sled. They were notched to fit over the ends of the crosspieces so snow couldn’t get in.
I fastened spruce sapling quarter round just inside the side boards, resting on the crosspieces, to stabilize the boards. That left a gap under the quarter round, but the sidepieces sat right down on the sled floor.

Quarter round is a wood board with a cross section in the form of a quarter circle. It is often used as molding. Drawing by Brady Wedman
I made holes through the side boards and put 1/4-inch selvage rope around the quarter round. The selvage was a piece of ugruk rope or maybe a piece of moose hide. It went through a hole near the bottom of the crosspiece, around the quarter round, and up and out through a hole near the top of the quarter round. I didn’t put a half hitch over that, but I stretched it tight and did the same thing again. The holes were 18 inches apart. The rope filled up the holes.
I attached another board that held up the back of the sled, and the curve of the sled held up the front. Then I lashed everything together.
Finally I took a length of canvas maybe 30 inches wide, and fastened it to the inside of those edge boards on each side, so that I could fold it over the sled contents. When you’re breaking a trail for a toboggan in soft snow, some of the snow invariably wants to tip over onto the sled. The canvas protected the load.
Plastic Sleds
Eventually I made a toboggan out of two little boat-like plastic sleds kids like to use.
Over at a neighbor’s place a bear had tossed things around and damaged a couple of old plastic sleds that had been worn out by the kids. I was able to salvage the front end of one and the rear end of another. I overlapped the rear one onto the inside of the front one to make a toboggan-like sled that was about half again as long as the original plastic sleds—maybe close to 6 feet.
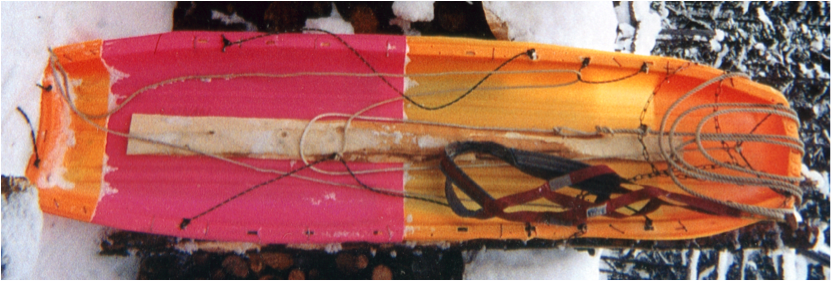
Oliver’s reworked plastic sled. Image by Tonya Schlentner
The overlap of the two little sleds was about 6 inches. I didn’t use any fasteners. Instead, I installed a piece of thin board along the center on the inside, sewed up with wire going through the bottom of the sleds.
I also reinforced the sides of the overlapped sleds. I laid a piece of birch, maybe 1-1/4 inches in diameter, underneath the lip on each side and through a hole in the side just below the lip. I tied a couple of half hitches every 8 inches around the lip of the sled and the stick, so that the whole sled was supported by the two sticks. I fastened the usual rough lock to the front ends of the sticks.
I didn’t like to use my real toboggan on wet trail or damp ground, but this plastic sled pulled nicely in those conditions, or even on bare ground. Eventually I used the plastic sled exclusively for hauling jugs of water up from the lake.
The board made a hump in the middle. That would have been a problem when I was hauling five-gallon cans or something like that, so I’d lay a couple of loose lath-like strips to stiffen the bottom, distribute the weight, and make a flat surface for them to sit on.
Sometimes I pulled it myself, but usually I used the dog.
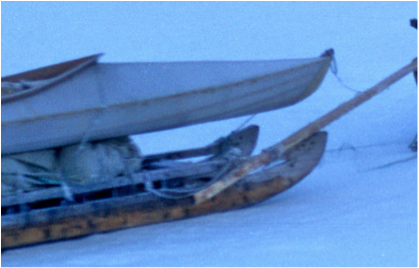
Sport Sleds and Ahkios
An ahkio is an open, canoe-shaped sled. The name is Finnish. The commercial versions are made of plastic, and are sometimes called “sloboggans.”
George Hobson, a pilot out of Fairbanks who made deliveries out my way, saw one of those plastic combination “sloboggans” on sale. He bought one for me and brought it out, and I paid for it. It was wide, somewhat deep, and quite a bit long. It was originally designed to be pulled behind a snow-go.
I fixed it up in a similar manner to the children’s sleds, with a little pole sewn onto each side and with a rough lock yoke. I didn’t need to reinforce the bottom, as it was made of heavy, durable plastic. It didn’t leak at all. That was very convenient when we got quite a bit of rain and my trail got soggy and had standing water.
I seldom ever use that tamarack toboggan I made any more. The plastic sleds are lighter and much more practical. I would have never bought one, but since George brought it out, I couldn’t tell him to take it back.