BLACKSMITHING
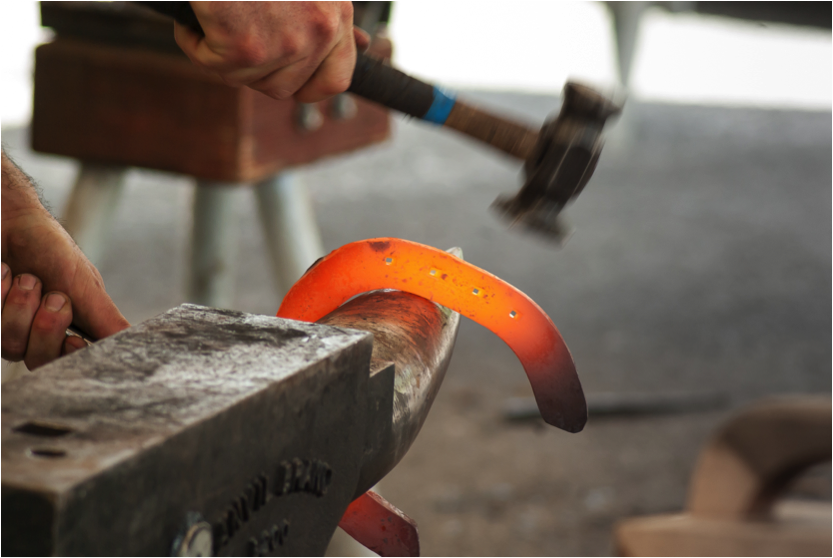
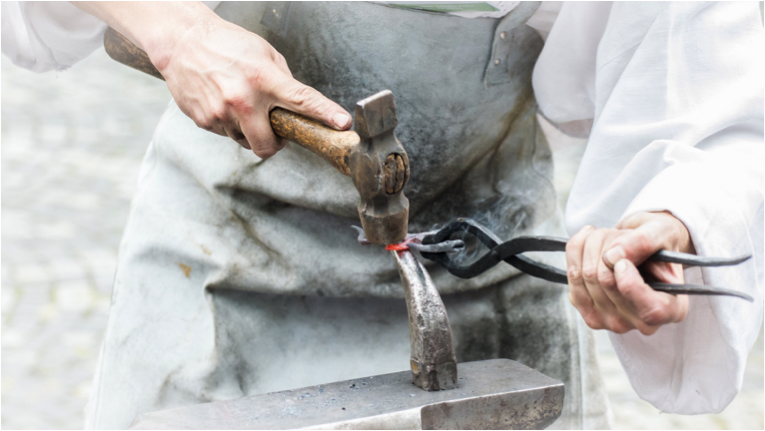
A blacksmith shapes a horseshoe. (image credit 27)
Blacksmithing is an important skill for living a self-reliant life and making one’s own tools. Oliver was a self-taught blacksmith.
BLACKSMITHING
I grew up during the Depression. My father didn’t have a lot of money, but he did have the initiative to get a piece of unimproved stump land and turn it into a home. He was an adaptable person. At that time, I was old enough to have an interest in working with him, and that was the big start of this lifestyle for me.
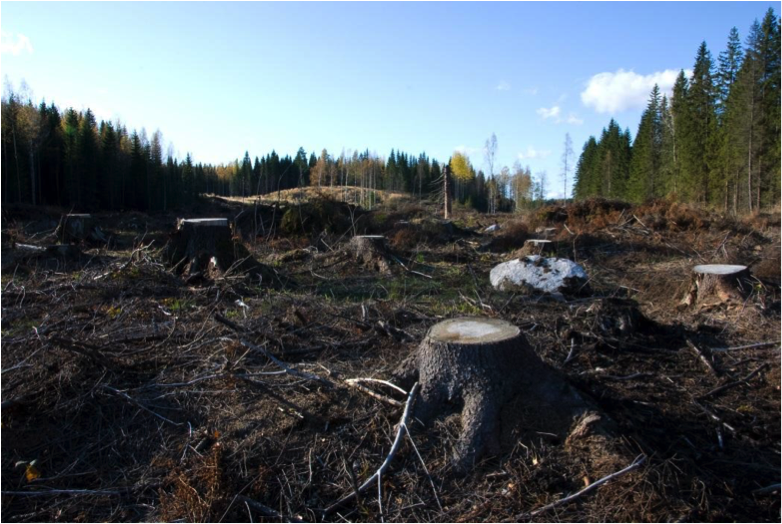
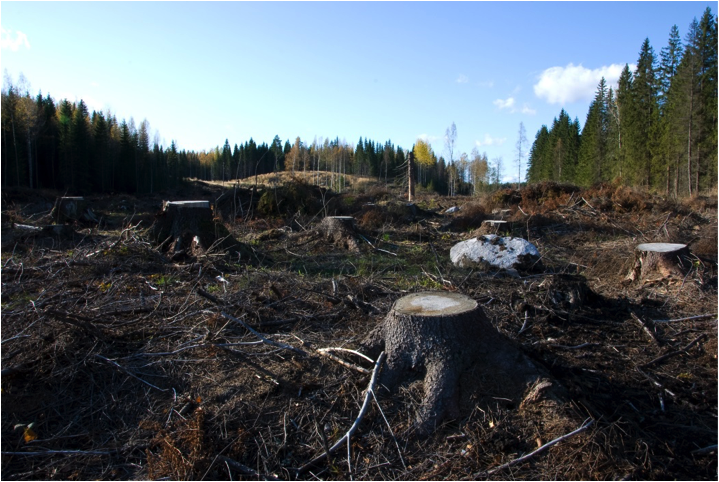
Stump land has been cleared of commercially valuable timber. (Image credit 66)
In that sense, the Depression was a very valuable experience. I learned that when you want something but don’t have money to buy it, you can make it.
I wanted a knife of my own. The loggers around the area where we lived sometimes left a file sticking in a stump out in the bush. If I found a file as I ran around out there, I picked it up.
There were a few touring cars that had folding tops in the junkyard. Their framework was made of wooden bows with metal stays and braces. I made sleds from those hardwood bows that worked very well.
Anyway, I went to the dump and cut a piece of soft iron out of the framework that had held up a car’s folding top, and worked on it for a long time, shaping it into a knife blade.
Of course it was very mild steel, maybe not even steel at all, so naturally it wouldn’t hold an edge. I asked my dad about it, and he said, “Take it over to the blacksmith at Meadowbrook,” which was a big dairy farm that had horses and a well-equipped blacksmith shop.
I took the knife over there and stood inside the door watching the blacksmith at the forge. He asked me what I wanted. I showed him my knife and told him the problem. He asked what I had made it out of, and I told him.
He was encouraging and said, “Let’s give it a try. Maybe we’ll luck out.”
He heated my blade and cut it through some tissue paper floating in a bucket of water. [The tissue paper helped to slow the cooling process on the outside of the blade as it struck the water, preventing cracks.] He pulled the blade out cold and touched it with a file.
Then he explained to me that steel is iron with a certain amount of carbon worked into it, and that this piece had practically no carbon. He said there was not much that could be done about it; the steel would always be soft and would never hold an edge.
I was six years old, and I remembered what he told me. It was some time before I tried to make another knife.
The next time I did, I used a piece of a saw. I found a two-man saw that had been broken, and I cut a piece of it and went through the process the blacksmith had shown me. The steel in a crosscut blade is soft enough for filing, so I was able to use that blade just the way it was, with the original hardness.
I tried tempering it. [Tempering is drawing out the hardness from a piece of metal to the precise degree of ductility desired.] In those days of the early twentieth century, most men in the rural northwest had grown up on homesteads and knew about that skill.
My dad didn’t have a forge, but he did have a blowtorch. I stood some bricks on end and made a makeshift furnace, put the blowtorch inside, and heated the steel with that. I didn’t have any supervision, but I’d watched my dad use the blowtorch, mostly for heating soldering irons. It wasn’t hard to figure out how to use it. I don’t remember ever having restrictions on any of the tools we had. I used whatever I needed.
My dad gave me a few pointers on tempering. He said to get the steel red hot, but to avoid letting it shoot out sparks, because that would burn out the carbon in it. Then he said to plunge it and reheat it. I waited until it turned a dull cherry red before plunging it. That drew the hardness out of it.
I did all that and got the blade too soft. So I heated it better the next time. I let it cool, and then I had a workable piece of equipment. That’s the way I learned about blacksmithing, through lots of trial and error. I learned by experimentation, usually the hard way, by making a tool and having it split, or by having big chunks break out of it.
I often use files as a source for steel, depending on the project. Most files are made of high-grade carbon steel, but they’re coarse, unsuitable for edge tools like a knife. Even as a file, it’s easy to break teeth out of them. But you can change the steel if you heat it to a certain temperature—the “critical temperature”—just before it gets really malleable. Then you pound it. That compresses the grain structure in the metal and makes it tougher. If you work it enough, you can bend a blade without breaking it.
You have to keep the steel above the critical temperature while you’re working. That temperature differs for different types of steel. I go by color—the color you want to keep the steel at is red, but not bright red. Steel with a lower carbon content will work at a lower temperature.
I don’t have solid rules that I go by with blacksmithing. I experiment with the steel. I often salvage steel from old tools or car parts. I’ll stick the end of a spring leaf [a type of curved steel spring commonly found on wheeled vehicles] into the fire, get it hot, bring it out, and see how malleable it is. The color will change fairly rapidly, indicating it’s cooling off, and then I stick it back in the fire.
If I can make a good chisel or a good axe out of a piece of spring leaf, I’m happy. I’m proud of the ability to take a piece of scrap steel and make a useful tool. Since my tool didn’t come from a factory, you might say that I cut out a whole lot of middlemen!
The more I can do for myself, starting with materials that are commonly available or otherwise thought of as throw-away items, the more I am an individual in my own right, and the less I am dependent on someone else’s initiative and ingenuity.
Blacksmithing tools and forges
A fellow who lived at the edge of Fairbanks had a pretty extensive collection of old blacksmith tools—shop tools, hand-cranked tools, and such—and he was selling them. They were on his place when he bought it, and he had no use for them.
I bought some blacksmith hammers, a pair of tongs, a drill press, and a few other things from him. I also bought a medium-sized anvil. It was a conventional one with a horn. It probably weighed sixty or seventy pounds. I brought it up to my homesite in Ambler. If you have an anvil like that, along with a drill press and a hacksaw and some spring leaves or other assorted metal, you can do a lot. That old anvil is out at the lake homesite now.
One of the hammers I bought was a cross peen. The peen is narrow, tapered, and takes up the full width of the hammer. I have another hammer with a peen that is in line with the handle rather than extending beyond it.
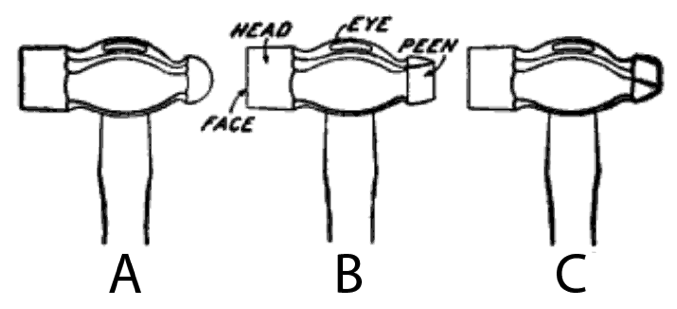
Left to Right: A: Ball peen, B: straight peen, and C: cross peen hammers. (Image credit 67)
Those peens aren’t sharp like chisels, but they’re handy for working a piece of metal into a different shape—thinning it down, for instance, making it longer or wider.
Usually I used a homemade forge—a grease barrel with the top beaten and stretched, and some small holes punched into it for ventilation. My fan was a commercially made device with a geared-up crank, mounted on a block of wood alongside the tank.
If a fan is positioned directly under the forge, coke and ash fall on it. [Coke is a fuel with a high carbon content and few impurities, usually made from coal.] I placed my fan in the side of the barrel so it blew up through a grate. It worked well because the air flow was more or less even.
I’ve worked with many handmade forges, so I understand what has to happen. You rake your coals and burned-out coke into a pile and get a fire going. Then you lay your iron on top of that and bury all of it except a little area where the heat comes through. You can heat any specific part of your project to extreme temperatures.
Forges can also have bellows or centrifugal blowers. On the custom-made ones, there is a trap door so you can dump out the ashes that come through the grate.
Sasha and Ole Wik visited Sweden in 2004. One of the highlights was a trip to the farm where Ole’s father grew up. The attic of the barn was like one of those archaeological sites that people had abandoned quickly, leaving everything in place.
The most interesting thing was a small forge built by Ole’s father when he was a young man in the early 1920s.
It was as small as a portable barbecue grill, and it featured a flywheel that he operated with a foot pedal to drive a centrifugal fan. The firebox was a square about 8 inches wide. He could build a good fire in no time for working on small stuff, such as the metal fittings on the ends of the wooden shafts that attached a cart to the horse’s harness.
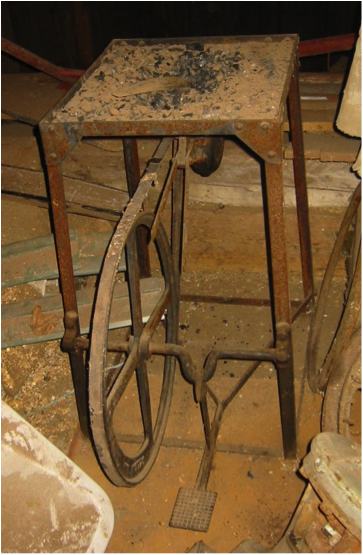
Carl Wik’s homemade ässje (forge), Åm, Västernorrland, Sweden. Image by Sasha Wik
I had made a similar forge in Norway. Per Øyvind Sørebø and his friend, Norway natives, wanted to make an axe head and an adze, and we needed a forge to shape the tools.
Per’s friend had a fish tank with different kinds of fish in it. The tank had an electric air pump that aerated the water. We found an old tractor wheel. It was heavy iron, 1/2 inch thick, and still had a tire on it.
Per had a charcoal-burning barbeque there that he used for cooking steaks. I rigged that up for the forge, taking the blower from the fish tank and turning the tractor wheel into an anvil. Per and his friend were somewhat amazed at what you can do if you heat a piece of iron.
Our main problem with that forge was keeping enough charcoal on hand. Part of the time we made our own. They often ate at an outdoor fireplace in the evening and let the charcoal go out quickly, but it takes a lot of charcoal fuel if you’re going to do extensive blacksmithing. We ended up buying some.
Charcoal is made from wood. Coke is made from coal. Coke is like coal, but without the combustion material. If you use straight coal, you have to deal with lots of flames and smoke.
The process for making coke is similar to making charcoal. It’s coal that is heated and partially burned, so what is left burns like well-lit coals. It’s already been reduced.
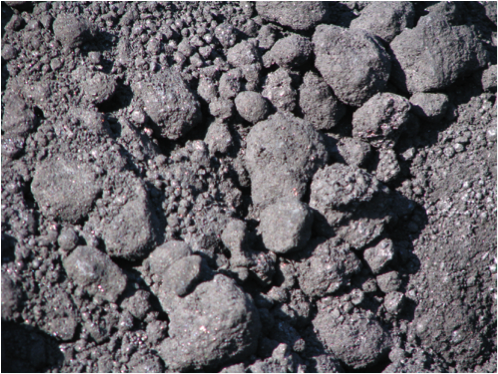
Raw coke. (Image credit 68)
When I was living outside of Fairbanks in the early 1950s, I’d buy twenty-five-pound bags of coke. The coke was like briquettes, but irregular, as if it had come from a big broken sheet. When feeding your forge, you have to start with a wood fire, and then add coke to it.
These days I use regular firewood in my stove-forge, which has a door on its front. I use another piece of metal made out of a bucket with the edge folded over to cover the opening, leaving a little space under it so that I can insert my wood.
I keep a good fire going, and as I need more coals, I rake the partly-burned wood in front of the draft, making an area that can heat a piece of iron as hot as needed. You heat the metal until the sparks are flying, indicating that the carbon is burning out of it.
This system of control isn’t nearly as good as with a proper forge, but it gets the job done.
BLACKSMITHING TECHNIQUES
Blacksmithing is the ancient art of working metal. This essay is primarily concerned with steel, and in most cases, with salvaged or repurposed steel, a useful resource in rural Alaska. The art of blacksmithing is wide and varied. See the end of this essay for a list of additional resources about the skill.
A blacksmith works a piece of metal on the horn of an anvil. (Image credit 69)
The basics of working with steel
Steel is an alloy [a blend] of iron, a small amount of carbon, and varying amounts of other elements. Most steel is purchased in its softest state, known as the annealed state, which is generally the most workable state best for machining. Machining is the process of bringing a piece of raw material into its desired final shape and size by controlled material-removal. After machining it is often desirable to bring the steel to the hardness best suited for that tool’s intended use. Heat is used for this hardening process.
Each unique alloy blend of steel has a critical temperature range at which the atoms of the metal and the atoms of carbon mix and ultimately bond. The lowest temperature in the critical range is the heat at which this mixing begins, and the upper temperature is that which must be reached to ensure that the process has been completed and the atoms bonded.
This process of bringing the steel into its critical temperature range changes the metal’s lattice structure, giving the steel new properties.
After this process the steel must be properly cooled to preserve its new, stronger structure. Oil, water, air, or other cooling media are used to control the cooling process and maintain the new properties of the heated steel.
This gradual cooling process, which is called tempering, takes the steel, which was made hard and brittle when brought into the critical temperature range, and toughens it into a softer and optimally useful state.
Tempering draws the hardness out of the metal to the durability and ductility desired. If you draw all of the hardness out of a piece of metal, that’s annealing.
Files, auto springs, leaf springs from the front of a snow-go, and various coil springs can all be heated and straightened, but you use a different technique for each.
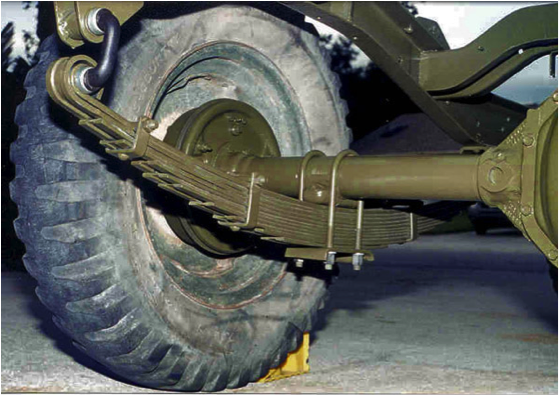
The layered spring passing beneath the axle is the leaf spring on this vehicle. Oliver used leaf springs as sources of steel for his tools. (Image credit 70)
Salvaged source steel, such as an old file, likely needs to be annealed in order to be worked. The source metal goes in the forge’s fire, and once heated, it can be hammered into any shape. If there is residual heat, the piece can be reheated and shoved into the ashes or laid on top of the hot forge to cool slowly, and through this process, it will be annealed. If this does not happen, there will often be flaws, and the tool you make from the salvage will chip when used.
If the metal requires further shaping, after annealing is the time to do it. It’s easy to shape an annealed piece of steel. I like to use a large, coarse bastard file as a basic source of steel. [The cut of a file refers to how fine its teeth are. From roughest to smoothest, files are classified as rough, middle, bastard, second cut, smooth, and dead smooth.]
After annealing, you need to heat your piece red hot again to shape it, which will build tensions into the metal. Anneal the piece again, after shaping, to release those tensions from the metal.
Once you get the shape you want, heat the piece past the critical temperature—red hot, depending on the type of steel— and plunge the piece into your cooling medium to harden the metal. You need to be careful with the cooling process—if you cool the outside of your steel too rapidly in comparison with the inside, the outer surface of the steel will shrink before the interior does, leaving cracks.
To slow the cooling process, dip the metal in your cooling medium [such as water or oil], pull it out, let the heat return to the surface, and repeat. It won’t take long to cool the piece enough to fully plunge it and harden it.
High-carbon steel is particularly prone to cracking if cooled too fast. To avoid this when working with it, lay a tissue on the water, or use oil or salt water as your cooling medium. Don’t plunge your piece all at once. Put the steel into the water and pull it out quickly, so that the central heat can work outward. Don’t leave it in there to cool off the outside edge—cool it somewhat, pull it out, wait for the heat to spread through the metal, and do it again two or three times.
If you want the final metal to be hard like knife steel, plunge it while it’s still hot. For spring steel, cool it using the dipping method above a bit before you plunge it, and that will harden it to a lesser degree. Then the metal will be able to flex without breaking.
After you’ve cooled the piece, soften it again—that is, draw out the hardness so you have the degree of durability you want. That’s tempering— versus annealing, which is when you draw all the hardness out of the steel so it is easier to work. Shine the surface and heat it again to a dull red color. Then quench it again.
The hotter the metal before you quench it, the softer it will be. Judge by the color of the hot metal. Learn to play with tempering until you reach the desired durability.
Commercial knife-makers have electric furnaces. They work a specific type of steel and get it to the correct temperature using the electrically calibrated furnace. They heat the metal once and then cool it.
When you don’t have those electric furnaces or a precise way of knowing your temperature [such as magnets, materials, or thermometers], you must learn to judge the temperature by the color of the metal as it is heated. The only way to tell with an unfamiliar piece of steel is to try it. If you heat it until it’s blue and then quench it and try it, it might not be hard enough, so you heat it again, hotter this time, and repeat until you get the durability you want.
If the tool you’re making doesn’t require a very hard edge, you can often find a piece of steel to use as the source metal—even hard, high-carbon steel—that is already tempered. Then all that is necessary is cutting the metal to the desired shape.
But if you bend and compact a larger piece of steel as you forge it to a desired shape, you will leave stresses in the metal. You must reheat it again, even though the original tempering might have been suitable.
You can skip hardening and just temper, but it’s difficult. You must have a uniform heat throughout the whole piece, and that can be hard to achieve.
Additional Resources:
Blacksmithing Tutorials: a repository of metalworking resources, examples, tutorials, and user submissions. http://blacksmithingtutorials.com/
DelaRonde, Joe. Blacksmithing Basics for the Homestead. Layton: Gibbs Smith. 2008. Print.
BLACKSMITHING
I grew up during the Depression, at a time when my father had the initiative and the know-how to get hold of a piece of unimproved stump land and turn it into a home. He was a very adaptable person. I was old enough to have an interest in working with him, and that was a big start for me.
Stump land.
[Land that has been cleared of commercially valuable timber. Image: http://en.wikipedia.org/wiki/Clearcutting]
In that sense, the Depression was a very valuable experience. I learned that when you want something but don’t have money, why, you try to make it.
I wanted a knife of my own. The loggers sometimes left a file sticking in a stump here and there out in the bush. Whenever I found one of those files as I ran around out there picking berries or whatever, I picked it up.
In those days, there were quite a few touring cars that had folding tops. The framework was made of wooden bows with metal stays and braces on them. I made sleds from those hardwood bows that worked out very well.
I went to the dump and cut a piece of soft iron out of part of a framework that had held up the folding top, and worked on it for a long time. Finally I shaped it into a knife blade.
Of course it was just very mild steel, maybe not even steel, so naturally it wouldn’t hold an edge. I asked my dad about it, and he said, “Take it over to the blacksmith at Meadowbrook”, which was a big dairy farm that had quite a few horses and a well-equipped blacksmith shop.
So I took that knife and was standing inside the door watching. The blacksmith had the forge going and was working. He asked me if I wanted something. I showed him my knife and told him the problem. He asked what I had made it out of, and I told him.
He was encouraging, and said “Let’s give it a try. Maybe we’ll luck out.”
He heated the blade and cut down through some tissue paper floating in a bucket of water. He pulled it out cold and touched it with a file.
Then he took a little time and explained to me that steel is iron with a certain amount of carbon worked into it, and that this piece had practically no carbon in it. He said there was not a whole lot that could be done about it, because the steel would always be soft and would never hold an edge.
I was six years old at the time, I guess, and I remembered what he told me. It was some time before I got around to trying to making a knife out of another piece of steel.
I think the next time I did, I used a piece of a broken saw. I found a two-man saw that had been broken in two, either accidentally when a tree fell on it, or more likely, purposely. I cut a piece of it and went through the same process again. The steel in a crosscut is soft enough so that you can file it, so I was able to use it just the way it was, with the original hardness.
I don’t remember just what happened, but anyway, I started fooling with tempering it. In those days most men had grown up on homesteads and so forth, and knew quite a bit about that sort of thing.
My dad didn’t have a forge, but he did have a blowtorch. I stood up some bricks and made kind of a furnace, put the blowtorch in there, and heated it with that. I didn’t have any supervision, but I’d watched my dad use the blowtorch, mostly for heating soldering irons. It wasn’t much of a job to figure out how to use it. I don’t remember ever having any restrictions on any of the tools we had.
My dad gave me a few pointers. He said to get the steel red hot, but don’t let it start shooting out sparks, because that’s burning out the carbon. Then plunge it. Then you have to heat it up again, but not so hot this time. You heat it until it’s maybe a dull cherry red, and plunge it. That will draw the hardness out of it.
I did all that, and got it too soft. So I tried it again, and heated it just a little hotter. I let it cool, and I did have a workable piece of equipment. That’s pretty much the way I learned.
I once made a hunting knife out of a fairly big file. Those files are made of a very high carbon steel, but they’re coarse grained and are not suitable for edge tools like a knife. Even as a file, it’s easy to break teeth out of them, if you mistreat them.
But you can heat that kind of steel up to a certain temperature, the “critical temperature”—not quite to the place where it’s really malleable. Then you pound it. That compresses the grain structure in the metal and makes it a lot tougher. If you work it enough, you can finally get a blade that you can bend quite a ways without it breaking. You can’t do that at all with a file.
You have to keep it above the critical temperature while you’re working. I don’t know what that temperature is—it differs for different types of steel. It’s red all right, but not real bright red. Steel with a lower carbon content will work at a lower temperature.
I learn by experimentation, usually the hard way. You make a tool and it splits, or a big chunk breaks out of it.
I don’t have a solid rule that I go by. I fool around with the steel a little bit and check it out. I’ll stick the end of, say, a spring leaf into the fire, get it hot, bring it out, and see how malleable it is. The color will changes fairly rapidly, indicating it’s cooling off, and then I stick it back in the fire.
If I can make a good chisel or a good axe out of a piece of spring leaf, I feel good about myself in being able to take a piece of scrap steel and make a useful tool. Since it didn’t come from a factory, you might say that I cut out a whole lot of middle men.
My point in blacksmithing is that the more I can do for myself, starting with whatever is commonly available, the more I am an individual in my own right, and the less I am dependent on somebody else’s initiative and ingenuity.
BLACKSMITHING TECHNIQUES
Introduction [Adapted from http://www.swhtva.com/treatment.htm.]
Steel consists mostly of iron, a small amount of carbon, and varying amounts of alloying elements. Most steel is purchased in its softest state, known as the annealed state, in which the atoms of carbon are suspended in the steel but are not mixed with the metal atoms.
Since this is the softest state, it is also the best state for machining steel. Once the machining has been done, however, it is often desirable to make the steel harder and more durable. To accomplish this, heat is used.
Each steel has a critical temperature range, which is the temperature at which the atoms of the metal and the atoms of carbon mix freely and ultimately bond together. The lower critical temperature is the heat at which this process begins, and the upper critical temperature is the heat which must be reached to ensure that the process has been completed.
The steel is actually heated slightly above its upper critical temperature. The iron crystals then have a different lattice structure, and the steel has different properties.
However, the atoms will not stay bonded if the steel is not cooled properly, and the desirable properties will be lost. Therefore the steel is cooledunder controlled conditions using various cooling media, such as oil, water, or air.
The metal is then very hard and brittle until it has been reheated to a temperature that is lower than the lower critical temperature. This process, which is called tempering, toughens and usually softens the steel, which is then optimally useful.
= = = = =
I’m a little bit of a blacksmith, but I hesitate to get started talking about it. I just learned by experimenting. I don’t know if I’m capable of telling somebody else how to do it. I don’t know how to describe the process adequately for different kinds of steel.
Files, auto springs, leaf springs from the front of a snow-go, and various coil springs can all be heated and straightened out, but you use a little different technique to work with each of them. [Local term for a snow machine.]
You put your iron in the fire and hammer it out to the shape you want. If you’ve still got quite a bit of residual heat, you can reheat the piece and shove it into the ashes or lay it on top of the hot stove and let it cool very slowly, and it will be annealed. That takes the stress out of the steel. If you don’t do that, quite often there will be flaws in the steel, and chips will break out of it when you use the tool.
If you need to do further shaping to it, that’s the time to do it. It’s easy to shape an annealed piece of steel. I usually use a coarse 12- or 14-inch bastard file. [The cut of a file refers to how fine its teeth are. From roughest to smoothest, files are classified as rough, middle, bastard, second cut, smooth, and dead smooth. http://en.wikipedia.org/wiki/File_(tool)]
If you need to heat the piece red hot again to bend it or something to get the shape you want, that will build some tensions into it, so you need to anneal it again afterward to let them go out of the metal.
After you get the shape you want, you can heat it past the critical temperature—red hot, depending on the type of steel of course— and plunge it to make it hard. Not too cold—you don’t want to cool the outside of your steel too rapidly compared to the inside because it will shrink before the inside does, and cause cracks.
In order to slow that down, you can just dip it in, pull it out, let the heat come back into the edge, and repeat that. It only takes a little bit of that to cool it off so you can plunge it and harden it.
If you want it to be fairly hard, like knife steel, you plunge it while it’s still fairly hot. For spring steel you let it cool a little more before you plunge it, and that will harden it to a lesser degree. It’ll take a little more of the hardness out, so that the piece of iron can flex many times without breaking.
Then you have to soften it a little bit—that is, draw out the hardness so you have the degree of hardness you want. That’s called tempering. You shine up the surface on it and heat it just enough that the dull red color comes into it. Then you quench it again.
The hotter you get it before you quench it, the softer it will be. You judge that by what color you allowed it to get to. You just have to learn to play with it until you get the right hardness in it.
Commercial knife makers have electric furnaces. They have a specific type of steel and know how to get it to the right heat to start with. They heat the metal and then cool it, and that’s all it takes.
There is some kind of stuff you can sprinkle on hot iron to tell you the temperature of the metal. One kind will tell you that the temperature is in a certain range, and another is for metal that’s a little hotter or a little cooler. Those are used by professionals.
But when you don’t have those electric furnaces or some other way of knowing your heat, you have to go by the color of the metal as you heat it. The only way you can tell with an unfamiliar piece of steel is to try it. If you heat it up until it’s blue and then quench it and try it, it might not be hard enough, so you heat it a little hotter and do the same thing again until you finally arrive at the hardness you want.
If the tool you’re making doesn’t require an especially hard edge, you can quite often find a piece of steel—even hard, high carbon steel—that is already tempered. Then all you have to do is cut the metal to the shape you want, and use it.
But if you bend and perhaps compact a larger piece of steel as you forge it to make it the shape you want, that’s going to leave stresses in the metal. Then you’ve got to get it hot again, even though the original tempering might have been suitable.
What is the difference between hardening and tempering?
Tempering is drawing the hardness out to the level that you want it. If you draw all of the hardness out of a piece of metal, that’s annealing.
Can you skip the hardening, and just temper?
You can do that, but it’s pretty hard. You have to have a uniform heat through the whole thing, especially sharpening picks and things like that. I’ll draw the pick out, heat it up again, let the temperature cool slowly to take the stresses out, and then heat it up again to the right temperature.
But depending on the hardness of the tool, I’ll sometimes draw the pick out, harden it, and then watch it cool off. What you do is dip the point of the pick in the water to harden it and then pull it out right away, starting the cooling process. Then the heat will work down into the point from the pick blade that you didn’t cool. As soon as the color comes in that you want, you plunge it, and that should be ok.
So that might not work on some other kinds of tools that don’t have that heat reservoir?
Right.
I guess we’ve gone over this part before, but when you get a very hard piece of high carbon steel hot and then you quench it, if the outside of that piece of steel cools rather rapidly and the inside isn’t cooling off, then the outside is going to be full of cracks.
You can avoid that by laying a tissue on the water, or by using oil or salt water. You don’t just plunge it in all at once. You put the steel into the water and pull it out quick, so that the heat from the center of the piece can work out to the edge. You don’t leave it in there to really cool off the outside edge—you cool it somewhat, pull it out, wait for the heat to spread through the metal, and do it again, maybe two or three times.
BLACKSMITH FORGES
There was a fellow out on the edge of Fairbanks—I don’t recall just where. He had a pretty extensive setup of blacksmith tools—all kinds of shop tools, hand cranked-tools and such—and was selling them off just to get rid of them. I think those things were on the place when he bought it, and he had no use for them.
I bought some blacksmith hammers, a pair of tongs, a drill press, and a few other things. I also bought a medium sized anvil. It was just a conventional type with a horn on it, and probably weighed 60 or 70 pounds. It came up to Ambler. If you have an anvil like that, along with a drill press and a hacksaw and some spring leaves or assorted metal to work with, you can do a lot.
By the time I moved to Fairbanks, Dave Rue had taken over Dan’s [Dan Denslow] air taxi business. [Ambler Air Service] Quite often he went to Fairbanks without much of a load, so I sent some of that stuff over with him. Of course I paid him, but it was cheaper than parcel post. I have the anvil out at the lake now.
One of the hammers I bought was a cross peen. The peen is narrow and tapered, and the peen is the full width of the hammer. I have another one with a peen that is in line with the handle, instead of being across. Those peen parts aren’t sharp like chisels, but they’re very handy in working a piece of metal into a different shape—thinning it down and so forth. Having both cross peens, you can work a piece of metal and make it longer or wider.
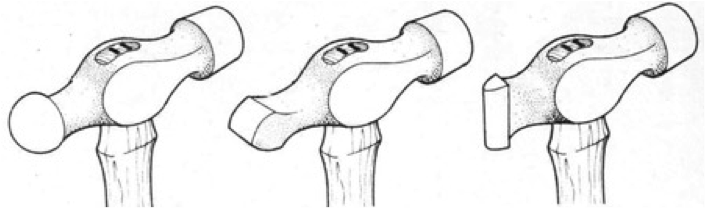
Left to Right: Ball peen, cross peen and straight peen hammers.
[Image: http://www.secondchancegarage.com/public/hammers.cfm]
Usually I had a homemade forge—a grease barrel with the top of it kind of beat down and stretched out a little bit, and then some small holes punched into it for the air to come up through the tank. The fan was a commercially made device with a geared-up crank on it, mounted on a block of wood alongside the tank.
If a blower is positioned directly under the forge, you’ll have coke and ashes falling down on it all the time. That fan blew into the side of the barrel and then up and through a grate. It worked pretty well because there was enough volume of air that it didn’t come by bursts, but was more or less evened out.
I’ve had a couple of those outfits and worked with them, so I understand what has to happen there. You rake your coals and burned-out coke or whatever you’re using into a pile and get a fire going. Then you lay your iron on top of that and bury all but a little area where the heat comes out through. Then you can heat the specific part of what you’re working on really hot.
Forges can also have bellows or centrifugal blowers. On the custom-made ones, there is a little trap door so you can dump out the ashes that come through the grate.
Sasha and Ole visited Sweden in 2004. One of the highlights was a trip to the farm where Ole’s father grew up. The attic of the barn was like one of those archaeological sites that people had abandoned quickly, leaving everything in place.
The most interesting thing was a small forge that Ole’s dad had built as a young man in the early 1920s. It was as small as a portable barbecue grill, and featured a flywheel that he operated with a foot pedal to drive a centrifugal fan. The firebox was a square only about 8 inches wide. He could build a good fire in no time for working on small stuff, such as the metal fittings on the ends of the wooden shafts that attached a cart to the horse’s harness.
I had a similar experience in Norway. Per [Per Øyvind Sørebø] and his friend wanted to make an axe head and an adze. The other fellow had a huge fish tank over by the shop, with a lot of different kinds of fish in it. It was his hobby. It had some kind of electric air pump that aerated the tank.
There was an old tractor wheel lying back in the brush. I had Per wheel it out. It was made out of very heavy iron, half an inch thick, and still had a tire on it. There was also a spring-tooth harrow, with some of the springs broken on it.
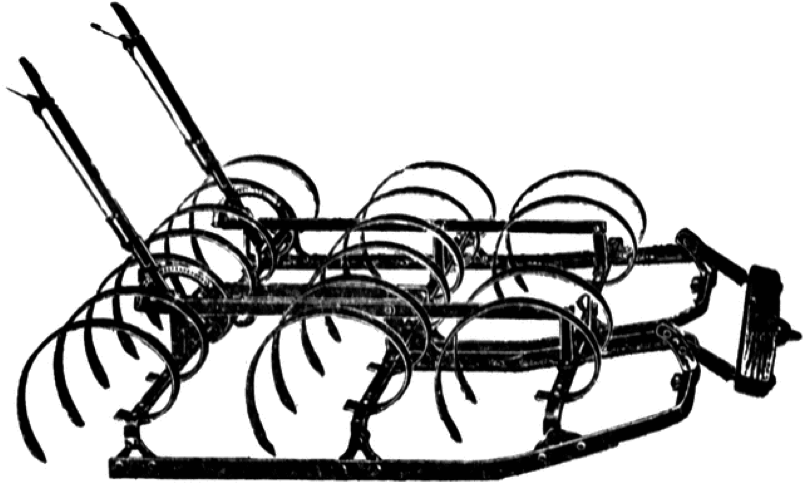
Example of a spring-tooth harrow.
[Image: http://etc.usf.edu/clipart/12000/12030/sptthharrow_12030.htm]
He had a charcoal-burning outfit there that he used for cooking steaks. I rigged that up to use for the forge, using the blower from the fish tank. I used the wheel for an anvil. They were somewhat amazed at what you can do if you have some way to heat a piece of iron.
Our main problem was keeping enough charcoal on hand. Part of the time we were making our own. There was an outdoor fireplace where they quite often ate in the evening. Whenever we were cooking I’d keep raking the glowing coals off the fire and letting them go out, but it takes a lot of charcoal if you’re going to do any extensive amount of blacksmithing. We finally ended up buying some.
Charcoal is made of wood, but coke is made from coal. If you use straight coal, you have to deal with flames and smoke. Coke is just like coal, but without all that combustion material.
I don’t know the process for making coke, but it’s something similar to how they make charcoal. It’s heated and partially burned, so what you have left is something that burns like you’ve got a bunch of coals right there. It’s already been reduced down.
We once visited an active coke oven in Australia. It was really impressive to see the red-hot coke tumbling out.
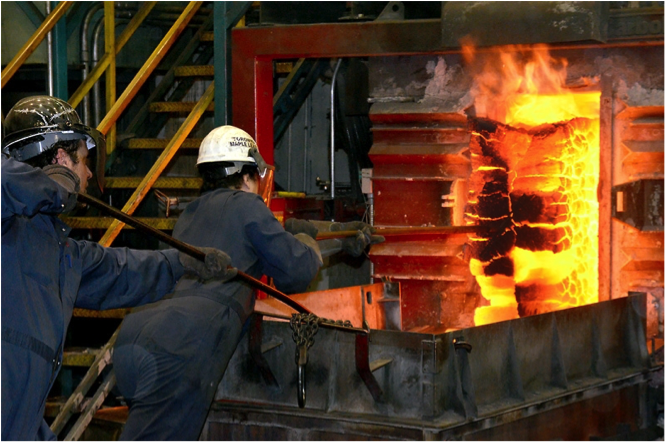
Small coke oven.
[http://www.nrcan.gc.ca/sites/www.nrcan.gc.ca/files/www/images/science/articles/2012/coke-image3.JPG]
When I was living outside of Fairbanks in the early 1950s, I’d buy 25-pound bags of coke. It was sort of like briquettes, but as I remember it was irregular, as if it came from a big sheet that had been broken up. You have to start it with a little wood fire, and then add the coke to it.
Now I just use regular firewood in my stove, which has a lid on the front end of it. I have another piece of metal made out of a bucket with the edge folded over. I hold that over the opening, leaving a little space under it so that I can stick my wood in there.
I keep a fairly good fire going, and as I need more coals, I just rake the partly burned wood in front of the draft. That gives you an area where you can heat a piece of iron as hot as you need it. You heat the metal until the sparks are flying, indicating that the carbon is being burned out of it.
Your system of control isn’t nearly as good as you would have with a proper forge, but you can do quite a lot of work that way. It gets the job done.