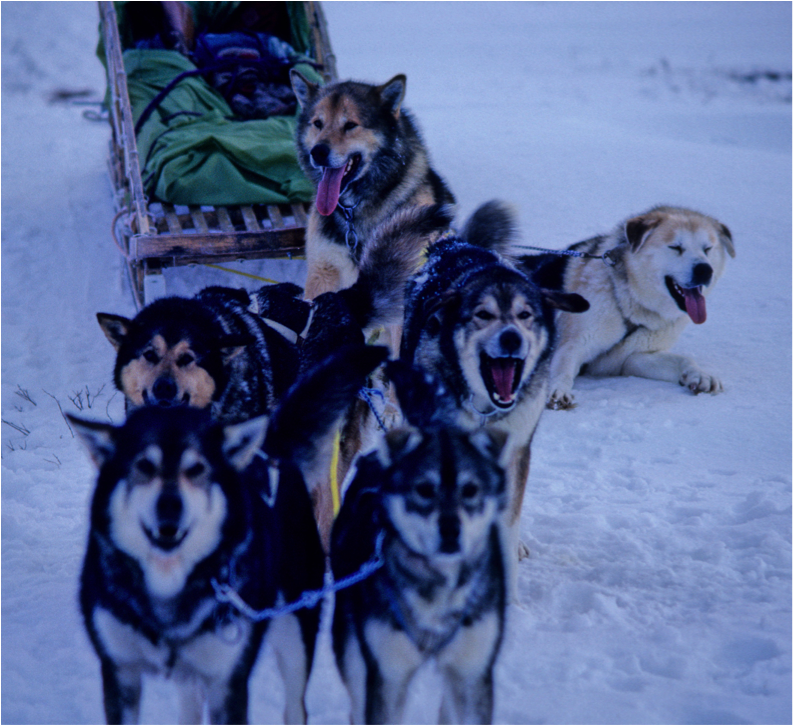
Dog team at work. Image by Sasha Wik
DOG HARNESSES
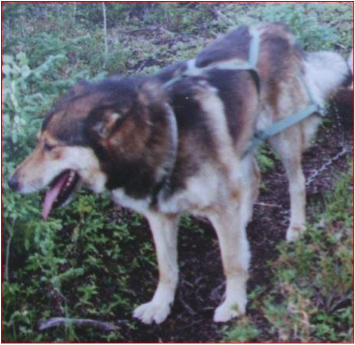
I have never used conventional dog harnesses that pull from high off the back. When hauling loads, the animal’s hind legs are doing the work. A conventional high-on-the-back harness works if you’re going a long way fast, and you don’t want each dog pulling for all it’s worth, but if you need the dogs to haul a load, you need a harness that helps them use their back legs. The harness style that I prefer comes down low around the dog’s back and sides and distributes more of the load into their back legs.
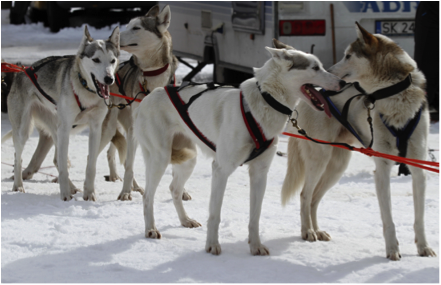
Typical harness that pulls from high off the back. (Image credit 103)
I make my own harnesses. I use a singletree spreader bar to keep the rear of the harness apart and off the animal in the back, which allows the harness to come down much closer to the animal’s back legs.
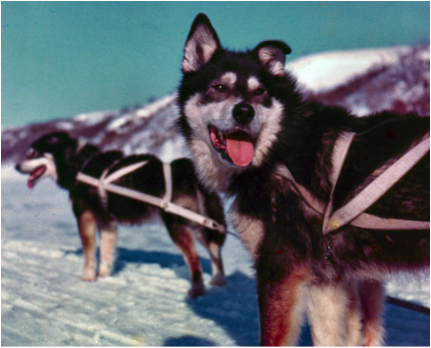
An example of the style of harness Oliver describes, with a low back end. Image from the collection of Lorene Cameron
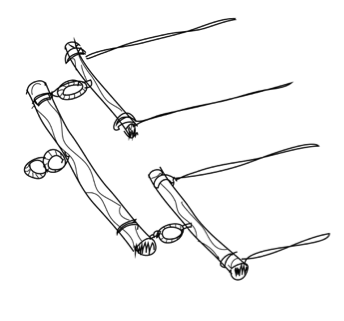
A singletree serves as a spreader for the harness or traces. It swivels as one shoulder or the other of the draft animal moves forward at each step. In this image, a similar device, the doubletree, attaches to the cart, carriage, or sled. Each dog harness has its own singletree. Drawing by Brady Wedman
The singletree rides below the dog’s tail, so that the pull is quite low on the dog and is almost entirely on the chest, below the neck. That gives the dog the advantage that it can use all four feet to haul.
A key point is that the singletree spreader bar has to be wide enough that it holds the harness away from the dog. Otherwise the dog will be working back and forth against the webbing, and this soon wears on the hair and even the skin.
How to make a dog harness
Oliver’s dog, Pack, in harness. Note the straps that cross low over the hips to hold the spreader bar up, and also how low the bar rides.
Image by Dorene Cameron Schiro
Construction:
1. Start by laying a long piece of webbing [a strong, closely woven strap] across the dog’s neck. The two ends go down alongside the neck ahead of the shoulders, crossing between the front legs, and are long enough to continue back to the singletree and farther beyond that where they will come together behind the dog.
2. Fasten a short cross strip to the two sides of the first strap, behind the front legs, just below the neck. It’s very important that this strap fits well. You don’t want it to pull back too far on his shoulders.
3. Sew a short piece of webbing to the collar piece above the dog’s neck. It comes back behind the shoulder blades, and is usually adjustable.
4. Fold a piece of webbing in the middle to double it over itself, and stitch it together partway along to form a Y-shaped arrangement. The base of the Y connects to that piece that comes back from the collar at the top of the neck. From there it goes between the shoulder blades to a point that is even with the shoulders, or even with the back of the front legs.
5. The two arms of the Y then fork and angle down, one on either side, and fasten to the long piece of webbing that runs underneath the dog back to the singletree. The attachment point is between the front and hind legs.
6. Run another strip of webbing from each arm of the Y across the back of the dog and sew it to the long piece of webbing in front of the spreader bar on the opposite side. Sew these two strips together where they cross on the back. This arrangement holds the bar below the tail so that it won’t drop too low and get the dog tangled.
7. Connect the two ends of the long strips of webbing behind the spreader bar. As you do that, sew in a loop or ring. The tug line from the sled will fasten into that.
Design considerations:
I usually attach the tug to the harness with a toggle. I don’t want to fool with metal snaps—they’re a nuisance, especially if the weather is too cold and the wind is blowing. All too often the dog’s body warms them enough to melt some snow, with the result that they freeze. Then you have to take your gloves off to warm them, or beat on it with the back of your knife to open it.
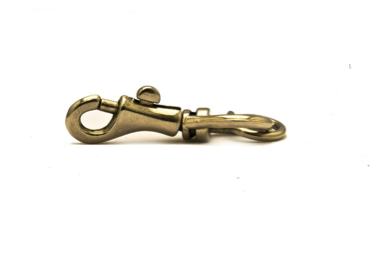
Swivel snap. It would snap into a matching D ring at the rear end of the harness. Oliver disliked them in the cold. (Image credit 104)
Instead, I usually make the attachment with a toggle. For hooking an individual dog, I splice one end of a short piece of rope into the dog’s tow line, with the toggle on the other end. It goes through a little loop at the end of the dog’s harness, behind the tail.
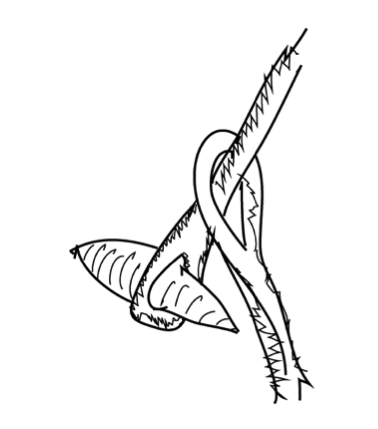
Example of a wooden toggle secured in a loop of rope. Drawing by Brady Wedman
When I first started making dog harnesses, all we had was cotton webbing, not nylon. I used to buy webbing in huge rolls, 100 feet in a roll, and I always had it on hand.
One time I tried making leather harness, with light leather doubled over and sewed up. I just sewed it together. But leather can stretch a fair amount, which can eventually affect the fit of the harness.
General considerations:
• Each harness must be individually fit to be most efficient. Usually I don’t have many dogs, so I know which harness goes with which dog. Some folks write the dog’s name on the harness.
• A harness shouldn’t be too big. It should not be so loose that it pulls back on the shoulders. To adjust it, I attach a plastic buckle.
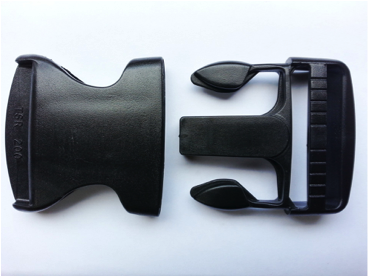
Side-release plastic buckle. (Image credit 105)
After making the harness, I put it on the dog, hook it to a load, and run alongside to see how the collar part fits, particularly. When the dog is pulling, he puts his head down. If the collar is too high on his throat, it will choke him and interfere with his pulling. That’s why the strap that fastens to the collar part at the top of the neck is adjustable. I can adjust that so that it raises or lowers the collar part.
• I usually fasten the wheel dogs [those immediately in front of the sled] into the ring at the front of the sled, where the tug line fastens. I will make an eye in the end of the tug and fasten those lines permanently.
• I like to use neck lines for the wheelers most of the time, fastened into the main tug. Sometimes I hitch them around and sew them there. The neck line has a loop that will go over the dog’s head easily. I put the loop through the ring in the dog’s harness and slip it over his head. There are no snaps, and it’s easy to get the loop off the head.
• I once experimented with a padded collar design, using dog hair or caribou hair for stuffing. It had a rod in the front part, with the padded collar behind. After a bit of use, I sewed a tug into the front. Where that pulled, even if I had the collar pretty tightly stuffed, it soon wore thin. I didn’t think it was working as well as the other harnesses, in addition to being a nuisance to make, so I eventually gave up on it.
Running dogs
Sometimes I had five dogs, with a pair behind the leader, necked in, and the wheelers behind them. With four dogs, I may have had only one dog ahead of the wheelers, and then the leader alone. If I have a pair of leaders, usually one will depend on the initiative of the actual leader. They’re quite sensitive to working together.
When two dogs are hooked next to each other, a certain amount of energy is wasted pulling to the side. The shorter the tug from the dog to the tow line, the worse it is. For that reason, I don’t hook them tandem very often when I’m only using a few dogs. Instead, I hook them single file, between two traces[two side straps or ropes that attach the dog to the sled or main tow line when running single file].
The wheel dog’s harness has a loop at each side of the neck that the traces can go through. They’re loose enough that they can work up and down, giving the dog some freedom.
You want the traces close to the dog, but you also have to leave some room for times when you go over a hump. If you had three or four dogs together and the traces were fastened tightly to the harnesses, the tow line would pull them down as they went over the rise.
The ends of the singletree of the dog in front of the wheelerare fastened into the traces on each side, and then through the loops on the collar, and then onto the singletree of the lead dog (if you have three dogs).
If dogs have too much freedom, they’ll get one of the tugs between their legs. If that happens, stop and fix it and tighten things down.
When dogs are well-behaved, they get used to their harnesses and soon learn to cooperate with them.
MAKING DOG PACKS
Basics of using dog packs
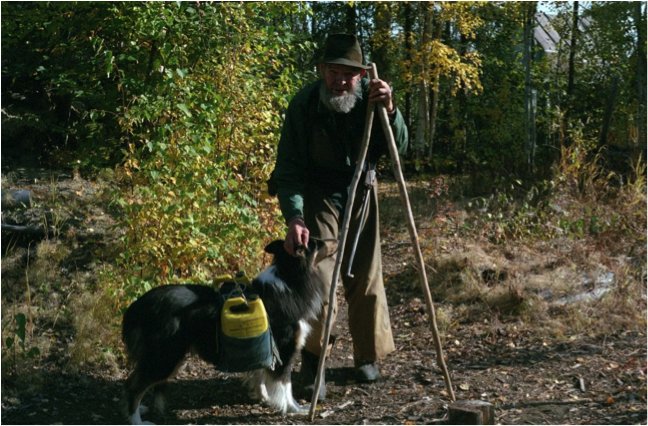
Dogs are pretty patient. They’ll put up with quite a bit, including carrying loads in dog packs. My dogs often carried water or hay.
When my dogs are carrying packs with loads, I keep them on a leash. Otherwise, they might go romping off after a rabbit or a caribou, and then you can lose the load or even the whole pack. Worse yet the dog may get hopelessly tangled in the brush with the pack making it difficult to free himself.
When carrying packs, dogs use a different set of muscles than what they use for anything else, so if your dog is new to packing, start with a light load. You want to balance the weight in the pack on each side of the dog.
In addition to being balanced side to side, the load has to have most of its weight forward on the dog, because a dog can’t carry much on his hind legs. If you load him too far back on his body, he’ll sit down, and then it will be hard for him to get up.
One of my larger dogs weighed 65 pounds. He could carry five gallons of water from the lake back to my homesite—around 40 pounds—but I never had him carry anything that heavy for any distance. Unless a dog was well broken into carrying, I’d never load more than 30 pounds if we were going any distance.
The longest trip I ever made packing with dogs was around five or six miles. That time we hauled meat, in plastic sacks, which is heavy and solid. I carried a load as well. I usually only have one or two dogs, and at that time I had only one.
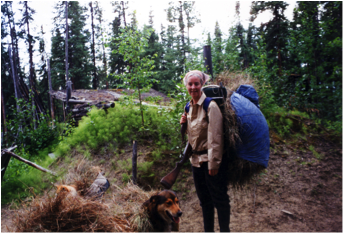
Oliver’s daughter Dorene returns from a trip to gather hay, with some help from the dogs. The hay can be used as bedding for the dogs in the wintertime. Image by Oliver Cameron
The shape of the load makes a difference in how you need to pack it. If both sides weigh the same, but one side is bulky while the other side is compact and close to the dog, the side that bulges won’t ride nicely. The sides’ centers of gravity will be different, and the bulky side will sag.
As you start out walking, you’ll soon see which way the pack wants to sag. Shift materials around or add some practical weight, like a stick of wood for the fire, to the lighter side. I usually have some small items that can be transferred from one side of a pack to the other to balance the load most comfortably for the dog.
How to make a dog pack
I will explain my way of making dog packs that resemble Duluth packsacks.
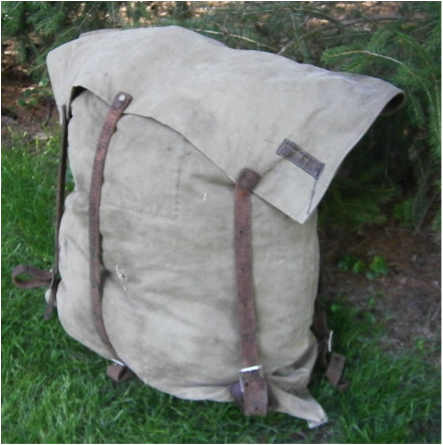
Duluth packsack. (Image credit 102)
For material, I have in the past used a tightly woven canvas, such as heavy filled No. 10 duck. I now prefer a coated nylon that is something like pack cloth, but quite a bit heavier. It lasts longer than the duck canvas.
I make the pockets for each side separately and later fasten them together with a strip of fabric about 5 inches wide to rest along the dogs back. This piece gets padded with a folded gunny sack or a blanket where it rides across the dog’s body.
To measure the size of fabric needed to make the pack’s main pockets, I drape a long piece of the canvas across the dog’s back, from the front of the shoulders to the middle of his back. The ends drape down nearly to the ground on each side. Those lower ends will fold up on each side to make the main pockets of the pack.
The overall fabric length needs to allow an additional amount for a flap over the top of each bag. After the fabric is measured in this rough way, I cut it into two pieces, one for the pocket on each side of the dog.
I make the cover flap nice and long so that if I have some bulky stuff in the pack, I can cover and contain it with the flap.
The finished bag should hang no lower than just below the dog’s stomach, so that he can lie down and ease his load at rest stops. I usually have a plastic bag inside each side pack to protect the contents from moisture.
Sew up each side and hem around all edges. The two pockets are ready to sew to the center piece that attaches them together. The front corners and the bottom of the pack take the most beating. Sometimes I cover those areas with leather so they last longer.
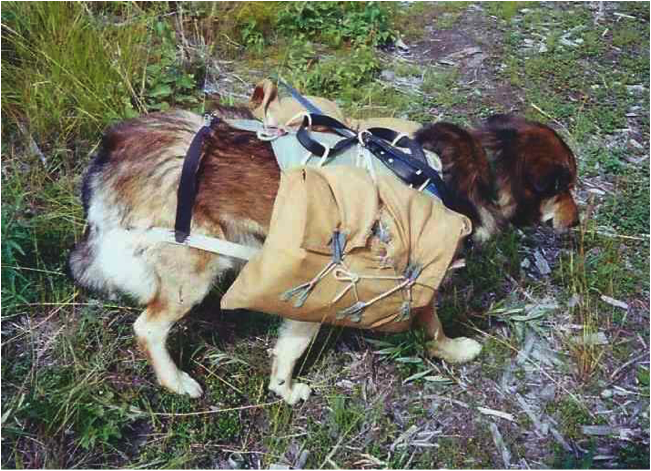
Oliver’s adaptation of a packsack on his dog. The black belt looped along the spine can be tightened to shift the load upward. The white strap behind the dog’s legs under the tail prevents the sack sliding forward when the dog is going downhill. The black strap across the dog’s rump holds up the tail strap, and is kept in place by a short strip fastened to the center of the pack. Image by Dorene Cameron Schiro
Next I make three loops out of a lighter weight fabric and sew them along the top of the flap. Another three are attached, in a row and evenly spaced, about halfway down the side of the bag. A piece of twine strung through these loops closes the bag and allows me to adjust for loads of varying sizes and shapes.
Weight in the bag causes it to sag. You can use the top loops and the string to pull up the sag. It’s easier for the dog to carry the load if it doesn’t hang too low.
Additional loops made out of heavy nylon twine are sewn to the top of the pocket. A strap or belt can be strung through these to adjust how the load rides on the dog’s back. The loops can also be used to lash something light, such as a bulky roll of foam pads on top of the dogs back.
To position the pack comfortably on the dog, various straps will secure it in place. One strap will go under the dog’s chest, behind the front leg. The two ends of this strap are sewn, one to the pack on each side of the dog, but come together under the belly with an adjustable buckle.
Then I add a strap that crosses the dog’s chest below its neck. I usually make this strap with several layers of canvas about 1-1/2 inches wide. It slopes down, comes around, and then rises and fastens to the bag on the other side. Since the outer part of the bags will be pulled out when they’re loaded, I fasten this strap to the inner part of the bags, some distance back from the front seam.
There are two ways to keep a loaded pack from sliding ahead when the dog goes downhill. Some people put an extra belly strap behind the dog’s ribs. I prefer to put a strap under the dog’s tail across the rump. This strap is made of fairly stiff material and fastened on the inner side of the pack on both sides. If you fasten it to the outer part, the bag can’t expand well with its load.
To keep the tail strap from falling, I attach another strap that goes from the tail strap, up over the dog’s back, over the hips in front of the tail, to the tail strap on the other side. A piece of webbing connects it to the back of the pad between the packs along the spine.
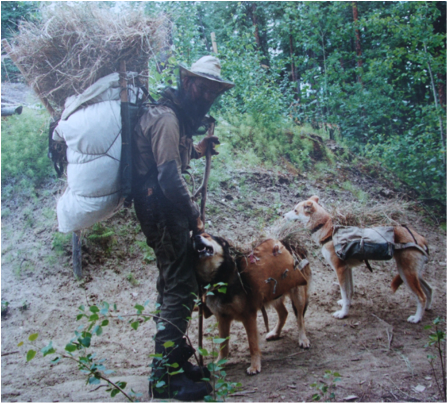
The pack on the dog on the right shows the straps around the front, under the chest, and under the tail.
Image by Dorene Cameron Schiro
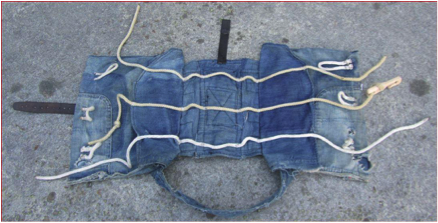
A dog pack, top view. The large denim loop is for the dog’s head. Image by Heidi Dammann
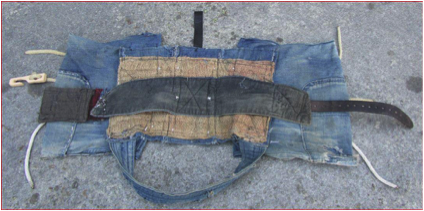
A view of the padding where the pack rides on the dog’s back. The short black strap at the top of the image will eventually attach to another strap that will keep the pack from sliding ahead when the dog is going downhill, as described above.
In an emergency, you can make a dog pack out of a small gunny sack. You fold it in half, sew up the open end, and cut a slot to make pockets. You can improvise a strap to hold it on the dog, and then you have a rough bag that fits over the dog’s back.
ONE DOG MUSHING
I’ve done a lot of work with only one dog. Sometimes, the dog would carry dog packs on its back; other times it would pull a small sled for me. On a good trail with a good sled, one dog can pull a lot of weight.
The basic commands I teach all my dogs are “gee” and “haw” for when I’m on the sled behind them. [Gee and haw are the commands for “turn right” and “turn left”, respectively.] I also teach them “go ahead” to let them know they can run ahead naturally at their own pace. The commands “whoa” [slow to a stop] and “stay” help me control them and have them stop when I want them stopped.
Dogs have individual personalities. Sometimes they have their own ideas about what they want to do or how they want to work. Some dogs, unless they are well trained, are used to following, and don’t want to go ahead by themselves; they aren’t necessarily good leaders. You may have to instill the qualities you want in the dog. It helps to start training the dog early, raising it as a puppy to do the things you’ll want it to do when it’s working. When I’m training a puppy, I allow it to go ahead on a fairly long leash. This gets it used to the idea of going ahead on its own.
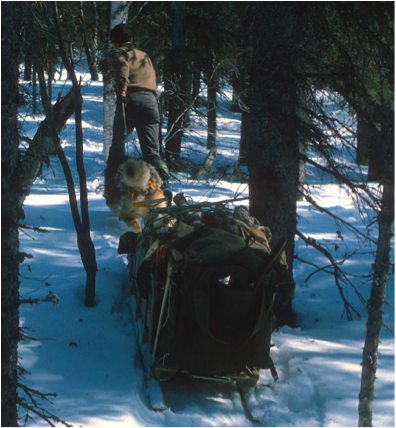
Oliver strides out on snowshoes as he helps his dog pull a heavily loaded ski sled, Kobuk River, 1975.
Image by Sasha Wik
When a dog runs ahead, it should not pull on you. When they’re young and eager to go, I train them to run easily, without jerking on me. If they don’t understand, I tip them over backwards a few times, and they learn quickly.
Dogs know the difference between walking on a leash with you and a pulling a load. When they’re pulling a sled, it’s hard for them to go slowly—they don’t want to run at your pace. A lead dog, especially, may pull too much. You can tie the leash to your belt or your waist to hold the dog back, but it’s much easier on the dog to just be allowed to go faster, because the momentum will help the animal over the harder places.
So, I train my dog to stay on command. I leave him in a stay, and then I’ll walk ahead as much as 75 yards, provided I can still see the dog from that distance. When I call the dog, he runs to me at his own pace, and we’re both happy.
Occasionally, I’d let a well-trained dog run ahead of me. I would tell it “go ahead,” and it would run with the load. Then when it would get far in front of me, I’d “whoa” it and tell it to stay. It would wait until I’d caught up with it. That actually works better than me traveling in the lead and having the dog catch up with me, because then I’m behind the sled in a better position to get the sled restarted. Some dogs will naturally jog from one side to the other to get a sled restarted, but that’s unusual.
Of course, if you let the dog run ahead, don’t do it when there are rabbits or caribou in the distance!
Tommy Lee, a friend, got a dog for me once, and it was trained to chase caribou. Tommy didn’t have good eyesight. Occasionally, when he’d aim at and shoot a caribou, he’d only wound it badly, and it would continue to run. That dog would chase down the wounded caribou, get it by the nose, and bring it down.
You have to use judgment about what a dog can do, and you need to give it the tools to successfully do its job. When pulling a sled, a lone dog must have a fair amount of control over the sled, so you need a short tug at the end of its harness. The tug line should be almost a part of the harness. From the tug back to the sled, use a longer yoke.
When you have only one dog pulling a sled, help the dog by getting behind the sled and pushing on any steep uphill pitch. Another way you can help is by fastening a rope into the sled yoke and looping it over your shoulders, but I don’t like to do that. It spoils the dog and sometimes takes away his sense of responsibility. I prefer to push the sled from behind.
If you are leading a dog hooked to a sled over a little rise, the sled is going to slide ahead and overrun the dogs. To prevent this, you should have a yoke made out of a chain that serves as a rough lock. When the sled starts to run up on the dogs, the tow line goes slack, the chain drops onto the snow, and the sled runs over it. That automatically slows the sled until the tow line tenses again and pulls the chain yoke free.
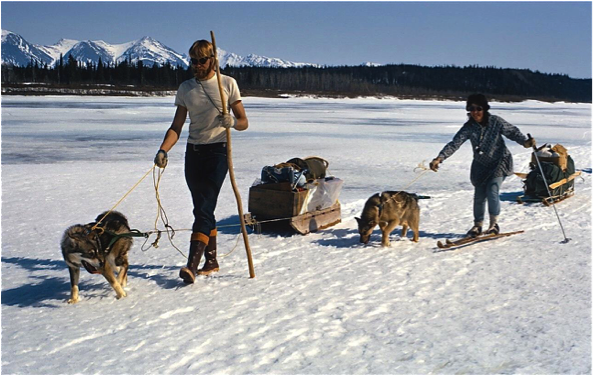
Single dogs hauling sledges.
Image by Sasha Wik
When you have a bulky load like skins and bedding, a travois is a handy way to move it.
My travois was about 2 feet wide at the back and tapered to the width of the dog at the front. The dog must be free to turn when he is pulling around a curve.
I used a couple of small spruce sticks with limber tips, about 10 feet long. I put the thick ends of the poles on the dog, so the limber ends dragged on the ground. That way the load bent the sticks and made natural runners of them.
I made a simple harness, a breast strap fastened on each side by a short piece to a strap around the dog, stretching behind the front legs. Then I fastened a strap 5 inches wide between the ends of the poles near the front. It sat on the dog’s back just behind the shoulders. There was a string tied onto the belly band or waist band and to the side poles.
I used a crotch from a small tree as a spreader to keep the two side members apart, fastened near the front ends. In the pictures you see of horse travois used by indigenous people of the American plains, they used quite a wide angle that they crossed over the horse’s back and fastened to a saddle.
A wide-angled travoisworks well on a prairie where there is only grass and open space, but when mucking around through brush and trees, it’s not practical to have them spread that wide. Instead, I nailed a board behind the dog, and then a few more farther back. They kept the side members parallel and only a little wider than a dog or dog sled.
I’ve hauled meat on that contraption. I’d put it on the deck and tie it down. That puts quite a load on a dog, but most of it rides on the travois. For firewood, I’d cut small dead spruce trees into 3-foot pieces, lay them lengthwise, and tie them down to the travois.
This travoisenabled a dog to carry much more than a dog pack. My large dog of 65 pounds pulled nearly 100 pounds with the travois, which is quite a bit more than he could pack. He was not apt to run off with the load, as that was a lot of work for him!
TRAINING DOGS
Some people seem to have a knack for working with dogs. Others lack it and will have nothing but trouble with them.
Oliver and Pal on a water run.
Image by Devta Khalsa
My dogs are all pets or semi-pets, but even so, I still discipline them. A dog has to know that you’re the boss, and you have to remember that they are emotional beings, and they’ve got to want to work with you. If you have a dog that won’t work with you, you need to get rid of it.
For most of my time in Alaska, I traveled with three or four dogs. I could work with a team of that size, and I couldn’t afford to feed more than that. I did not go as fast with a small team, but having fewer dogs let me have a more individual relationship with each one.
I didn’t have a specific method of training them. Dogs are all individuals, and I worked with each one as an individual. One rule I did follow was to start their training and discipline early. While they were still young and I was putting out their food, I made them wait until I told them to go ahead and eat.
When I was first working with dogs and wanted to teach them “whoa” and “stay”, I’d fasten them to a rope 50 feet long and let them run until it made them stop. If they didn’t stop, I’d pull on the rope and tip them over backwards. Then I’d tell them to stay. I’d walk up to them, coiling the rope as I went, and if they started to take off, I’d pull them up again. The rope gave me control, and the dogs learned that my voice meant business.
When I was teaching a dog to pull, I worked with one dog at a time so he’d get the idea that if he didn’t pull, nothing would happen.
I’d attach a stick of wood to his harness, about 5 feet long, 3 inches in diameter, and pointed so it digs down into the ground or snow to create drag. The dog would want to go, but wasn’t used to the idea of pulling anything. Some dogs would be frightened and take off at full speed, so I’d lead them until they got used to having something dragging behind them. [Taking a pup in harness for a walk on its own is a good way to start training. When the pup gets tired and sits down, it’s unable to break the drag loose and get going again. Just keep on walking without it. The dog will whine, very unhappy. Then call to it and encourage it. Finally it will leap at the harness and break the drag free. Then you can pet and praise the pup and walk on.]
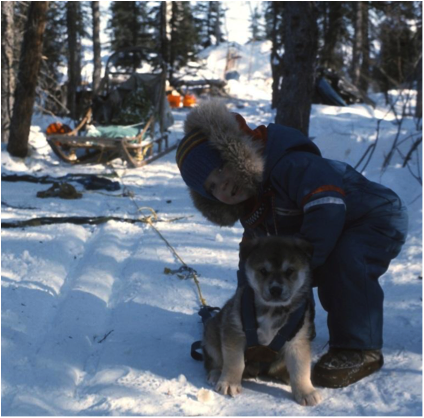
Kalle Wik getting a head start on training his puppy.
Ambler, Alaska, 1978.
Image by Sasha Wik
I’d train some dogs to stay behind me. That made it much easier to use them for one-dog mushing. By fooling with your dogs that way from the time they’re a couple of months old, you can train them to do almost anything you want.
As far as I was concerned, punishment was a very minor part of training a dog. It was much better to work with rewards and have a relationship that makes the dog want to please you. I used to carry some dog feed pellets in my pocket, and I’d reward a young dog I was training when he’d done what I wanted.
I also used to carry a stick in my hip pocket. I didn’t want the dogs to be afraid whenever they saw a stick in my hands, so I used a little one for disciplining them—maybe 1 inch in diameter and 1 foot long. I’d take a dog by the collar and rap it on the nose with the stick when it behaved badly. It didn’t take much of a rap.
It wasn’t too often that I had to do that, but if a dog was rebellious and refused to respond to what I wanted, then it had to have a little punishment. There were also a few times that two dogs would get to fighting and needed a good rap to catch their attention and settle the fight.
Any dog I raised learned early on not chew things, and it never chewed a rope or a piece of cloth or webbing. I have had two dogs given to me, though, that had the habit of chewing on their harness. One of them would chew on the main tow line as I was harnessing the team. Once I realized what he was up to, I’d watch him and then correct him with the stick when he started to do that. He learned.
The other problem dog would only chew when he knew I wasn’t watching, and he couldn’t be broken of the habit. I hated to get rid of a good dog just because it chewed, but the only cure for that one was a hole in his head. I couldn’t afford to keep and feed a dog that couldn’t work with me.
Here’s one thing about teaching dogs: if they’ve become accustomed to running loose, they’re much more difficult to train for running work. If they’ve been chained, they want to run, and then it’s much easier to work with them. If your dogs are well-trained and imprinted with your voice, you have control over them.
When you’re meeting another team, your dogs need to obey when you tell them to get off the trail. Once I came around a curve and there was a big long team coming toward us. I called to my leader, and he went out into the soft snow and pulled my team off the trail. The other driver was very impressed by the way my dogs had gotten out of the way so readily.
To train my dogs to gee and haw [turn], I’d pack down some trails with side trails taking off at various places. I’d have the dog I was training ahead, and when it got to a fork that took off to the right, I’d tell it “gee.” If it wanted to keep going straight instead of turning, I’d stop the sled and tell it again. After a while it would try the side trail, I’d encourage it, and that’s the way it would go. It takes some patience.
Some dogs are natural leaders and learn quickly, as though they read your mind. Other dogs, you’d better put them at the wheel position. [The wheel dogs are those immediately ahead of the sled. They do a lot of work but don’t make decisions or respond to commands as a lead dog does.]
One thing I never managed was to get my dogs to pay attention to me if there was something distracting around, like a bear or a caribou. They would be so focused on the bear that I might as well have stayed quiet.
I never really used the terms “come gee” and “come haw,” and I never especially tried to train my dogs to do that. [“Come gee” and “come haw” are commands issued when you’ve stopped the team and wish to reverse course. With “come gee,” the leader will turn the team 180 degrees to the right and head back the other way. “Come haw” is the same thing, to the left.] I’d usually just say “gee” or “haw” and then say “come.” But I have had some leaders with the sense to do it on their own. If I fell off the sled or lost it for any reason, the leader would miss me, make the whole wide turn, and bring everybody back. [Even with a very intuitive leader, training the dogs to voice command has value. One unfortunate fellow trained his team to start off when he shook the handlebars of his sled and made the lashings creak, no voice command. One day, when he was just about to leave home and had stepped away from the sled, a new dog in the lineup leapt at his trace. The other dogs heard the creaking of the lashings, and the whole team took off. The guy had to follow them on foot for miles. He found them tangled in the brush where the trail left the river and went through some willows!]
There is a unique bond between dogs and humans. One summer day I was walking with a young dog from my new house at Ambler toward my old place, which was out of sight behind a stand of timber. The dog sensed something at my old place and came running to get my attention. Then he started that way again, wanting me to follow him.
I went back to the new house to get my rifle, and I followed him. When we got far enough along the trail to where I could see the old house, I saw a black bear on the roof when it raised its head.
I stopped to size things up. When the bear ducked again, I went around through the trees to where I could see up on the roof better. Since the bear didn’t run off on its own, I shot him. I didn’t want bears around that were too bold.
My dog was right beside me the whole time. I don’t know that I said anything, but I reached down and petted him. He realized he’d done something worthwhile, and I acknowledged that. Those rewards can be quite subtle, but very potent. Dogs provide companionship and security and well as assistance with labor.
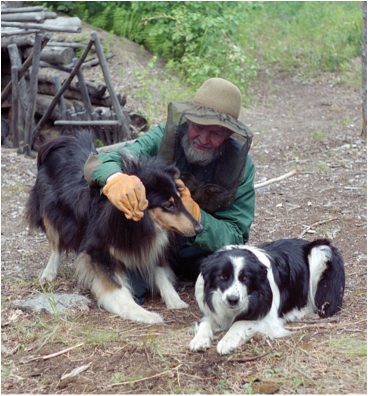
Oliver used dogs as draft and work animals, but he also felt they were “semi-pets.” Here he puts mosquito repellent on his dogs. Image by Devta Khalsa
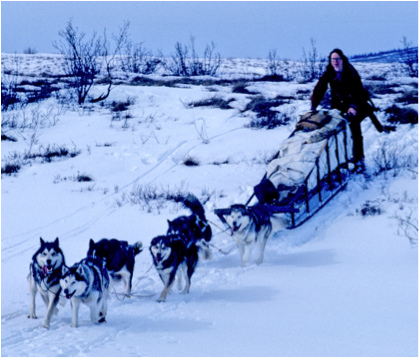
Anore Jones drives a dog team over the snow in a basket sled. Image by Sasha Wik