Part I: Building a Homesite
Shelter
TENTS

Tents are the handiest shelter when out traveling. I prefer lightweight tents that add little to my load but keep me out of the weather and the bugs.
I’ve made wall tents out of polyester bed sheets which are much lighter than the canvas fabrics used in commercially available wall tents. When I’ve traveled, either by dogsled or by boat, I have carried a set of poles for my tent. A basic tent such as the sheet tent shown in the photo would only need three poles, a ridge pole and an upright for each end. The ridge pole is the length of the tent, plus six inches on each end. I cover the tent with a lightweight waterproof nylon tarp. These tents are easy to set up and comfortable to camp in.
I haven’t worried about windows. I’ve always gone out with a dog or two, and they gave me information about what’s happening outside the tent. A possibility for a window is to replace a square of fabric in the back of the tent with clear vinyl. The vinyl is flexible and will roll up with the tent. Another possibility is to sew in flexible screening, with an over flap of clear vinyl inside that can be rolled up for ventilation or tied down against the wind.
In the winter, when I set up the tent for just one night, I didn’t shovel the snow first. That would have taken too much work.
To keep the upright supports from driving through the snow to the ground, I drill holes through them, about three inches up from the bottom ends, and I put pins through them crosswise. Then I put small sticks or branches with forks in them down on the snow, like snowshoes. I then set up the uprights in such a way that the pins rest in the forks.
I have also used a different system. I round off the lower ends of the uprights and make wooden shoes that have sockets for them. They are maybe four inches wide, a little longer than that, and thin- three quarters inch thick at the center and tapering in all directions. I carry those with me.
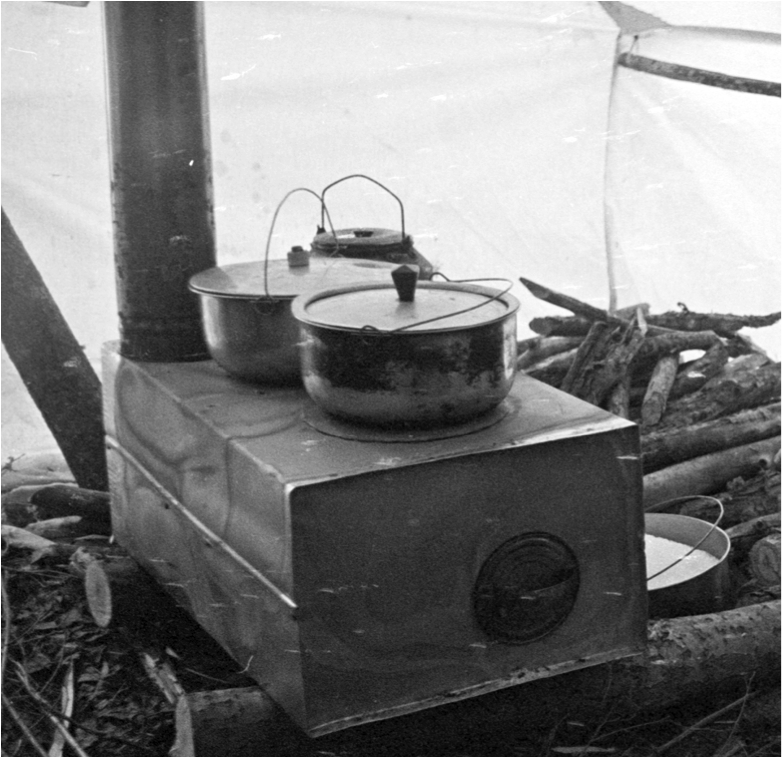
The wood stove
Camping in the Alaskan bush can be a cold experience. To keep warm inside the tent, one needs a heat source. A small lightweight wood-burning stove keeps camp toasty warm when the outside air is damp or chilly.
I put my wood stove just inside the door, to one side. To keep the tent fabric from flapping loose and touching the stove or stovepipe, I have some ties that secure the front of the tent permanently to the vertical pole on that side.
I also make a shield to protect the walls near the stove from the heat. Layers of aluminum foil stretched across a wooden frame, or a piece of galvanized sheet steel which may be purchased from a heating and air conditioning shop will deflect the heat.. That way the stove can be within a foot of the wall, and you can make the best use of a small space.
You need to cut a hole for the stovepipe through the tent roof. To keep the fabric away from the heat of the stope pipe, I sew a piece of sheet metal or a piece of fiberglass fabric into the tent fabric. Here is how I do it: I begin by setting the stove up inside the tent and see where the stovepipe hits, to determine where to make the hole. Then I mark where the hole will be in the fabric.
For the metal or fiberglass safety that will protect the fabric, I use a piece of lightweight sheet metal, a cookie sheet, or a square of fiberglass fabric designed for this purpose. I punch holes every half-inch or so around the edges for sewing it into the roof. If using metal, to shed rain, I place the upper half of the safety inside the tent, and the lower half outside. If using the fiberglass fabric it can all be on the outside.
Next I cut the hole for the stovepipe in the middle of the safety material, elliptically, to account for the angle of the roof. I make the hole a little smaller than needed so that I can lift flaps in the metal to make a snug fit where it touches the pipe. That prevents the safety from riding up and down the pipe when the tent flaps in windy weather.
I usually run the stovepipe up through the tent, then add an elbow and run the stovepipe forward or to one side so that sparks won’t fall onto the fly or the tent. It is possible to use another set of shear poles to support the horizontal pipe at the far end.

Some kinds of fuel are going to make a lot of sparks, and you should try to avoid them in this kind of tent and stove arrangement. Beginners can get in trouble with sparks when they use newspaper or cardboard as fuel.
I carry a small lightweight wood stove and a four-inch stove pipe. A tapered stove pipe also works, in which each joint nests inside the next bigger one. I crimp the ends of the pipes where they attach to the one below, so that condensation would run down inside the pipe, not on the outside where it would leave stains and give off odors. I cook over this little stove and stay comfortably warm.
Making a stove
I make the tent stove itself out of two five-gallon cans. I cut the top off of each can. That gets rid of the opening and the handle. I then crimp the sides of one can, about two and a half inches down. This allows it to be squeezed into the open end of the other can. With the two cans connected, the stove ends up being inches shorter than the combined length of the two cans.
Several two-foot joints of four-inch pipe fit inside the stove when I pack up my camp for traveling.
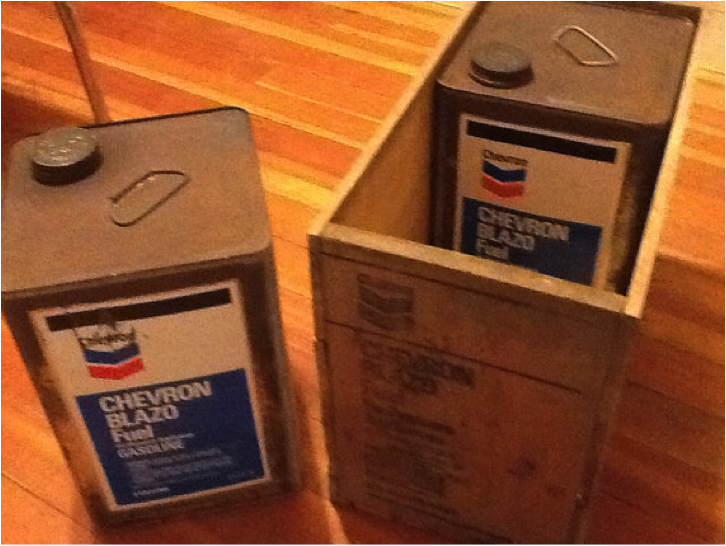
Blazo cans are not easy to find. Readily available stove pipes can also be opened and made into a similar stove. See the following videos describing how one can be made.
I have also made a backpacking stove out of a single five-gallon can. For that I shortened the pipes to go inside the stove or into an added-on area under the main box of the stove. I could tie this lightweight stove to my backpack.
Organizing the space
With a tent being such a small living space, organizing for the best use of the space is important. Everything must be easy to find and close to where it will be used.
The bed will take up three feet at the back end of the tent, running the full seven-foot width. This way no space is wasted. If a bed frame is desired, that will take up space as well. The bed should be the right height for the user to sit on. This allows storage area underneath the bed. However, for a temporary setup, the bed can be four logs cut from local trees. Two of the logs need to be seven feet long for the sides of the bed. The other two logs need to be three or five feet long for the head and the foot of the bed, depending on whether the bed is intended to be a single or a double bed. These four logs placed on the ground in a rectangular shape create a ground-level bed frame ready to be filled with brush, topped off with softer evergreen tree boughs and/or dried caribou skins.
In the compact kitchen area, I generally have a grub box that sits against the wall of the tent on the right side, between the bed and the stove. A grub box serves the dual purpose of being a convenient way to pack all the kitchen items for transport, while also serving as kitchen shelving upon arrival. I make my grub boxes from a wooden Blazo crate that originally held two five-gallon cans of Blazo, cut open and hinged.
Just inside the tent door, convenient to the stove, I keep a few extra sticks of firewood. This allows them to dry from any moisture they may have picked up outside, especially if it is snowing.
I tie a piece of rope stretched from front to back along the ridge pole, which serves as a clothesline inside the tent. This is handy for drying socks.

Bedsheet tents are versatile and easily transportable. Using a little ingenuity, you can create a useful temporary shelter. Other useful items in the tent can also vary depending on what you have or create. I have developed the items I use because I camp frequently and find it useful to have them made and ready to go. Also, the method of setting up the tent will vary depending on where you camp and what is available for tie downs. Tent stakes may be something to add to the travel kit if there will not be trees nearby to which to tie the tent.
OTHER TEMPORARY SHELTERS
At times I’ve come to a camping place tired, and all I’ve wanted to do was get into a shelter away from wind and cold and go to sleep. When that happens, I put the tarp down on the ground, put my sleeping bag on top of one edge, and pull the rest of it over me, without a fire.
There have also been a few times when I have gotten caught out in wet weather and wasn’t intending to camp. In those cases, I make a brush shelter. I cut a tree off part way so that it falls over but is still attached to the stump, chest high. I cut out the limbs on the underside so that I can get out of the weather. I find little trees or whatever to lean against it, and cover them with branches, with the stems up. By making those sides quite steep and putting enough branches on them, they shed a lot of water.
If I get into that kind of a situation, it is usually because I underestimate the amount of time I’d be out. A good way to avoid that problem is to stop early enough and camp even if I’m not too far from home. I have had to change my approach as I have gotten older. [Oliver was eight five years old at the time of these interviews.]
It’s only six or seven miles as the crow flies from my place to a good hunting area. If I get a moose out there, I like to camp near the kill until I get it organized. As you can imagine, that’s a lot of work, especially for one man. That’s the kind of situation where I might have to build a temporary shelter.
When out, little by little one learns to be simple and practical. A tarp can be used to put up a typical lean-to. The tarp can alternatively be on its diagonal axis. This is easy to set up and provides a protected area to build a fire for warmth. Under that peak is a good place for the little fire, as it’s out of the rain. It doesn’t take much of a fire to reflect heat back into the shelter.
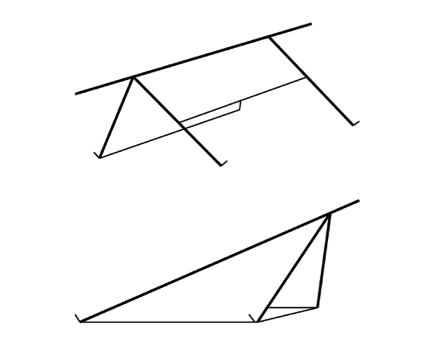
I secure one corner of the tarp at ground level and support the diagonally opposite corner at the front of the structure. The two edges of the tarp at ground level surround the living space and offer protection from wind, rain, and snow. The other two edges form a peak that projects out over the opening.
I use a coated nylon tarp that is 10 feet square. I’ve also used a 10 x 12-foot poly tarp at various times. Poly tarps are waterproof and light, though not indestructible. If nothing else, 6 mil Visqueen can be used. I use a ground cloth made of a blue poly tarp beneath the lean-to.
Usually for an improvised camp, I look for a stand of close-set trees or the thickest brush I can find to get out of the wind. r I set up the lean-to so that the wind is opposite the opening, so smoke doesn’t eddy back into the living area.
I use this setup for either winter or summer camping. If the ground is frozen and I cannot drive stakes, I tie to a little bush or whatever is available. I can always put the tarp edge down and shovel snow on it.
I also sew ties for guy lines on each side of the tarp. If they’re up three feet from the bottom edge, that’s a convenient way to hold the main part of the tarp out. Additionally, these ties provide a place to hang clothing or other items up off the ground.
If there’s nothing nearby where I can tie the tent, I fall a small tree, cut the branches off the bottom of the trunk, and bury it upright in the snow where I want it. I leave the remaining branches sticking up as guy posts, and tie to them. It’s surprising how much these will hold.
In the summertime a bed net for mosquitoes is important. I usually have a couple of ties on the inside of the tarp where I can tie the net, at least the part over my head. It will be leaning in over my head, but the edge of the net is tucked under the bedding, leaving enough room to move.
For a bed, I don’t usually put down logs or boughs—I prefer caribou skins. Foam is fine, but hide is a lot better. Since hides slip around under the body, I fasten two of them together in such a way that the hair on one flows toward the foot, and toward the head on the other. That stabilizes them.
I put my bed down crossways so that there is a space behind it for a pack or gear. The dog usually finds a comfortable place on his sleeping pad. The experience of being out camping minimally is highly enhanced by having a dog along. A dog with its alertness and heightened sense of smell and hearing will alert the camper to whatever is going on nearby.
SOD HOUSES
Many people grow up with the idea that pioneering necessarily involves a log cabin in the wilderness. Even though sod houses were a part of our pioneering heritage, they don’t have the same mystique as a log cabin in the popular imagination. It takes a lot to overcome those ideas, however, I don’t recommend a log house for homesteaders living in this area of Alaska. Log structures are practical for outbuildings or caches but not for homes. A sod home requires much less fuel to heat.
When I talk about a sod house, I’m talking about a house that’s partly dug into the ground which is different from a pioneer stacking up blocks of sod, as they often did in the American Midwest.
I built a little log house in Fairbanks in 1952 after I first arrived in Alaska, but it was difficult to heat in cold weather. That’s when I began to think about underground houses.
In some situations, I’ve combined elements of both log and sod construction. For instance, I may dig a few feet into the earth, build the lower part of the walls with logs, followed by building the upper portion above ground as a sod house.
When I was in high school, I wrote a book report on Vilhjálmur Stefansson’s The Friendly Arctic, which described the way sod iglus were made. [Vilhjálmur Stefansson lived and traveled with the Inuit of the Central Arctic Coast of North America from 1906 through 1912. Stefansson wrote that an iglu is a “more or less permanent shelter for man or beast.”]
When I moved to Kotzebue, on the coast, I built a frame house for temporary use, but when I moved across the inlet from Kotzebue, I was in an area with trees and sod and thus able to build an iglu for my family. It was about 14 feet square, and it was very much superior to the frame house.
Everyone in Kotzebue burned oil for heat which was the only available fuel. That created quite an expense each cold winter. After moving to a timbered location I was able to burn firewood for heat instead.
My sod home was framed and sided with poles. Sod added insulation on the outside. My friend, Charlie Jones, a Kotzebue local, had a little sawmill not far from where I was building, so I had him cut me some lumber for flooring.
House Size
The first decision when building a dwelling of any kind is what size it will be. In the regions of Alaska where I live, it is best to plan for a minimum of heated space, along with plenty of outdoor storage that doesn’t need to be heated. Keeping those priorities in mind takes a little self-discipline.
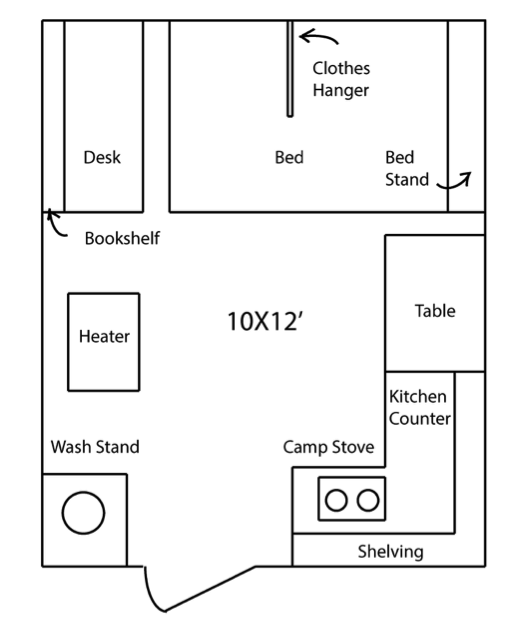
A living space 12 or 14 feet wide and 16 feet long will give plenty of room for a small family with a couple of kids. That’s even generous if the family uses a little ingenuity. For people who are totally inexperienced, it might be a good idea to try living in a 10 by 12 foot tent or a little trailer house for a while to see how much room they really need.
A larger house has less heat-losing surface area per unit of volume than a small house does. Owing to this area/volume relationship, a house with 200 square feet of floor area will not be twice as difficult to heat as one with 100 square feet.
Bear in mind that if there is an insulated area between hot and cold spaces, heat will travel through the insulation faster when the temperature difference is greater. For example, if there is 1 inch of insulation and the temperature is 70 degrees inside and 68 degrees outside, the heat is not going to move very rapidly. But if the temperature is 68 inside and 60-below outside, it’s almost as if the insulation isn’t there.
Underground housing allows a dirt bank to be packed around the house at a slope of about 45 degrees. [This is the slope of the surface of the banked dirt. The sod home’s slanted walls are much closer to vertical.] If the dirt is piled all the way to the eaves of the house, as it should be, it creates a heat bank, and it’s almost the same as if the house were dug underground much deeper. The walls are covered with dirt for two reasons—it seals the insulation to some extent, and it keeps chimney sparks from starting dry sod on fire.
Make this bank against the sod home’s walls by layering first clean moss, then sod, and then dirt. At least a foot of thickness is required up at the eaves to give the most heat efficiency.
That’s why and how a sod home is efficient. Now let’s start on construction.
House Pit
Begin with an excavation deep enough to provide the dirt needed for banking and covering. If building a house that is 18 by 12 feet, one needs to dig down about 16 inches to produce enough dirt to bank the walls. Going down deeper gives more heat efficiency, but that needs to be balanced against how far one wants to step down when passing through the home’s entryway.
First cut squares of sod and lift them off the surface of the land area where the house will be built. Stack the sod where it can be easily found and retrieved if it snows before the house is constructed to the stage of being ready for the sod. Dig sod from an area large enough to extend beyond the house footprint to include the sloping backfill area around it. If the house wall is 7 feet including 2 feet dug down into the ground, that leaves 5 feet of wall to cover with banked dirt above the ground. If the dirt slopes at 45 degrees, the sod needs to be removed from at least 5 feet greater on each side than the actual house dimensions.
Cut the sod pieces down to mineral dirt, to include the top layers of organic material and humus. Cut in squares or rectangles that are of manageable size to pick up and move.
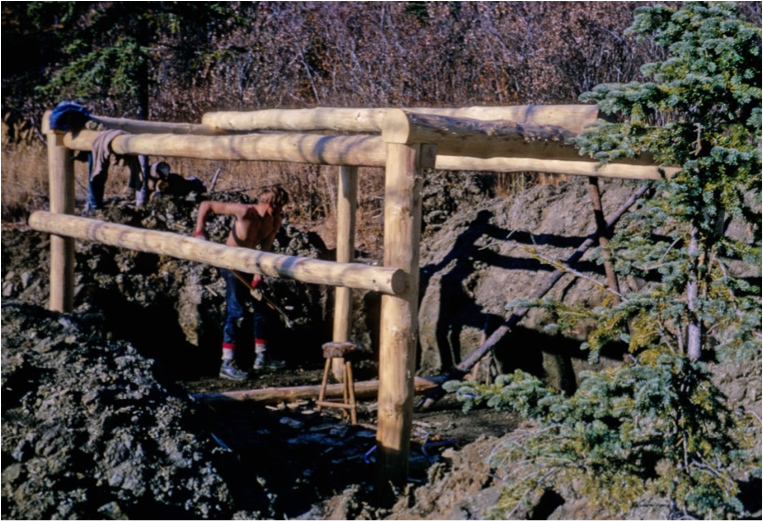
Posts
Four vertical posts define the shape of your iglu. If tamarack trees are available, that is the best post material in Alaska’s north. Cedar is good, or any type of wood that doesn’t rot easily. The lower part of each post can be charred over a fire to make it more rot resistant.
Dig the post holes at least 3 feet deep to give the vertical posts stability. Remember, the whole building is fastened to these posts. If they’re not solid, everything else will be flimsy.
When setting the posts, it’s important to use a tamping pole with a small, flat end, of 2 inches diameter or less. Tamp down the dirt around the base of each post very solidly, in layers. When you get close to the top of the hole, put some good-sized rocks against the posts to increase the area for the lateral pressures that help to stabilize the posts. If you have no rocks, you can use blocks of wood instead. Use a wood variety like tamarack that doesn’t rot quickly.
Your posts will still rot eventually. They might soften a little as the wood deteriorates, but the house won’t tip over. The dirt propped against the sides of the house will prevent the posts from falling. You can install sister posts later next to the rotted posts to extend the life of the house.
If you are going to build a house that has a center ridge poleand a sloping roof, there will be a post holding each end of the ridge pole, in addition to the four corner posts. The framework for the top of the walls rests upon these six posts.
An additional post midway under the ridge pole, in the center of the house, may be necessary to support the weight of the roof depending on the size and the length of the ridge pole used. Without a midway post, the weight of the sod and 3 or 4 feet of snow on the roof could cause the ridge pole to sag. A 10-foot-long ridge pole may not require a center pole for support while a 14-foot long one might need it. A seasoned log is better to use than one that is freshly cut as it will not bend as easily under the weight.
Girts (horizontal members)
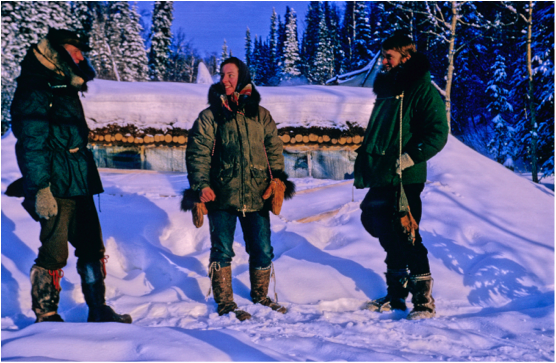
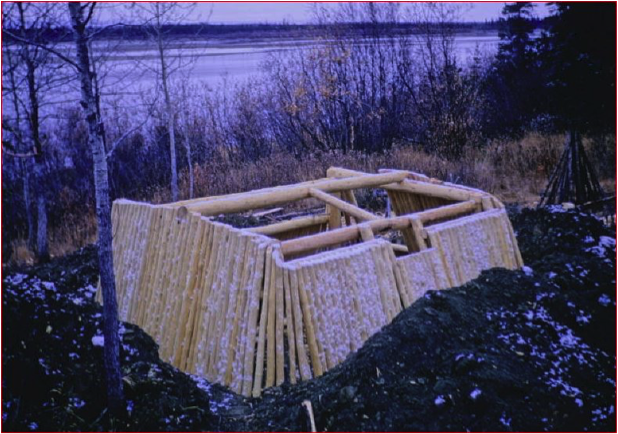
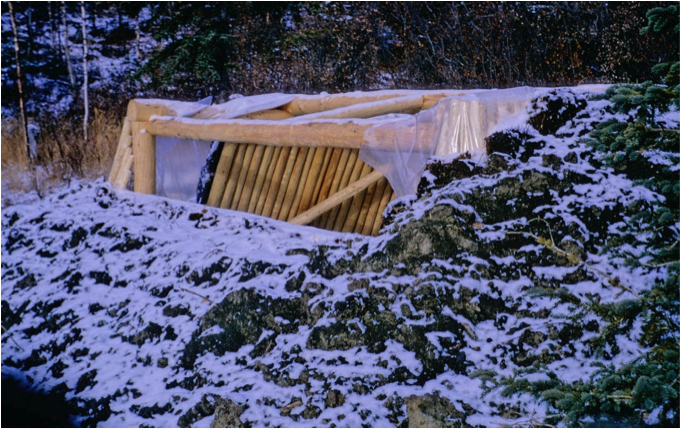
A small log or heavy pole will run across the width of the house at each end and sit atop the corner posts. The posts supporting the ridge pole will stand just inside of these cross girts. Some iglus are small enough that they don’t need posts to hold up the ridge pole, as shown in the next photo.
To securely support the girts, make a ledge at the top of each corner post by cutting about halfway through the top and then chopping off the wood on that side. Flatten the end of the girt in the same way; it will rest on the corner post ledges. Or you could cut a “V” notch in the top of the corner posts and shape the girts to fit it.
There’s no need to worry about weakening the girt by cutting those notches or ledges. Half of the thickness of the log right at the end will hold up as much as the whole log will in the middle of the span. Later, your wall poles will also offer some support.
Mid Support
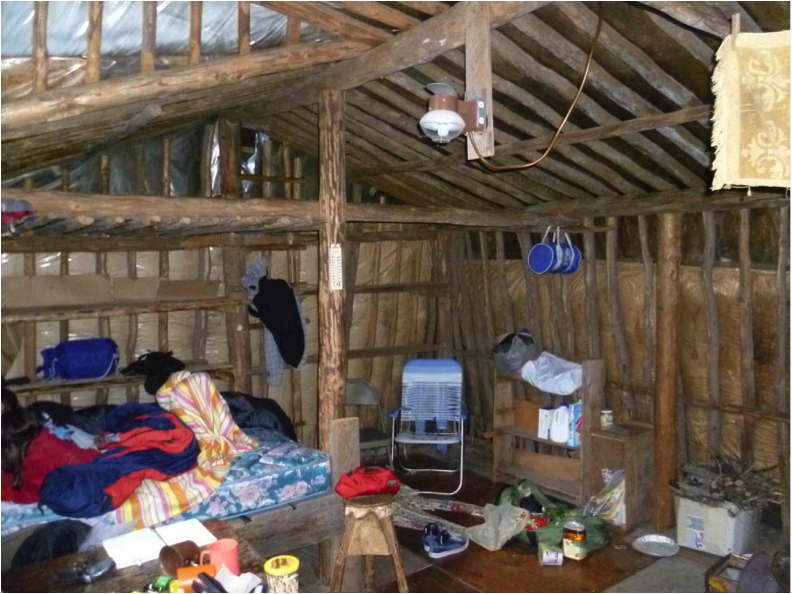
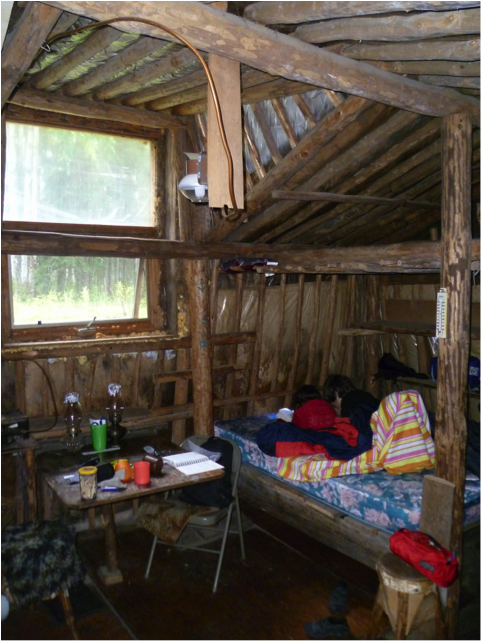
I usually put an additional post near the middle of the lengthwise walls because the roof is going to be heavy. Also, a strong middle spreader, going from front to back, attaches to these posts. Its purpose is to keep the walls from pushing in. You can see the middle spreader halfway up the wall in the photo below, although the Wik’s did not use the additional vertical post mentioned above. In this type of building, the weight of the dirt outside on the walls will push inward and lift up the ridge pole. Any house of a practical size for a family should have that middle spreader.
Walls and Roof
The walls and ends must slope because sod and dirt will settle down and shrink away from vertical walls. A slope of just 5 or 6 inches in a 7-foot wall is enough to keep the sod and dirt hugging the walls. If you increase that to 18 inches, you will create a lot of storage space at floor level—for instance, under a kitchen counter or a bed.
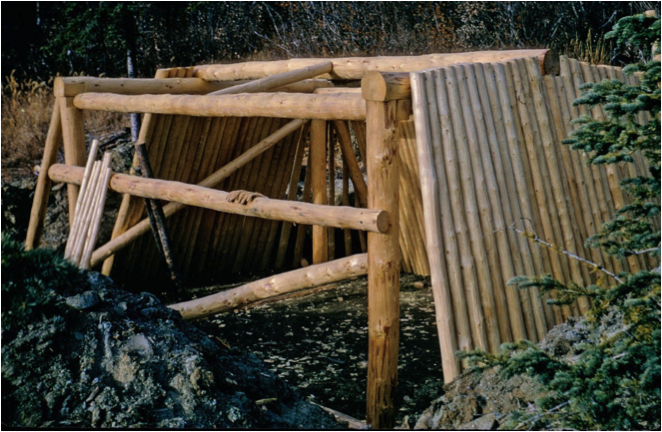
You can put a log on the ground on the outside of the upright corner posts. The lower ends of the wall poles come against that log to prevent them from kicking in. The distance between this log and the corner posts will determine the slope of the walls. A steeper wall will have much less tendency to kick in.
Wall poles can be as much as 12 inches apart, center to center. Roof poles should be no more than 8 inches apart. However, I usually space my wall poles the same distance apart as the roof poles to create a smooth area for the plastic sheeting to come over the eave as I pull it on down to cover the wall.
I leave the roof poles extend out beyond the walls a few inches, flattening them on the underside. Then I install the wall poles upright so that the ends fit up underneath the flattened off area. I saw off the excess length of the roof poles at a downward sloping angle. Then I smooth the end with a hatchet or a draw knife to make a rounded surface for the plastic to drape from the roof down the walls.
Door
A bear skin makes a suitable insulation layer for a front door. If you use fur for insulation, put the skin side out. Otherwise, moisture will form between a plywood door and the skin, causing the plywood to deteriorate rapidly. A bear skin or a caribou hide over a frame of light poles is a good alternative to a plywood door.
If you have the materials and a rip saw, you can make an effective and substantial wooden door by ripping out 2x4s and fitting them together so that you have a door at least 2 inches thick. Make the door with a crosspiece at the top and bottom and a diagonal to brace it.
I like having a big window in the door with a wooden shutter that I can open from the inside so that I can see what is out there or even shoot through it if necessary.
If your door is set in a sloping wall, it will want to swing shut or open, depending on how it is hung. It’s better to make a vertical frame and support structure, inset into the sloping wall, so that the door is vertical and stable.
As for building a covered entry, it’s easiest to ignore that for the time being. You need to focus on getting a livable shelter as soon as possible, so concentrate on getting the core of the house established. Later you can frame an entryway that butts up against the house, separate from the house frame.
Windows
Make a window frame the size you want your windows to be. Make the frame out of poles and make it fairly wide from inside to the outside so that it will extend out from the wall enough to allow for the sod and dirt that you will be stacking against it.
Fasten the window frame into an opening between two wall poles wherever you wish the window to be placed. The frame can either be upright or angled out an inch at the top to help the outside stay cleaner longer.
To set a window inside of the rough frame, you need the framing to be finished with a fairly smooth surface. That makes it easier to chink moss between the window and the frame around it to seal out the cold. I have designed a rip saw that is much more efficient than an ordinary hand rip saw, so it’s easy for me to cut material for things like that. But you can just flatten or hew lumber and true it up as best you can. [See Oliver’s Essay, “Rip Saws.”]
A thermopane [air-insulated, multiple pane] window is best for this cold climate. You can make one using Mylar, a transparent polyester film. Leave a 1-inch gap between layers. Install a vertical or horizontal crosspiece between the layers to maintain that space. It you have multiple layers, two or three dead air spaces, the window will keep clearer for visibility and light. I usually make up that Mylar pane as a separate unit and fit it into the frame afterwards.
Vapor Barrier
Once the shell of the iglu is finished, you cover it with plastic sheeting. Visqueen brand plastic sheeting is ideal for this. Use 6 mil or heavier. Plastic sheeting is absolutely the key to this kind of structure. It keeps a bubble of warm air inside, while keeping water and bits of dirt and moss out.
You need to leave plenty of slack as you lay the plastic on the roof so that it can bag down between the roof poles when sod is placed on top of it. Also leave a generous overlap of 12 inches or so where it crosses over the ridge pole. Allow the plastic an extra 6 to 8 inches at the top of the walls to lap over the outside of the plastic sheeting covering the walls.
The plastic covering the walls is held in place at the top of the walls by a nailer strip of wood, or a half-pole. I double the Visqueen over the nailer board and nail it right to the wall. The extra layers of plastic keep it from tearing easily. The roof plastic drapes down over these nailer boards providing a watertight joint where the roof meets the walls.
Along the bottom of the walls, I usually dig a ditch and put a strip of Visqueen into it for the wall poles to rest on. That way the pole ends won’t sit directly against the dirt and will be preserved longer. The Visqueen on the outside of the walls also ends down into that ditch but outside of the strip protecting the wall poles. Any moisture running down the wall needs to drain right into the dirt not into the plastic protecting the wall poles.
At the ends and around the doors and windows you cobble enough Visqueen together in whatever way seems best, remembering to overlap the Visqueen so that it will shed any water running off the roof.
Moss and sod
Cut your sod as early as you can in the fall. Stack it up so you can find it after the snow falls. I usually cut bricks of sod, maybe 8 inches wide and however long, and stack them atop one another. Bear in mind that you’re going to have to carry the sod to your building and you don’t want them too heavy.
There’s a lot of variation in the quality of sod. Some has more moss, which is better insulation, and some has more dirt, which is more fireproof. If you can find a place where there is grass growing, that is good sod because there are lots of roots in it. Often you can find places between trees where you can cut good-sized blocks of quality sod.
Clear the grass and small brush off close to the ground and set it aside for later use. Cut the sides of your blocks with a sharp axe. Pry and lift the sod loose from the ground with an adze or a shovel. Trim the bottoms of each piece so they are smooth. The pokey roots will tear your plastic and as the sod dries those roots will protrude even more.
Now you start sodding the walls. There are two ways to do that. One is to bank dirt partway up, and then put sod above that. I prefer to sod the entire wall, before banking any dirt. Without the sod between the walls and the banked dirt the house will take forever to heat up when you build a fire in your stove. It must thaw and heat all that frozen dirt outside the walls, especially if you have been away for a while without heat in the house.
As I go, I put smooth green moss right against the plastic or even a layer of dry grass, and then the sod. This prevents roots in the sod from tearing the plastic.
The sod will eventually settle, so when you get to the top of the wall, stack an extra round of sod blocks above the roofline and let the roof sod come over it. Even with that you will almost certainly have to go back and put more moss in the gap later after the sod has settled.
Put a layer of sizable pieces of the best and cleanest sod on the roof poles. Put the first layer rough side up. Subsequent layers can be placed dirt side down.
On top of the first layer of roof sod, I lay out a bunch of sticks or branches. These hold everything together and keep the whole layer of sod from sliding or shifting.
When I put the second layer of sod on the roof, I overlap the joints of the first layer. Sod has a certain amount of give which allows me to squish the chunks together tightly too. This additional layer of sod with brush between the layers greatly increases the insulation value of the roof.
Sod shrinks in dry weather, and gaps will open. Then when the rain comes, it swells up again and the gaps close, but sometimes not entirely. You’ll want to go up there with a bucket of moss and sod and chink the gaps periodically.
In the fall the roof will be wet from rain, so its insulation capacity will not be as great. It will take a little more to keep the house warm. However, snow is a great insulator, and once it gets deep enough that it won’t melt, the house will be much warmer.
To keep your roof drier, you can make a different kind of roof structure. Build a frame the size of your roof out of 6- inch logs. Place the frame over your first roof of poles and Visqueen. Fill the frame’s area with moss for insulation. Then put another layer of rafter poles and plastic on top of that. That will provide a layer of good insulation with a vapor barrier above and below. Air can move through the sides of the roof structure allowing moisture to escape from the underlying moss during dry weather. That’s important, because if it gets too wet and soggy, things could start to rot.
However, dry moss can be a fire hazard. Use the method for the stove safety described below to reduce the risk of fire.
The final step is to backfill the excavated dirt around the walls.
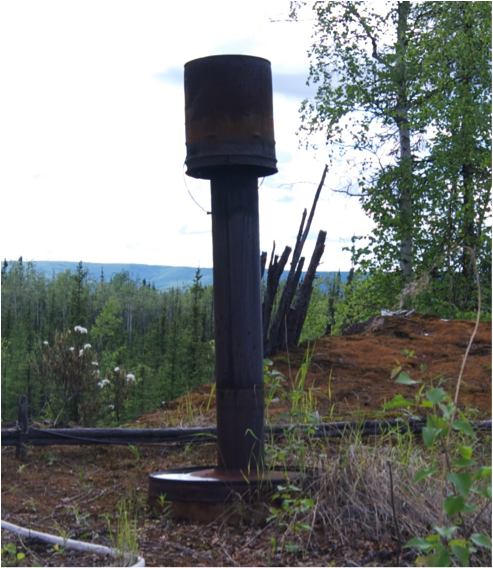
Stovepipe safety
The next very important thing is the stove pipe safety[a structure designed to prevent a hot stovepipe from igniting the roof].
Build the stovepipe safety out of something big. For a house I use an abandoned fifty-gallon oil drum that will be placed to stick up through the roof poles.
I open the drum by cutting off one end, making my cut about 3 inches in from the end of the drum. Then I flare the metal all around the edge of the 3-inch cut-off end, so that it will slip back over the sides of the barrel. This end becomes the lid of the stove pipe safety.
I make a hole in the center of this lid, a little smaller than a 6-inch stovepipe, and peen up the edges so that water won’t run down into the safety. [Peening is the process of repeatedly striking a piece of metal to bend or shape it.]
I cut the drum off at the desired length. I may use only a third to two thirds of the full drum depending on how thick my roof is.
Then I mark out a 6-inch circle in the bottom center of the barrel. I cut straight across the diameter of that circle a number of times to create triangular shaped tabs of metal that can be folded up into the circle, perpendicular to the bottom surface. I fold up the tabs. Next I install a section of 7-inch stovepipe around the outside of the tabs. This section needs to be long enough to stick up about halfway inside the drum. The 6-inch stove pipe will be inserted through this cylinder of metal later.
I cut a barrel-sized opening into the roof and build a frame of poles around it. I securely tie, with wire, two crosspieces under this opening and set the drum on top of these crosspieces. After placing the drum, I fill it with ashes, between the walls of drum and the steel cylinder in the center. If any ashes sift through any portion of the safety, I chink the spaces with rock wool or other insulation. [Rock wool is asbestos. The danger of asbestos was not recognized in the United States until the 1980s and 1990s. An alternative is aluminum foil.]
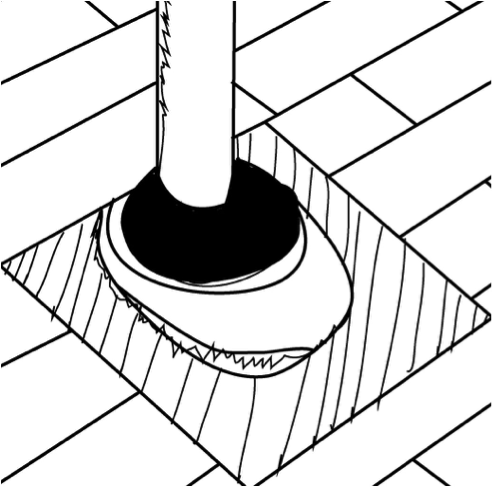
Where the drum passes through the roof, I create a plastic flashing so that water flows around the drum and not into the house. To do this I cut a hole in the plastic sheeting so that it fits over the barrel. I cut a short horizontal slit in the plastic on both sides of the center of the opening.
Then I cut a square piece of plastic as wide as the slit is long to insert as the flashing. I cut a round hole in the center of this square flashing piece slightly smaller than the barrel. I slide the top end of the flashing under the roof plastic and leave the lower end on top of the plastic. That way the water flows right past the safety. I seal the edges with roofing tar.
Then I install the top of the barrel and run my stovepipe up through the safety. I leave at least one full joint of pipe projecting above it.
I make a cap for the stovepipe by running wires from one side of a bucket to the other, both ways, inside the bucket about a third of the way from the bottom. I set the bucket upside down on the end of the stovepipe to keep the wind from blowing down the pipe. It also prevents rain from getting into the stovepipe and water from running down the outside.
For a stovepipe damper inside the house, instead of using a turn-type commercial one, I put two blades side-by-side in a hacksaw frame and cut a wide slot almost halfway through the stovepipe, slanting downward so that creosote running down the inside of the pipe stays there. [Creosote is a tarry liquid that forms on the inside of the stovepipe. It is a product of combustion and is especially formed when burning green wood. If lengths of stovepipe are installed with the crimped ends up, streaks of smelly creosote will run down the outside of the pipe.] I bend some tin can steel into a curve that matches the slit, rounded on the end to fit the contour of the inside of the stovepipe. I curl over the outside of the damper to create a handle for pushing it in or out as I use the damper.
To control the stove, I simply push the damper in and out. It is much more effective than a commercial turn damper, and it makes all the difference in the world. I just have to remember to open it up when I feed the stove. [The colder the weather and the longer the stovepipe, the stronger the draft will be. A commercial twist damper is a lot smaller in diameter than the pipe it’s sized for, and often will not shut the stove down as much as one would wish.]
Floor
The simplest floor is dirt, leveled with a long stick and covered by a tarp. At other times I’ve covered the dirt with layered spruce boughs.
To make a wooden floor, lay down and level some small logs for supports, 3-4 feet apart. Cut some poplar trees or whatever is available to suitable lengths and flatten one side. This flattened side will become the surface of your floor. Hew the ends of the undersides down to about 1-1/2 inches so that you can nail them to the supports. Make the ends of uniform thickness and trim them individually so that the tops are uniform. Trim the sides so that the flattened off poles fit closely together.
Green wood shrinks as it dries. Once your floor planks have dried, you can crowd them together and nail them down.
That just about does it, but remember, these are principles, not specifics. I’m trying to describe what is involved so that folks can adapt it to varied circumstances. If you understand the underlying principles, you can usually figure out a way to do what needs to be done.
I’m quite impressed with the ability of most people to adapt to their situations in one way or another. I know of more people who have made a success of building and living in the North than those who failed and had to give up. Remember, if you need it, you can make it!
Additional resources:
• For an article on building Ole and Sasha Wik’s sod house shown in the images above, see the article titled “Sod Iglu” in Shelter (edited by Lloyd Kahn. Bolinas, CA: Shelter Publications, 1973, 151). It contains many construction details.
• For an article on building a semi-subterranean earth-banked house using commercial lumber, see the article titled “Rigid Frame” in Shelter II (edited by Lloyd Kahn and Bob Easton. Bolinas, CA: Shelter Publications, 1978. 144-145.)