CLOTHING & FOOTWEAR
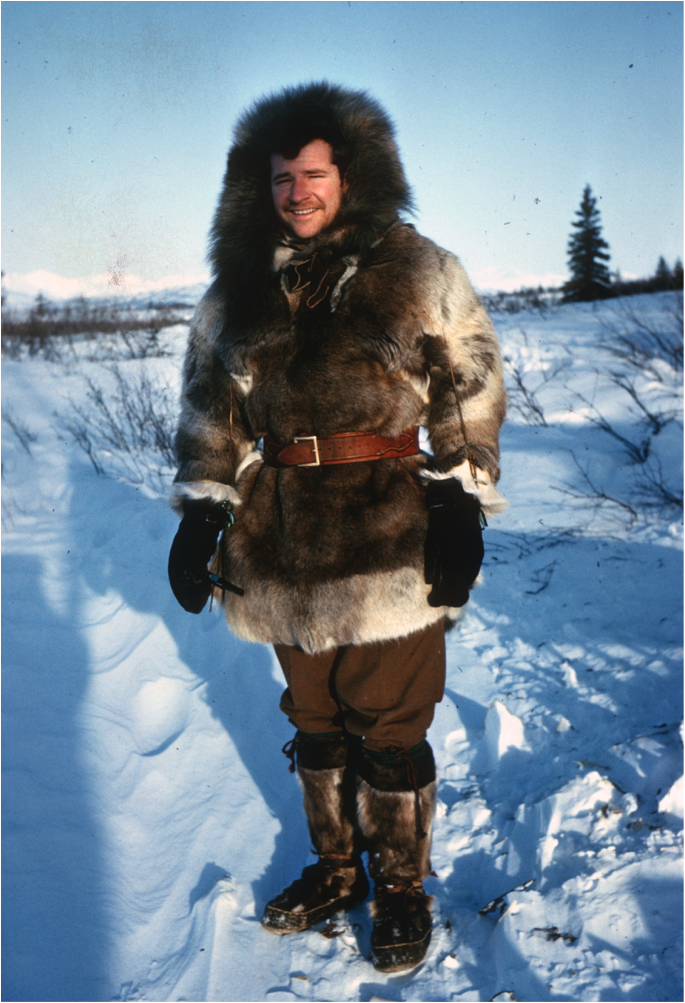
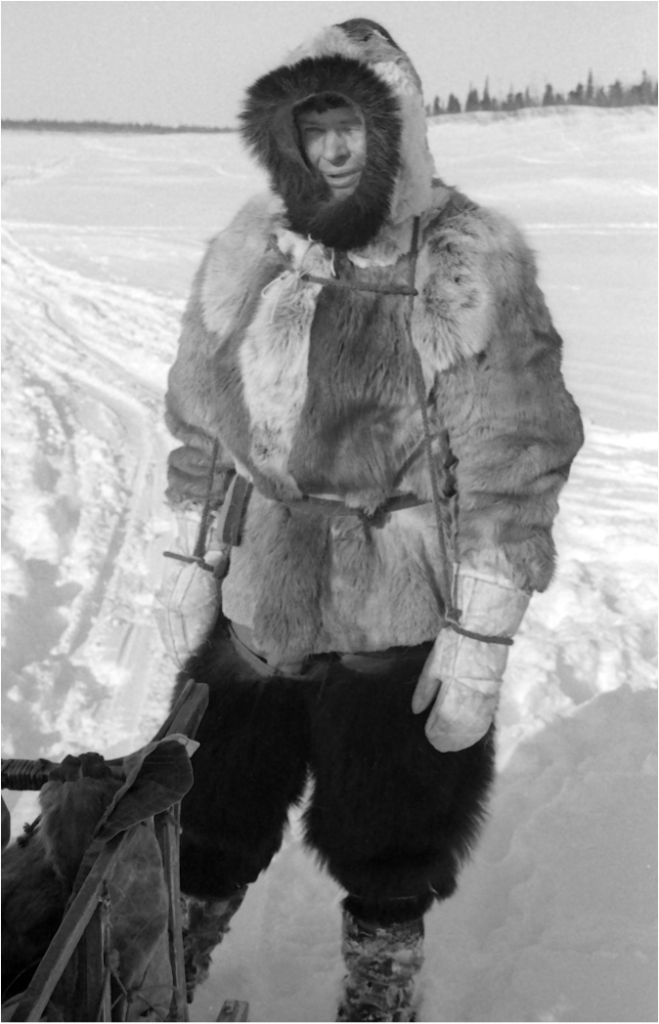
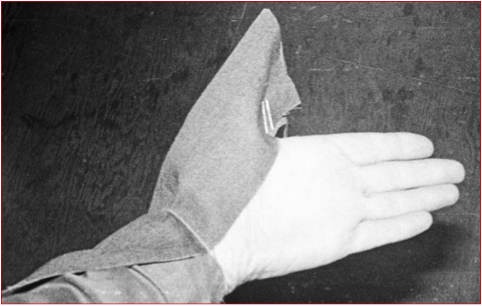
Don Williams in parka and caribou mukluks. Image courtesy of Don Williams
The northern weather presents certain requirements for clothing—it needs to be warm and yet breathable. Traditional Inupiaq clothing made from skins of caribou or seal successfully balances these needs.
CLOTHING
Keeping warm and dry is essential up here in Alaska. There are two aspects to keeping warm and dry. One is to protect your clothing and bedding from snow, rain, and damp ground. The other is to control body moisture. If you don’t have plenty of ventilation in your clothing, you have to be careful not to overexert yourself and sweat too much. You need to wear clothing that can be loosened up to provide ventilation when you’re active, and cinched up to hold in heat when you’re not.
Parkas
Nothing beats skin clothing for stalling air movement. With proper design, skin clothing is also great for ventilation. Stefansson talked about that in The Friendly Arctic. He described the way the Inupiaqs made their clothes so that they were easily adjusted according to how active they were going to be. [Vilhjálmur Stefansson (1879 –1962) was a Canadian Arctic explorer and ethnologist.]
His way was to make a parka that was plenty big and to wear it with a belt around the hips. I’ve used that idea, though not in the full way he described it.
In the early 1960s, when I moved to Ambler, I bought some fawn skins and made them into a parka. The skins came from a reindeer herd up near Point Hope. I had the parka partly made before I went up the river to my homesite, and finished it after I got there. I was really fortunate to be friendly with people like Maude Cleveland and Dora Johnson, two elders who understood those how to make suitable clothing for this climate and who helped me with the design.
Maude Cleveland (above) and Dora Johnson (pictured below) were Inupiaq elders who helped Oliver learn about designing suitable clothing for the cold environment. Here Maude wears two cloth parkas and seal skin mukluks. Image by Sally (Jones) Mc Daniel
Dora Johnson in a cloth parka with fur-lined hood, likely of wolverine. Image by Lorene Cameron
I could wear that parka when it was quite cold. When I was doing something that didn’t take much exertion, like riding on the sled, I tucked the sleeve ends under the belt and pulled my arms inside to keep in a capsule of warm air. When I was active, I’d put my arms back in the sleeves and loosen the belt or take it off so that the parka hung loose and allowed for air movement.
If I pushed the hood back so it rode on the top of my head, the parka would lift up off my shoulders enough to let the air circulate and come out around my face and neck, cooling and drying my skin. Then when I wanted to relax again, I just pulled the hood forward and let the parka settle back down on my shoulders.
The parka had a cloth cover with a cord inserted into a fold sewn around the front of the hood. By pulling the cord I could fold the ruff forward around my face and keep a little pocket of warm air there. By loosening it I could push the ruff back again.
I never figured out any way to wear that parka without working up a sweat when I was really active, so when I started cutting firewood or working hard, I’d pull it off and work with my skin bare. Even if the weather was quite cold it would take a while to cool off after I’d had a head of steam up and my body was hot. I’d work like a demon cutting the wood and getting it ready to load, and then I’d put the parka back on.
At that time in the 1960s, the upriver people were still wearing parkas made of caribou or muskrat skins. I was the first person up there to have an Eddie Bauer down jacket, but it wasn’t long until a lot of the men were wearing them, and some of the women, too.
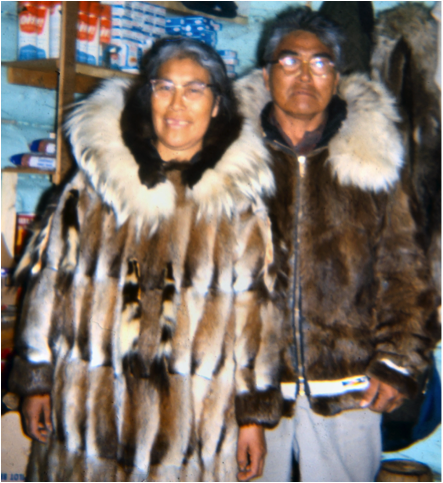
Olive and Mark Cleveland in their muskrat parkas. The Clevelands ran the local store in Ambler. Image by Lorene Cameron
In the traditional Inupiaq method sixty muskrat skins would make a man’s jacket and part of a woman’s parka. They used the bellies for women’s parkas, and the backs for men’s.
The Inupiaqs also used marmot fur, and Mark Cleveland, another native elder, once had a jacket made from lynx skins. He said it was very warm and very light.
When it came to caribou hides, fawns were preferred for clothing. Skins from older caribou were not valued as highly for making garments.
In the old days, the Inupiaq men traveled over to the Noatak River with pack dogs in the spring to hunt caribou and to bring back meat and fawn skins.
Caribou skins shed a lot of hairs, so they’re not very popular for something that takes a lot of work to make. [Mark Cleveland once mentioned that the villagers no longer wore caribou garments because they associated them with poverty.]
Overpants and Leggings
I once had a pair of bear hide overpants, but I didn’t use them much. Eventually I cut them up and made leggings [legwarmers that did not cover the hip area] from them. I prefer to wear a fairly long parka, and to heck with the pants. They’re bulky, they’re hard to get on and off, and you get sweaty in them.
The leggings I made from the bearskin pants overlapped the tops of my mukluks and reached to my upper thighs under my parka. They had drawstrings at the top and the bottom.
When I started walking or snowshoeing and got too warm in the leggings, I’d just untie the upper drawstrings, push the tops down, and tie them just above the calf—the same way you do with a pair of hip boots. That way I didn’t have to fool around taking them off and carrying them. If I started to get chilled again, I’d just pull them back up.
The bear skin was special. In general, I made my leggings out of whatever kind of skin I had. Caribou leg skins work well. I’ve also used dog skins. Dog skins make good leggings, inner socks, and mittens. I’m not sentimental about dogs. If it’s time to get rid of one of them, I don’t mind using its skin. I don’t like the smell of dead dogs, but that goes away pretty quickly.
Oliver in 1966 with caribou leg mukluks, bear hide overpants, fur overmitts, and caribou parka. Note the deep hood, the ruff, and the harness for the mittens.
Image by Sasha Wik
Long underwear
Maybe my carcass isn’t built right, but I never had any one-piece long johns that fit me. I wear an undershirt and separate drawers. I like my underwear snug.
Snow suits
I never had a snowmobile suit with zippers. I hate the things. A zipper is hard to work when your hands are cold and numb, and sooner or later it’s going to break. If you’re out someplace when it does, you have to pin yourself together with whatever you have, and when you get home you may have to replace the whole thing. I prefer drawstrings.
Belts
I have one wide, sturdy leather belt, and another that has a little pack hanging from it that fits inside my hip pocket.
I also have a woolen belt, about 1-1/4 inches wide, that Sasha [Ole Wik’s wife] made on her little loom. I really like it, because it works great and stays in place well. I asked her to make it extra long for me. She made it with special yarns, the blue of the sky, the brown of the earth, and the green of the water. I use it when I’m wearing my parka.
I doubled one end of the belt back and sewed it to make a loop. That way I can pull the other end of the belt through the loop and wrap it around to make a fisherman’s knot, or just fold it under four or five times. I’ve been using that belt for fifteen or twenty years, and I can’t tell that it’s worn at all.
Headgear
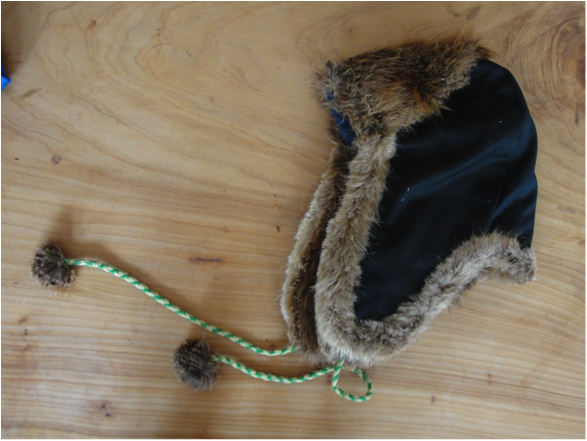
Beaver fur makes for good cold-weather caps, and I really liked one I had that was made out of marten skins. It was light, not too bulky, and quite warm. It had flaps that I usually tied on top of the cap, but could be let down and fastened under my chin for extra warmth on my ears and my face.
Beaver hat with ear flaps. Image by Emily June Street
Maude Foxglove was a village elder known for her skill at making those kind of caps. Ole Wik once brought her the skin of a beaver that had drowned in his fishnet as a gift. He figured she’d use it in various sewing projects, but wouldn’t you know it—she made it into that same kind of hat and gave it back to him.
Maude Foxglove, village elder. Image by Betty Jo Goddard
Scarves
People often cover their faces and mouths with scarves and breathe through them. When I did that the fabric got wet and froze, and then I had to shift the scarf around endlessly to find a new spot to breathe through. Rather than a scarf, I prefer a properly designed hood that I can pull out in front of me and have a little pocket of warm air to breathe.
When I’ve had a beard, ordinarily I wasn’t outdoors for the long, long periods, as beards can be a bit troublesome. Frost forms on mustaches and beards. Most of that moisture is from the breath. When I have a beard, I’d have to pull hunks of ice out of it after staying out for a long time in the cold. [Note: Stefansson insisted that his men shave every day because otherwise they’d have trouble with ice accumulations on their beards, and potential frostbite.]
Overmitts
Overmitts are especially useful when you’re out with the sled. I use a pattern to make my overmitts. They hang over my neck, with a connecting cord across my chest. That way I can pull my hands out of them, throw the mitts behind me, and give them a little twist so they stay there. I also make smaller, less bulky mitts with less fur on them that fit inside the overmitts.
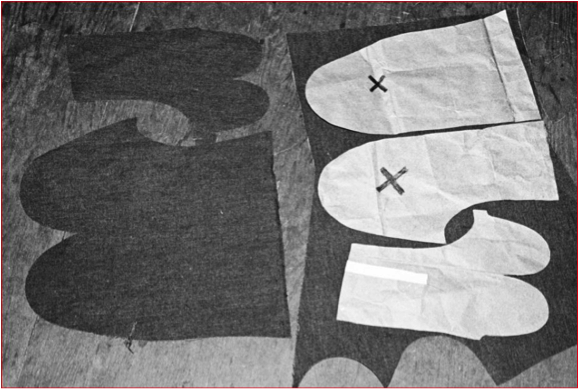
Oliver’s patterns for making cloth overmitts. The smaller pattern is for the thumb piece (below). Images by Curt Madison
Thumb piece, in progress.
I like my overmitts with long caribou hair on the inside. I’ve also made them with wolf skin and dog skin. It’s nice to have long fur inside so that air isn’t moving around when you have your hands in there.
I usually made my mitts big enough that I could wear pigskin dress gloves that fit real snug beneath them. If I stopped to get out of the wind, those gloves were all I needed. It doesn’t take much on your hands to keep them warm when you’re cuddling a cup of tea. And when I talk about a cup of tea, I don’t mean a teacup—I mean something more the size of a pint!
Even if the pigskin got a little damp, those gloves would still break the wind, and I didn’t have to use my bare hands when I was untangling a dog harness or working with frozen snaps.
Eye protection
I have experimented with several types of sunglasses. I had one pair with very dark lenses and wings on the stems that cut off a lot of the light from the side. They kept my eyes comfortable, so I’d use them whenever my eyes were sore from too much light exposure. In the summertime those glasses cut the glare off the water. That’s a big advantage when you’re running a boat and have to watch for things floating ahead of you. [Un-colored polarized glasses also cut the glare off the water, and are useful for grayling fishing. You can see the fish very easily, and drop your lure right in front of them.]
I used polarized sunglasses when the weather was not so bad, but I didn’t like the plastic lenses. I preferred real glass.
FOOTWEAR
You need to know what conditions you’ll be facing to properly plan your footwear.
These days almost everybody uses Sorel shoepacks or bunny boots around here.
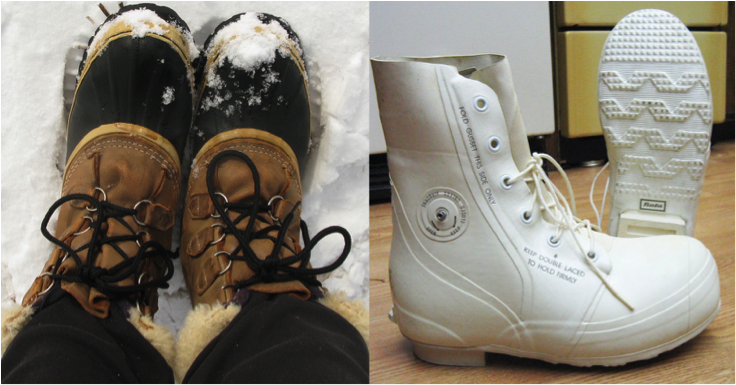
Sorel shoepacks on left. (Image credit 48) Bunny Boots on right. Bunny boots is the nickname for the Extreme Cold Vapor Barrier Boots (Type II) used by the United States armed forces. (image credit 49)
I never had Sorels or bunny boots. I used mukluks for cold weather. When it was a little warmer, I used store-bought Tingley boots. They were made of light rubber and had a folding front that buttoned over.
Oliver in his Tingley boots. Image by Tonya Schlentner
When I first went to Alaska, the Army was clearing out Ladd Field [a military airfield located in Fairbanks]. There was a lot of GI clothing for sale at cheap prices, and I bought quite a few pairs of white felt boot liners which I’d wear inside my big Tingley overshoes. I’d also wear a sock inside the felt liner with an insole under it.
If I was going to be outside in the cold for a long time walking or snowshoeing, I would take a plastic sack and pull it over the light sock, beneath the felt liner. That wasn’t the most comfortable thing, because my feet got too wet inside that plastic, but it confined the moisture to the innermost sock and keep the rest of my footgear dry.
I carried one or two extra pairs of socks when making long outings. I would take my footgear off once in a while, put on a dry pair of socks, and stick the used wet ones under the lashing of my sled so that they could dry as I traveled.
When I came in at night, I took my felt liners out of my boots and hung them up above my stove, each separately, to fully dry and be ready for use the following day.
Waterproof sealskin boots with ugruk soles are good in the springtime, and in the winter, too, if you figured you might be breaking through the overflow. The ugruk bottoms can be slippery, so often I would have the boots made with the inside of the skin out. Then I would roughen up the bottom with my ichuun [an Inupiaq tool used to scrape hides].
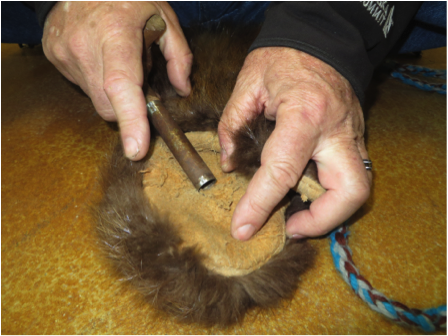
Roughening ugruk with an ichuun. Image by Dorene Cameron Schiro
If you’re wearing sealskin boots and the weather is cold, and you dress your feet inside the house when your footgear is warm, snow will melt and some ice will collect on the sole when you step outside. Then everything is slippery, and you’re an accident waiting to happen. Whenever I was wearing mukluks like that, I kept them hanging outside. I’d go to the door, bring them in, put them on, and get out again as fast as I could.
When hanging the mukluks to dry, pull them down over a shovel handle or some kind of stick. An axe handle also works. Start working the boot back and forth against the stick to stretch out the leather. This will prevent the leather from shrinking up as it dries.
I’ve had several pairs of sealskin mukluks over the years. One pair was evidently made by somebody who wasn’t a careful craftsman. I’m not sure what kind of thread she used, but it was the wrong kind, maybe dental floss. The stitches up and down the heel and around the toe and sides were so open that the wind would blow through.
That was one of the first pairs I had, and I wasn’t yet familiar with the different materials used to make mukluks. Sinew is a good thread. When you use sinew, you need to use a small needle to make the stitches. The sinew swells up when the leather gets wet, and that maintains a tight seal at the stitches. What a difference that makes! It doesn’t look as if that much air could get in the small gaps at the stitches, but you sure could feel it when they weren’t tight. Stitches made by expert seamstresses using sinew were tight enough to be waterproof
Early in my days in Alaska, I used wool socks, but I soon learned that skin socks were better.
You usually make skin socks from the leg skins of a caribou, because the hair is shorter and more permanent on the legs. Leg skin hair doesn’t shed as easily as hair from the body of the caribou skin. You wear the sock with the hair side in.
The first time I made caribou skin socks, I used a pair of sheepskin socks I had as a pattern.
To make the socks, you want a sole that’s a little bigger than the bottom of your foot with your socks on. Then a toe piece fits onto that, with the edges gathered over your toe and around to the sole.
Another longer piece of caribou skin wraps around the heel and comes together on the front of the foot, big enough that you can slide your foot inside of it. Sometimes you trim the hair off that piece a little. The sides of that piece come right down to the sole and across your instep. The toe piece comes clear across your foot, and the back piece is shaped off there so that it fits with the toe piece and you sew them together.
It’s not likely that anybody would be making skin socks on their own nowadays. People who have access to caribou might be able to do it, but I think that everybody is using bunny boots or shoepacks these days.
Insoles
If you don’t have anything to make a permanent insole, grass does a good job. One of my chores in the fall is to find coarse, dry grass that is suitable for insoles.
To make an insole, you lay a handful of grass with the tips all facing the same direction on top of another handful that has the tips facing in the opposite direction. The grass pieces should be twice as long as your mukluk sole, as you want the two handfuls to overlap for the length of the sole, and have about another length of the sole sticking out from each handful to fold over.
Fold over the grass tips that stick out past the overlapped section, and do the same at the other end. That gives you four layers of grass, with the tips of the top layer facing one way, and the tips of the bottom layer facing the other way.
Shove that stack of grass into your moccasin or mukluk so that the tips of the bottom layer are at the back, pointing toward the heel. The tips of the upper layer will be pointing toward the toes, so your toes won’t rough them when you slide in your foot.
Then you take your bare foot and put it in on top of that. The grass insole is usually big enough that it doesn’t leave a whole lot of room in there, so you have to wiggle your foot and walk around a little bit to press it down.
To adjust the insole, you can take the grass out, shuffle the stems around, and shove it back in. Then you put your sock back on, and you’re ready to go.
I like that type of insole a lot because it doesn’t absorb sweat much. Even if your feet are sweaty, it’ll keep them warm longer than a skin insole will.
Footwear for boating
For boating, I usually wore rubber hip boots, because I didn’t like to run my boat up onto the bank or nose it in too much. There was a time when I could qaqisakthe boat, but conditions don’t always allow that. [To qaqisak is to run the boat right up onto the beach, as coastal people sometimes do when large waves are expected.] For the conditions of the water and shore near my homesite later on, hip boots were plenty tall enough to keep me dry while I waded to shore.
MAKING MOCCASINS
Making moccasins is a useful skill for a self-sufficient person.
I have used various patterns. One is a type of moccasin made in the southeastern states, styled with a pleated or puckered surface around the toe.
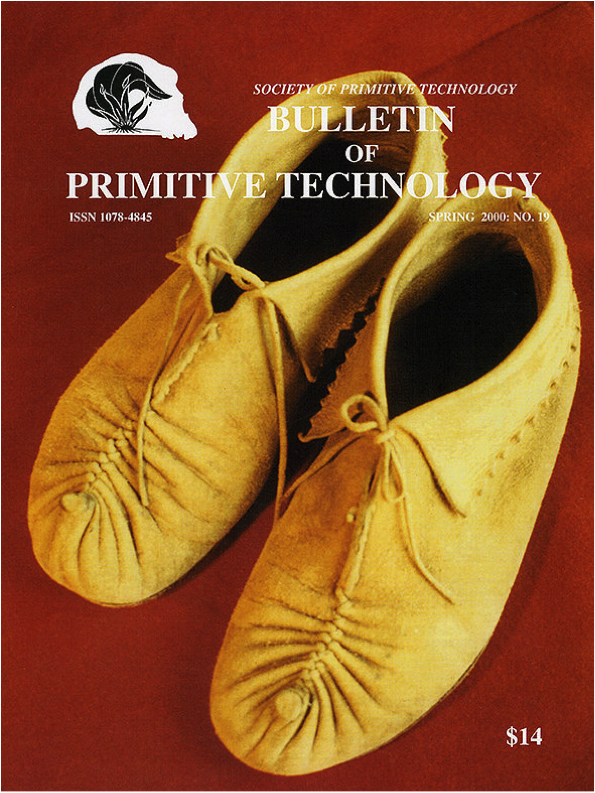
Primitive Technology. [The Society of Primitive Technology Bulletin 19 (Spring 2000) has a section on footwear. This image shows the top of the pucker-type moccasin.
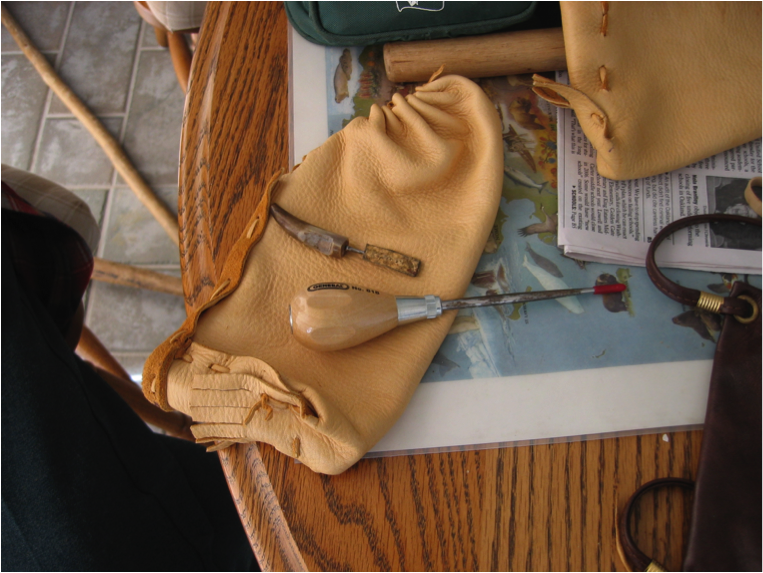
A pucker-type moccasin in progress. Image by Dorene Cameron Schiro
Another type is a side-seam moccasin, generally found in the American northwest.
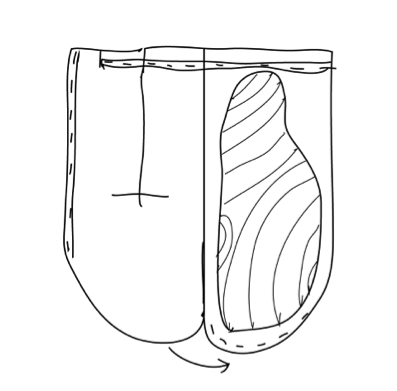
Sample pattern for a side-seam moccasin. Drawing by Brady Wedman
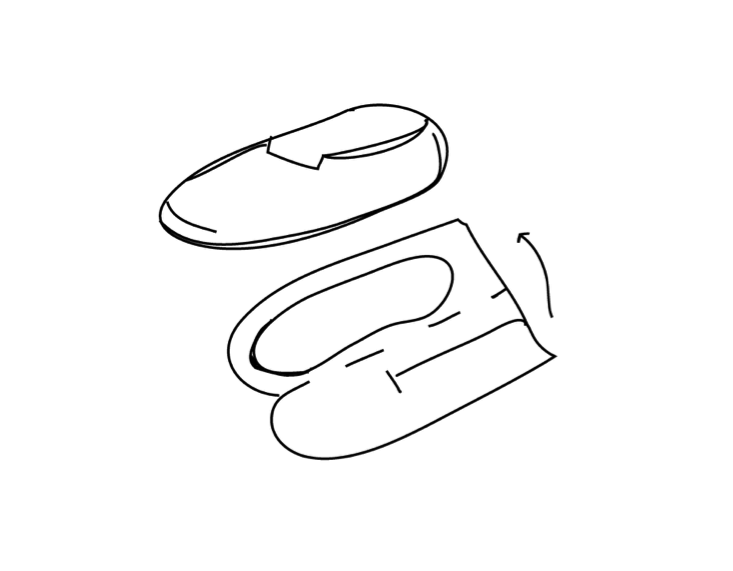
The basic concept of a one-piece side-seam moccasin. Dashed line is a fold. Note t-shaped line where top will be cut for foot opening. Drawing by Brady Wedman
To make a moccasin pattern for a side-seam moccasin, use a piece of paper or leather, cut into a rectangle that is at least a few inches larger than your foot in every direction. Fold the paper or leather in half along its long axis, and place your foot on top of it with the crease along the inner edge of your foot. Mark a line above your toes, leaving enough room to put two fingers horizontally above your big toe at the top of the pattern. Then mark a line below you heel, leaving one finger’s worth of space. Those are the guide marks for the length of the moccasin pattern.
Now you need to figure out the width of the pattern. This involves a few steps. First wrap a measuring tape or a string around the biggest part of your instep, from floor to floor on either side of your foot where it still sits on your pattern. Note that measurement or cut your string off at that length.
After this, make sure your foot is lined up with its inner edge on the fold in your paper or leather. Now mark where the outside edge of your foot is with a temporary guide mark. Make that guide mark right at the place where you measured your instep, earlier, just below the ball of the foot. Then you can remove your foot from the pattern.
Now, make your final width guide mark by adding half the distance of your instep measurement to that temporary guide mark, so your pattern is now wider than your actual foot by half the measurement you made around the instep. Make your final width guide mark there.
Now you can trace the outline of the pattern. You can do this with your foot in place again on the pattern, your inner edge of foot lined up on the fold. Starting at the fold above your big toe, draw a line through the guide mark and follow around the curve of your foot, staying about two fingers away from your foot. Head down through the final width guide mark you made. From there, just draw a line straight down to the edge of the paper or leather. Cut out your pattern by following the line you just drew.
Wrap your pattern around a folded piece of leather so the fold of your pattern lines up with the fold of the leather. Mark around your pattern and cut it out. Do the same for the second shoe.
The folded edge will make up the entire instep edge of a moccasin, which is handy because you won’t have to sew it!
Next, you need to prepare for sewing. You’ll want to pre-punch holes in the leather for the stitching to pass through. It will look a lot better if you go about this with a template to guide where you punch the holes, so they are all evenly spaced and a uniform distance from the edge of your leather.
To make a template, use a block of wood with the end grain sticking up, and make some guide marks into the wood itself.
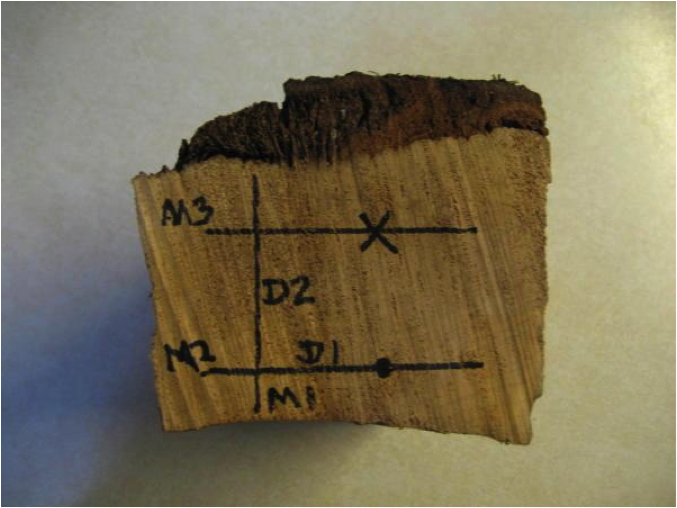
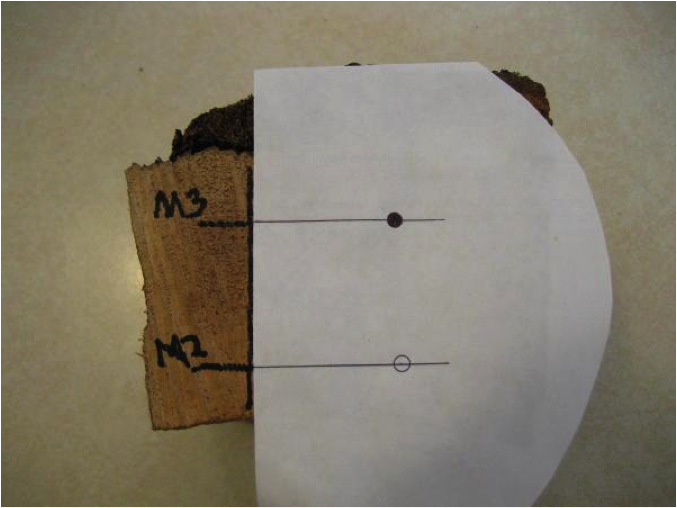
This is a replica of the Oliver’s system for pre-punching holes in leather. The leather is represented by paper in this image. The dimensions are not to scale.
Replica and photos by Ole Wik.
• First, punch a hole into the wood block with an awl or a sharpened nail set. Wiggle the tool around a bit before removing it so you know you’ve made a nice deep indentation.
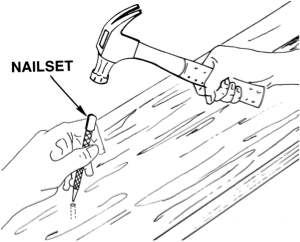
A nail set is a tool used to drive nails without leaving an impression of the hammer in the work. (Image credit 50)
• Next draw a horizontal line on the wood that runs through your first hole (horizontal line M1) to show the distance (D1) where you want to place the hole in relation to the edge of the leather.
• Now draw a vertical line that will show how far apart to space the stitches. Draw this line perpendicular to M1. (Represented here by D2. )
• Next, extend line M1 out a ways beyond D2, since eventually your leather will be covering the hole and your lines and you’ll need to be able to see the line beyond the leather’s edge (horizontal line M2).
• Then draw another horizontal line, parallel to horizontal line M2, passing through end of D2 , (This is M3)
• Along line M3, make an X directly above your original hole. The space between the X and your original hole should be the distance you want between your stitches.
• Now, to punch your holes. Punch one hole in your leather, making sure to place it the correct distance from the edge of your leather. Then position the leather so that the edge is lined up with D2, the vertical line. Line this first hole in your leather up directly overthe point marked X.
• The hole you made with your awl or nail set in the block of wood will be covered up, but with the existing hole in the leather (at X) and the assistance of the visual guide provided by M2, you’ll know where to position the awl so that it will be above the hole in the wooden block. You can feel a bit with the awl to feel where the indentation is in the wood before you make the hole. Then push the tip of the awl into that hole. Move the new hole up over the X mark, and continue in the same way until you’ve pre-punched all the holes.
Now, you’re ready to sew the leather together and make the side seam of your moccasin. Beginning at the top at the toe side, pull the two sides together with a piece of leather thong (babiche). Avoid thread, as it frays and wears out more quickly. Run the babiche in and out through the holes you punched along the toe curve, drawing up the leather until it gathers to make room for your toes. Then go along the outside of your foot, but stop lacing a couple of inches before you reach the heel and tie off the babiche temporarily.
Now you have a big pocket with no place to insert your foot. You’ll need to make an entry point.
You’ll want to plan out your entry point carefully, as this can be tricky. Remember, there are two moccasins. If you cut the same side on each one, you won’t have a right and a left moccasin—you’ll have two of the same side. So, make sure your seams are both on the outsides of your feet when you plan the cuts. You’ll also make these cuts a little off center to follow the shape of your foot. You might like to draw the planned cuts before doing them.
The first slit you cut should be about a 1/4-inch or so closer to the inner or folded edge of the shoe, because the leather will pull up into your instep and move around after a while.
When it’s time to cut, make sure you only cut through the top layer of the shoe!
Cut the top layer starting at the heel, moving forward toward the instep, but only far enough so you can to slide the shoe on over your foot.
Next make a small crosscut at the instep end of your first cut, making a T-shape with your two cuts. Your cross cut may extend a little further towards the folded edge of the moccasin than the sewn edge. It will straighten when completed.
Now you can try to slide your foot into the moccasin, and pull around the sides of the leather to check sizing. I usually let the moccasins sit for a while to make sure that they can fit. Leather may shrink if it gets dry.
Earlier, while sewing the side seam, you stopped stitching a few inches before the heel. In order to avoid making a bulky seam along the heel, cut a little off each side and punch a hole closer to the edge. Instead of a running stitch, I use a whip stitch at the heel.
If done correctly, the seam will smooth out, with both ends of the leather butted together inside of the seam. That makes it easier to set the two sides together up and down the back.
Lastly, you can put in a tongue. To do this, punch holes along each side of the entry cut where the tongue will go, feed a string through and tie it together, so that it will lace like a regular shoe.
There is no top piece to these side-seam moccasins. If you want to make a high moccasin, sew another piece of leather to the top portion that goes around your ankle. This is simple stitching; there is no bother about how to pucker the bottom to fit the top.
That’s the simplest way to make a moccasin. Most of what I know, I learned from written sources. Elmer Kreps gave some moccasin patterns in his book, but I didn’t get my ideas from him. The patterns came originally from the indigenous people on the northwest coast. The main thing to remember is: don’t be afraid to experiment to make it work out the way you want it to.